Pages

Monday, February 28, 2011

A Closer Look at Cocoa Powder


In my last post, I showed you what can happen if you use the wrong type of leavener in a cake. To recap, I used baking powder instead of baking soda in this devil's food cake recipe. But then I realized that another great devil's food cake recipe (which I used for the homemade Ring Dings) used baking powder as its leavener. I was confused for a minute, but then realized there was another difference in the two recipes - each recipe specified a different type of cocoa.

There are two different types of cocoa - natural and alkalized, also known as Dutch-processed. Dutch-processed cocoa is darker in color and is harder to find in stores, but easily found online. Hershey's Special Dark cocoa, which is generally more available, is a combination of natural cocoa and a very heavily Dutched cocoa which makes it even darker (sometimes called black cocoa). Black cocoa is the cocoa that is used to make Oreo cookies.

I won't go into all the details here, but in general, natural cocoa reacts with baking soda and Dutch-process cocoa reacts better with baking powder. The devil's food cake made for the Ring Dings called for Dutch-processed cocoa, therefore using baking powder. The batter made for the cake called for natural cocoa, therefore using baking soda as the leavener.

It is still confusing though. The Baked cookbook that I bake a lot from, says not to get too hung up on the type of cocoa, just use one that smells richly of chocolate and has a nice deep color. However, their recipes call for a "dark unsweetened cocoa" (most darker cocoas are dutched) and they do mention that they primarily use Valrhona cocoa (found at Whole Foods or online) which is a dark Dutch-processed cocoa.

{As a side note: Often there is value in reading the front section of a cookbook and not just the recipes because you obtain information on the brands or types of ingredients the author used and the methods used to make the recipe a success. Ingredients, methods, and equipment can make a big difference.}


In the picture above, I have taken the four (!) kinds of cocoa I had in my pantry. They happen to be the types most commonly found in the grocery stores in my part of the world. You can see, there is quite a difference in the color of the dry cocoas. Oddly, the Ghirardelli natural cocoa and the Rodelle Dutched cocoa were almost identical, and the two natural cocoas were quite different looking.

I took a little of each cocoa and mixed it with a tablespoon or two of hot water and then compared the difference in color again. This time, the natural cocoas were most similar, the Dutched cocoa was slightly darker, and the black cocoa remained the darkest of the four.


Then I took a little taste of each. I have to say that I preferred the Dutched cocoa to the other three, but the difference wasn't that remarkable. The black cocoa was the most bitter tasting.

So what if a cake recipe doesn't specify which cocoa to use? It may have a little of both leavenings or, in recipes that call for less than 3/4 cup of cocoa, it may make less of a difference. In non-leavened recipes like those for chocolate sauce or custards, you could swap one kind of cocoa for another without any worry.

In short, I keep both natural and Dutched cocoas in my pantry and I'll be sure to use the kind the recipe specifies. And I'll try not to be distracted when following a recipe and use the right leavener too! Now I know that I have two great recipes for Devil's Food Cake, so if I run out of one kind of cocoa, I'll just use the recipe that calls for the other kind.

Friday, February 25, 2011

Baking Blunders - What happens when you use baking powder instead of baking soda


You've heard it before..."baking is an exact science" ... it's so true.

I was making a devil's food cake for my neighbor the other day - made the batter, poured it carefully in the pans and popped them into the oven. As I was putting the ingredients away, something hit me...I was putting away baking powder...did the recipe call for baking powder? or baking soda? Crap. The baking soda was tucked back in the cabinet. I didn't use the baking soda the recipe called for.

I didn't really know what this would do to my recipe. How different can they be? It was only 1 1/2 teaspoons after all. I googled it... The sinking feeling was getting stronger as I read. Better make another cake. Fortunately I still had time.

Turns out the difference is significant.

This is the cake made with baking soda...

The cake below, is made with the same exact ingredients, except with baking powder. Granted this one was made with a 9" pan and the other one was made with an 8" pan, so that makes up part of the height difference. But look at the difference in color and shape. (no editing was done on these photos)

Here's the insides of the good cake with baking soda...

and with inside of the bad cake using baking powder...

So it looks different, but how did they taste? The "good cake" was very good, chocolatey and moist. The "bad cake" was almost tasteless, kinda dryish - just not up to my high standards. I had figured we'd just eat the "bad" cake ourselves, but after tasting the cake, it ended up in the trash.

But here's the twist... the recipe for devil's food cake that I used for the retro ringers in my last post calls for baking powder and not baking soda. How could that be? Both are excellent recipes for the same kind of cake. Both have very similar ingredients.

You'll have to come back Monday to see how this story unfolds. I'll give you a hint: I'll be doing a cocoa comparison!

Wednesday, February 23, 2011

Homemade Ring Dings, Ding Dongs, King Dons...


Ring dings, Ding Dongs, or King Dons...whatever you call the convenience version of these, they don't even compare to these homemade ones! These have no strange chemical taste, no waxy and tasteless chocolate coating, and a real not-too-sweet whipped cream filling.

I know that football season is over, but just imagine these cakes in the shape of a circle (like a hockey puck - Go Penguins!) or in the shape of a heart for your sweetie. I made these for the Superbowl. Our Pittsburgh Steelers were playing and that required a little celebration. It seems now like a distant memory - our team was outplayed but they were still in it until the very end, when they lost. Ah, well. Maybe next year.

These cream filled cakes do not seem like a distant memory, however. They are probably the fondest memory I have of this year's Superbowl. We were supposed to watch the game with some friends, but Ben was hit hard by a sickness that day and we ended up staying home and watching the game in our jammies.

Making these starts with a devil's food cake baked in a 9x13 pan. Once cooled, a cookie cutter is used to cut out the shapes.


The process of cutting and filling them is similar to my Homemade hostess cupcakes. I used a small serrated tomato knife to make the initial cut to get the cut-out shape you see in the photo above, then used a grapefruit spoon to carve out some of the extra cake to make more room for the whipped cream filling.

Fill the cake with the whipped cream,


and replace the "lid".


Pour the melted chocolate over the cake and let it drip down the sides. Alternatively, you can cover the sides of the cake with a slightly thicker ganache using a knife or offset spatula, then pour the thinner ganache on top. I found that in order to cover the sides by only pouring over the top required a lot more ganache and a lot more that dripped down onto the cookie sheet below.

If you fill these with whipped cream, they will need to be kept in the refrigerator. I would suggest using a vanilla buttercream, such as this one, or the hostess cupcake filling if you won't be able to keep them refrigerated.


Retro Ringers
adapted from The Art and Soul of Baking by Cindy Mushet

Devil's Food Cake:
1/2 cup dutch processed cocoa powder
1/2 cup boiling water
1 cup water
6 ounces unsalted butter, at cool room temp
1 cup sugar
3/4 cup brown sugar
3 large eggs, room temp
2 tsp vanilla extract
2 cups sifted cake flour
1/4 cup all purpose flour
2 tsp baking powder
1/4 tsp salt

1. Preheat oven to 350 degrees F. Spray a 9x13 pan with cooking spray, line bottom with parchment, and spray parchment.
2. Mix cocoa powder and 1/2 cup hot water until blended. Add remaining cup of water and stir to combine. Set aside to cool to room temperature.
3. Whisk the flours, baking powder, and salt in a bowl and set aside.
4. Beat the butter with the sugars in a mixer until light in color, 4-5 minutes. Beat in the eggs, one at a time, scraping the bowl as necessary.
5. While the mixer is running, add the flour mixture (1/3 at a time) and the cocoa mixture (1/2 at a time) alternately, beginning and ending with the flour mixture. When just combined, remove the bowl from the stand mixer and stir once or twice by hand with a rubber scraper, making sure to scrape the bottom of the bowl.
6. Place the batter into the prepared pan and bake for 45-55 minutes until it springs back when touched lightly with your finger and a toothpick inserted comes out clean.
7. Let cool completely.

Filling:
1/3 cup heavy whipping cream
1 tsp sugar
1/2 tsp vanilla

Whip with a hand mixer or stand mixer until firm peaks form. Chill until ready to use.

Glaze:
8 ounces bittersweet chocolate, finely chopped
1 cup heavy whipping cream

Place chocolate in a heat-proof bowl. Heat the whipping cream just until it begins to boil. Pour the cream over the chocolate in the bowl and let the mixture set for 1-2 minutes. Whisk gently until completely smooth. Allow the ganache to cool slightly.

Assembly:
Cut the desired shapes from the cake and place the cut-out cakes on a cooling rack placed over a sheet pan. Cut out the middle as shown in the photos above, reserving the tops. (The crumbs can be saved for mixing with leftover ganache and making cake balls if desired - or just to snack on!)

Spoon the whipped cream mixture into the well made in the cake and replace the top. Spoon the ganache on top, letting it drip down and cover the sides of the cake. If piping decorations, allow the ganache to harden in the refrigerator, then pipe desired decor. If using sprinkles, put them on the cakes while still wet.

Refrigerate until ready to serve.


Tuesday, February 22, 2011

About Me, The Marzipan Mom


I thought maybe you'd like to know a little more about me.

I live in Pennsylvania, but I have also lived in Michigan. I was born in Kansas. I have travelled across the United State and back and also backpacked through Europe.  I used to be a pediatric physical therapist and before that I was an accountant/CPA. Now I'm a baker and the mother of three wonderful kids! (That's us in the picture at the top of the Duquesne Incline looking out over Pittsburgh.) 

I love reading about and trying new sweet and savory recipes. I also like growing vegetables and herbs in my garden, bike riding, reading, and occasionally knitting.  Most recently I've been into weight training, wellness and dieting trend, and making medicinal herbal teas, tinctures and oils.

I don't like cleaning or doing laundry, but I love to have super organized spaces, although they are not always easy to keep organized, especially when life gets busy.

I love to travel and would love to visit Greece, Italy and Spain and experience the cuisines there.

Last but not least, I love everything about summer! 


Sunday, February 20, 2011

Tips for Rolling Out Cookie Dough


If you're making a lot of cookies, it helps to have a method for keeping them the same thickness, so they look uniform and cook evenly.

There are other tools you can buy for rolling out dough but I'll tell you why they don't work for me:

1. rolling pin rings - I don't like the rolling pin rings because I like to be able to roll up and down as well as diagonally and well, they just get into the way and I end up making ring marks right across the dough. And then I get annoyed!

2. adjustable pastry board - at a whopping $75, it is expensive and would take up valuable space in the kitchen. I think it would be awkward to use and would limit the size of dough you could roll out.


Here's what works for me. The components you'll need are:

1. Inexpensive Wood Pieces: I went down to my local Home Depot and scoured the place for some wood pieces that were approximately 1/4" thick. They had to be square or rectangular shapes so they wouldn't roll around on the table under my rolling pin. I found a couple of things I thought might work and had the guy at Home Depot cut them for me about 18 inches long. (See both in the first photo.) The thinner, wide pieces are exactly 1/4" or .6 cm thick and those are the ones I use the most. The thicker square dowels are 3/8" or 1 cm thick. I think I spent $5 or less for all the pieces.

2. Silicone Rolling Mat: This is not necessary, but nice to have. As you can see, mine has been well used! It 's a little pricey at $30 from King Arthur Online, but I've also seen similar ones at Bed, Bath, and Beyond and with a coupon you could probably get it for about $20.

The silicone rolling mat is bigger than a cookie sheet Silpat liner and also great for rolling out pie dough. If my dough gets too soft while I'm rolling or cutting, I can slip the whole mat, with the dough on top, onto a cookie sheet and place it in the freezer for a few minutes. Soft, warm dough is difficult to cut-out and transfer to cookie sheets.

3. French Style Rolling Pin - I found this rolling pin while browsing a Sur la Table store on vacation. My kitchen is chock full of gadgets and accessories, so when I start browsing a kitchen store I really need to ask myself, "Do I need it? Do I have a place to put it? Do I already have it?" Most things I see I don't need, don't have a place for, or already have anyway! But when I saw this rolling pin, I grabbed it and ran to the register and never looked back! It is absolutely worth the $17 price tag. I love this rolling pin because it is long enough that I can even roll diagonally a little and doesn't have tapered edges, so it works perfectly for getting evenly rolled out cookies.


Other tips for rolling out cookies:

1. Chill the dough in the refrigerator for at least an hour. After it has been chilled, dust your work surface with flour, break the dough into tennis ball-sized pieces (I use a metal dough scraper) and then knead them together briefly to get a smooth, but still cold (but not too cold) ball of dough. I find this process makes the dough a lot easier to work with and prevents jagged edges and cracks along the outer edges of the rolled out dough.

2. Sprinkle the mat or counter and the surface of the dough with flour to keep it from sticking.


3. Start rolling to flatten the dough, and once or twice during the rolling process, lift the dough off the surface and throw a little more flour underneath the dough. You can flip the dough as well, which will help prevent any cracks from forming on the underside of the rolled dough. Flour and cold dough are the keys to keep the dough from sticking to things.

4. After the shapes are cut out and placed on the baking sheet, put the entire baking sheet (uncovered is fine) in the freezer for at least 15 minutes. The baking sheet can go right from the freezer into a preheated oven. This freezer time helps the cookies to retain their shape.


5. You can make the dough ahead of time, wrap it in a double layer of plastic wrap and refrigerate for up to two days, of freeze for up to a week. I keep a stack of peel-off address labels and a Sharpie in the kitchen for labeling things that go into the fridge or freezer and I make sure to include the date on the label. If the dough has been frozen, thaw in the refrigerator overnight to thaw.

6. Below: see how this method produces a consistent and even cookie! You can find my sugar cookie recipe here


Thursday, February 17, 2011

Chocolate Whoopie Pies


My husband subscribes to the Wall Street Journal. Occasionally he finds an article that he thinks might interest me and circles it for me to read. It could be there is a lack of big financial news, but on the front page of the WSJ the other day was this article about a big fight brewing over the Whoopie Pie. I'm not joking. Apparently there are people arguing over who was the first to invent it, and whose state should make it their "official state dessert".  Seems like a silly argument.

But the article did cause me to have Whoopie Pies on the brain. It was Valentine's Day and I thought I'd make some for the kids - and to see what all the hubbub was about.

They're delicious, quite similar to a cupcake, only perhaps a little easier to eat. They are harder than a cupcake to decorate seeing as you only have the icing peeking out between the cakes to attach any sprinkles too. I don't know if they need to be our state dessert, but the kids sure loved them!

Chocolate Whoopie Pies
from Baked Explorations by Matt Lewis and Renato Poliafito
{using a medium cookie scoop, this recipe made 28 pies}

For the cakes:

3 1/2 cups all-purpose flour
1/4 teaspoon salt
1 1/4 teaspoons baking powder
1 1/4 teaspoons baking soda
3/4 cup dark cocoa powder
1 cup very strong brewed coffee
2 cups firmly packed light brown sugar
3/4 cup canola oil
1 large egg
1 teaspoon vanilla extract
1/2 cup buttermilk, shaken
Preheat the oven to 350 degrees and line two baking sheets with parchment paper.

In a large bowl, whisk together the flour, salt, baking powder, and baking soda. Set aside.

In another large bowl, whisk together the cocoa powder and hot brewed coffee until completely combined and dissolved.

In a medium bowl, stir together the brown sugar and oil. Add this to the cocoa mixture and whisk until combined. Add the egg, vanilla, and buttermilk. Whisk until smooth.

Use a rubber spatula to gently fold the dry ingredients into the wet. Make sure to scrape down the sides and bottom of the bowl as you fold.

Use a 1 1/2 tablespoon sized cookie scoop to drop spoonfuls of dough onto the prepared baking sheets about 1 inch apart. Bake for 10 to 15 minutes, until the cookies are just starting to crack on top and a toothpick inserted in the center comes out clean. Let the cookies cool completely on the pan while you make the filling.

For the Swiss Meringue Buttercream Filling:
(This recipe makes more than you'll need for the whoopie pies.}

5 large egg whites
1 1/2 cups white sugar
2 cups (4 sticks) unsalted butter, cut into 1/2 inch cubes, cool but not cold
a pinch of table salt
2 teaspoons vanilla extract

In a medium bowl, whisk the egg whites and sugar together. Set the bowl over a pan of simmering water but do not let the water touch the bottom of the bowl. Heat the mixture until the sugar is completely dissolved and the color is a milky white, about 2 to 3 minutes, stirring often. You can test the mixture by rubbing a small amount between your fingers. It should feel completely smooth.

Transfer the egg mixture to the bowl of an electric mixture fitted with the whisk attachment and beat on medium-high speed. Beat until smooth and fluffy and completely cooled, about 5-10 minutes. Remove the whisk attachment and replace with the paddle attachment. Add the cubed butter and beat on medium-high speed until smooth and fluffy, about 5 minutes more. The buttercream will look as though it is breaking, but it will come together as you continue to beat.

Add the salt and vanilla and beat until combined.

To assemble the pies, turn half of the cookies upside down. Use a spoon or a piping bag fitted with a large round tip to apply a dollop of filling onto the flat side of the cookie. Place another cookie, flat side down, on top of the filling and lightly press the cookies together. Repeat until all cookies are filled. Spoon some sprinkles on the icing if desired.

Tuesday, February 15, 2011

Romantic Rose-Covered Red Velvet Cake with Cinnamon Buttercream Icing


I needed to make a treat to donate to our school's annual auction and this seemed like the perfect thing to pack a visual punch to get the highest bid possible. I made a red velvet cake with cinnamon-vanilla swiss meringue buttercream and covered the whole cake with romantic roses - just in time for Valentine's Day.


I'm proud to say that several people bid on the cake to raise money for our school! Thank you everyone!


Red Velvet Cake
adapted from Baked: New Frontiers in Baking by Matt Lewis and Renato Poliafito
Makes one triple layer 8-inch cake
(My recipe adjustments are in parentheses.)

1/4 cup dark unsweetened cocoa powder
2 teaspoons or up to 2 tablespoons red gel food coloring, depending on how red you want the cake
1/4 cup boiling water
6 tablespoons unsalted butter, softened, cut into small pieces
2 tablespoons vegetable shortening, at room temperature
1 2/3 cups sugar
3 large eggs
1 cup buttermilk
1 teaspoon pure vanilla extract
2 1/2 cups cake flour
1 teaspoon table salt
1 tablespoon cider vinegar
1 teaspoon baking soda

1. Preheat the oven to 325 degrees F. Butter three 8-inch round cake pans (I used 9-inch pans), line the bottoms with parchment paper, and butter the parchment. Dust with flour, and knock out the excess flour. (I didn't flour, just used cooking spray in place of the butter.)
2. In a medium bowl, whisk together the cocoa powder, food coloring, and boiling water. Set aside to cool. In the bowl of an electric mixer fitted with the paddle attachment, cream the butter and shortening until smooth. Scrape down the bowl and add the sugar. Beat until the mixture is light and fluffy, about 5 minutes. Add the eggs, one at a time, beating well after each addition.
3. Stir the buttermilk and vanilla into the cooled cocoa mixture. Sift the flour and salt together into another medium bowl. With the mixer on low, add the flour mixture, alternating with the cocoa mixture, to the egg mixture in three separate additions, beginning and ending with the flour mixture. Beat until incorporated. In a small bowl, combine the vinegar and baking soda and stir until the baking soda dissolves; the mixture will fizz. Add to the batter and stir until just combined.
4. Divide the batter among the prepared pans and smooth the tops. Bake until a toothpick inserted in the center of each cake comes out clean, about 30 minutes, rotating the pans halfway through the baking time. Transfer the cakes to a wire rack and let cool for 20 minutes. Invert the cakes onto the rack, remove the pans, and let cool completely. Remove the parchment.

Cinnamon-Vanilla Swiss Meringue Buttercream
from Martha Stewart's Cupcakes

7 extra-large egg whites or 8 large egg whites
1 3/4 cup sugar
pinch of salt
6 sticks (1 1/2 pounds) unsalted butter, at cool room temperature, cut into tablespoon-sized pieces
2 teaspoons vanilla extract
1 1/2 teaspoons ground cinnamon


1. Place sugar and egg whites in the heat-proof bowl of an electric mixer. Set bowl over a pan of gently simmering water, and whisk until sugar has dissolved and egg whites are hot to the touch, about 3 minutes. Test by rubbing the mixture between your fingers; it should feel completely smooth.

2. Transfer bowl to a stand mixer. Using the whisk attachment, beat on high speed until mixture has cooled completely and formed stiff and glossy peaks, about 10 minutes.

3. Add the butter, one piece at a time, and beat until incorporated after each addition. Don't worry if the buttercream appears curdled after all the butter has been added; it will become smooth again with continued beating. Add vanilla and cinnamon, and beat just until combined.

4. Switch to the paddle attachment, and beat on the lowest speed to eliminate any air pockets, about 5 minutes. If using buttercream within several hours, cover bowl with plastic wrap, and set aside at room temperature in a cool environment. Or transfer to an airtight container, and store in the refrigerator, up to 3 days. Before using, bring buttercream to room temperature, and beat on the lowest speed with the paddle attachment until smooth, about 5 minutes.

Friday, February 11, 2011

Homemade Marshmallow Fondant and Homemade Poured Fondant


These cupcakes were designed by a special 5-year-old girl for her kindergarten class to enjoy on the last day of her week as "Student of the Week". I did my best to deliver exactly what she wanted.

The request: a carrot cupcake with smooth, shiny, white icing decorated with a pink heart inside a bigger red heart.

Immediately, my mind starts churning. It's a little more complicated than it seems. I couldn't use cream cheese icing or buttercream and achieve the smooth and shiny she was looking for. So I came up with two alternatives: a white chocolate ganache or a poured fondant (the icing generally used on petit fours), neither of which I had any experience with. I decided the white poured fondant would be the better choice considering the age group. Had I been serving to adults, I might have tried the white chocolate ganache.


I found a recipe for poured fondant and thought it looked easy enough. It required four ingredients, plus a candy thermometer and a food processor, all of which I had on hand. The result was good, although I wished it had been a little thicker as I had a few cupcakes that had icing running down the sides. Next time I'll reduce the water by a tablespoon or so. This icing is very sweet, much like royal icing so it's not packing a lot of flavor. For kids, though, sweeter is just fine and my testers didn't seem to mind the sweetness at all! Poured fondant doesn't dry hard like royal icing, however. It stays soft, similar to the consistency of a thick honey.

I chose the best looking ones to give away, and these are what were left. As you can see, the icing was a little thin and drippy on a few. The consistency would have been perfect for petit fours as you want the icing to drip down and cover the sides in that case.


The next decision was how to do the red and pink hearts. I'd wanted to try my hand at homemade marshmallow fondant for a while and this was my chance. I already had some marshmallows and plenty of powdered sugar. Surprisingly, that's all you need!

You wouldn't believe how easy it is to make your own fondant. If you like to knead dough or play with playdough, you'll love making this.

Below are the red hearts, ready to be placed on the cupcakes. Food coloring is kneaded into the fondant (wearing latex-type gloves help keep your hands clean) and the dough is rolled out super thin with a fondant rolling pin and then cut with a cookie cutter. The fondant will dry out when exposed to air, so I keep them covered in plastic wrap until they're ready to be used.


I placed the red hearts on the cupcakes while the icing was still wet. I brushed the pink hearts with a little water and sprinkled on some pink shimmer dust. Then I brushed the underside with water and placed them on top of the red hearts. I ran out of red hearts for the leftovers, but I think the single pink heart is adorable too.

Why not try your hand at fondant hearts for Valentine's Day this year? Get your kids to help out too - it's like playing with edible playdough! It's fun and the results are worth the effort!

Food Processor Poured Fondant
Adapted from The New Pastry Cook by Helen Fletcher

2-1/2 cups sugar
1/2 cup water (or a little less)
1/4 cup corn syrup

Heat sugar, water and corn syrup to the soft-ball stage (238°F; 114°C). Pour into the food processor fitted with the steel blade. Wash the candy thermometer well and reinsert into the syrup. Let the syrup cool undisturbed in the workbowl to 140°F (60°C), about 30 minutes. Remove the thermometer.

Add any coloring or flavoring (vanilla, almond extract, etc.) and process 2 to 3 minutes, until the syrup completely converts from a glassy syrup to an opaque paste. Transfer to a container with a lid. Allow to cool slightly and then press plastic wrap directly onto the surface of the fondant and cover with the container's lid. Store at room temperature for 24 hours. Use or refrigerate for later use.

Marshmallow Fondant

Note: This recipe makes enough fondant to cover an entire cake. If you only need a small amount of fondant, it would be easy to cut this recipe in half and make only what you need.

10 ounce bag mini marshmallows
1 to 2 pounds confectioners sugar
2 tsp flavorings (vanilla, lemon, etc)
2 Tbs. water
vegetable shortening for coating hands and bowl

Measure out confectioner's sugar into a bowl and whisk to remove lumps. Use some vegetable shortening to coat the inside of another bowl. Add marshmallows to the coated bowl. Add 2 tablespoons water to the marshmallows. Melt the marshmallows in the microwave, stirring and checking every 30 seconds until completely melted. Once marshmallows have melted, add any flavoring and then add the confectioners' sugar a little at a time and stir to incorporate. When it becomes too thick to stir, transfer the dough to a surface greased with a little shortening. Continue kneading in the confectioners' sugar, a little at a time. Stop adding sugar when the dough is no longer sticking to the counter as you knead. Lubricate hands with shortening from time to time to prevent the dough from sticking to your hands as you knead. Divide the dough if needed and knead in any colorings at this point. Once the color is incorporated, rub a small amount of shortening all over the dough and wrap in plastic wrap. Let the fondant rest at room temp for 30 minutes. It is then ready to use. Wrap any unused fondant tightly in plastic wrap and place inside a resealable plastic bag. Fondant will keep at room temperature for up to 6 months.


Saturday, February 5, 2011

Nutella Pastry Pockets


Happy World Nutella Day!

Pies are all the rage these days - some are debating if the pie is the new cupcake of 2011. I've been reading that there are several pie shops trying to make a go of it around the country.


But I wonder if those pie shops have a use for their pastry scraps. An aversion to waste probably made the donut hole what it is today. And like the donut hole is just as delicious as the donut, these pastry pockets are just as good as the pie. Sure, you could roll out the scraps and brush the dough with egg, and then sprinkle with cinnamon and sugar like we used to do when I was growing up.


Or you could roll the dough like rugelach or a crescent roll with some nuts and jam or just about any filling you desire, making a darned good cookie.

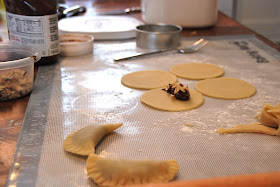
Or you could cut the dough into circles, dollop a bit of Nutella and chopped hazelnuts in the center, fold it over, crimp the edges and bake. If you want, brush the tops with egg wash and sprinkle some Turbinado or coarse sugar on top before baking. I love the extra crunch that the hazelnuts and the sugar on top give to the pastry, but you could leave them out if you want.

I'd take these pastry pockets over a donut hole any day.


Other Nutella recipes from the Marzipan archives:

Nutella Pastry Pockets
A Marzipan Original :)

Note: The nutella inside the pastry does not stay soft like it is right from the jar. It will firm up a bit as it is baked, like the chocolate in a candy bar. 

Leftover (or not) pie dough or tart dough
Nutella, about a teaspoon per pocket
Hazelnuts, toasted, skinned and coarsely chopped
Egg wash for brushing
Turbinado or other sugar for sprinkling

Preheat the oven to 375 degrees F. Roll out the dough to 1/8" thickness and cut into 3" circles with a cookie or biscuit cutter. Place a teaspoon of Nutella in the center of the circle and sprinkle with a few chopped hazelnuts. Dip a pastry brush or your finger into a small bowl of water and lightly moisten the edges around half of the dough circle. This will help glue the pastry together. Fold the dough in half and lightly press the edges to seal. Crimp the edge with a fork or make it more decorative if you wish. Brush the tops with egg wash and sprinkle with sugar. Bake until the dough is golden brown, 20 minutes or so.