Wednesday, July 28, 2010

A Birthday Request for Triple Decker Boston Cream Pie

Boston Cream Pie

My daughter, Ellen, turned 14 yesterday. Fourteen!! I am so proud of the young lady she has become. She's level-headed and sensible, smart, and beautiful. She is great with kids and likes to bake.

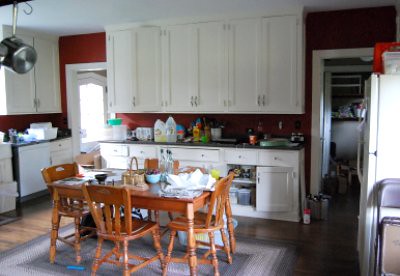
I was wondering what to bake first in my new oven and Ellen's birthday request was Boston Cream Pie. Ok, I can do that! Actually, WE can do that - the birthday girl helped with every step. It was a great way to break in that new oven - mother and daughter side by side!

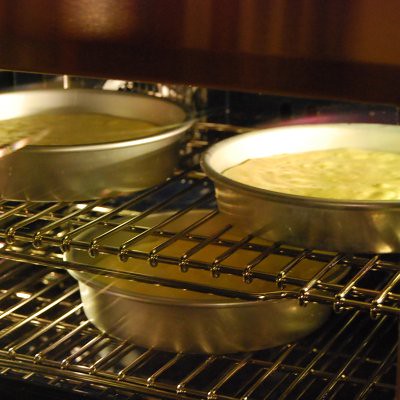
Below are the cakes all happy and baking inside the oven...

Boston Cream Pie

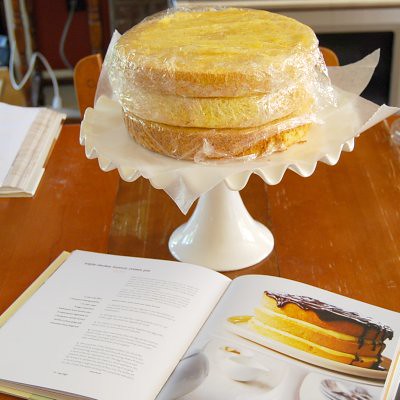
Below are the cake layers, ready for transport. After stirring the custard which chilled in the fridge overnight, I knew that the custard was none too thick, so I opted for taking the components to the party site and assembling it there. It was a good decision as you can see from the first picture, the custard starting oozing out and the cake would never have made it to its destination!

Boston Cream Pie

In retrospect, I think this recipe would've been even better made into cupcakes for a few reasons:
  • Easier to transport
  • Filling the cupcakes with custard would've contained the custard better and who doesn't like a little surprise inside their cupcake?
  • Higher chocolate to cake ratio (more chocolate = better)
and I probably would use this denser butter cake recipe for the cake component. But judging by the clean plates, the cake was a hit! We sliced the cake right away, but the leftovers were even better after allowed to chill a while in fridge!


Boston Cream Pie
from Sky High: Irresistible Triple-Layer Cakes
Makes one 9-inch triple layer cake

2 Cups Cake Flour
2 Tsp Baking Powder
1 1/2 Cups Sugar
8 Eggs, Seperated
1 Tblsp Fresh Lemon Juice
6 Tblsp Vegetable Oil
2 Tsp Vanilla Extract
Vanilla Custard (Recipe follows)
Chocolate Glaze (Recipe Follows)

1. Preheat the oven to 350F. Line the bottoms of three 9-inch round cake pans with a round of parchment or waxed paper.

2. Sift together the cake flour, baking powder, and 1/2 cup of the sugar. Set these aside.

3. In a medium mixing bowl, whisk together the egg yolks, lemon juice, oil and vanilla until blended.

4. In a large clean mixer bowl, beat the egg whites with an electric mixer on high speed until foamy. Gradually add the remaining 1 cup sugar and continue beating until moderately stiff peaks form that droop slightly.

5. Mix a quarter of the whipped whites into the yolks then carefully and gently fold the yolk mixture back into the remaining whites without overmixing. Now sift about a third of the dry ingredients over the egg mixture and carefully fold in. Repeat this step in 2 more additions. You don't want to deflate the batter the batter by handling it roughly or by dumping a large quantity of flour into the batter all at once. Divide the batter among 3 prepared pans.

6. Bake for 15-20 mins, or until a toothpick stuck in the middle comes out clean and the cake springs back when touched lightly. Let the layers cool completely in their pans on wire racks before turning out. To unmold run a blunt knife around the edge of the pans and invert to remove the cakes and carefully peel off the paper liners.

7. To assemble the cake, put one layer, flat side up, on a cake stand. Spread half the vanilla custard on this layer, smoothing it right out to the edge. Repeat with the second layer. Place the third layer on top and pour the chocolate glaze over, smoothing and spreading so the glaze drips over the sides.

Vanilla Custard
Makes about 2 1/2 Cups

2 Tblsp Cornstarch
2 Cups Whole Milk
6 Egg Yolks
3/4 Cups Sugar
2 Tsp Vanilla Extract

1. In a large heatproof bowl, combine the cornstarch and 1/4 cup of the milk. Stir until smooth and free of any lumps. Whisk in the egg yolks and set aside close to your stove.

2. In a medium saucepan, combine the remaining 1 3/4 cups milk and the sugar. Bring to a boil over medium heat, stirring to dissolve the sugar.

3. Ladle about a third of the hot sweetened milk into the yolk mixture in a thin stream, whisking the mixture constantly so as to not cook the eggs. Gradually whisk this yolk mixture into the remaining hot milk in the pan. Whisking constantly bring just to the boil. Reduce the heat to low and boil gently, still whisking for a further minute.

4. Transfer the custard to a bowl and whisk in the vanilla . Let cool slightly, cover with plastic wrap and refrigerate until chilled.

Chocolate Glaze
Makes about 1 Cup

1/4 Cup half-and-half
2 Tblsp Light Corn Syrup
1 Cup Bittersweet or Semisweet Chocolate (about 6 ounces) in small pieces

1. In a small saucepan combine the half-and-half and corn syrup. Bring to a simmer over moderate-low heat stirring to blend. Remove from the heat, add the chocolate, and let stand for 1 minute. Whisk until smooth.

Friday, July 23, 2010

Back in Business!

Wolf Range

Yesterday, I showed you my old kitchen and my new kitchen and interestingly enough, my new kitchen is old and my old kitchen is fairly new. Today marks the first improvement to my "new" kitchen. Those guys unloading the truck surely thought I was nuts as I was taking pictures and bubbling over about my new purchase.

I shot a photo of it coming off the truck (above)....

and here's a picture of it being wheeled down the bumpy walkway to our front door... it weighs 950 pounds!

Wolf Range

And my new Wolf range is here! It's installed and it works beautifully! It has inspired me to make a final push to get my kitchen things unpacked and put away.

Wolf Range

Not very exciting, but I sauteed up some sliced potatoes, fennel and onions to go with dinner last night and boiled water for coffee this morning. I love my new range! What should be the first thing I bake in it? Any suggestions?? I'd love to hear them!

Thursday, July 22, 2010

The New Marzipan Kitchen

Kitchen

Maybe I've never introduced you to the Marzipan Kitchen. Up until now, this is where all my baking was done. Ten years ago, I designed every detail of this kitchen. I loved it - beautiful custom cherry cabinets, granite countertops and kitchenaid appliances. It was efficient and had all the right storage for my needs. I designed it pre-Marzipan so eventually I ended up taking over the laundry room closet for all my bakeware.

It rarely looked this neat though. I'm a pretty messy cook. I like to have my things out where I can see them, so inevitably the island would be covered with stacks of recipes, mail, and baking ingredients, and the sink piled with dishes.

Well, as of this week, Marzipan has moved to a "new" kitchen. It needs a major overhaul but it has a lot of potential. It has no stove or oven at the moment (read: no baking going on). My brand new shiny range is being delivered today -oh yeah!

Wanna peek?

Here's the kitchen as the previous owners had it for showing their house. An island provided a little more storage but they took it with them. It was a bit too small for the space anyway.

Kitchen

Here's the old range...I sold it on eBay and the buyer got it for a steal! I just wanted to get rid of it..but it did have a lot of character. I bet it was awesome in its day. Let me just say, it wasn't easy getting that 1000 pound monster out of the house, but an old gas oven wasn't going to cut it in my kitchen.

Magic Chef Range 5

Ok, I'm keepin' it real here. Keep in mind, we moved 5 days ago...

The kitchen gets some great morning sun. There's more unpacking to do.

Kitchen

When did I accumulate all this kitchen stuff?? And how did it all fit into the old kitchen??

Kitchen

The kitchen sink is an awesome old farmhouse enameled sink. I'm not sure it's going to fit into the final renovations, but we'll find a use for it somewhere, perhaps in the laundry.

Kitchen Sink

Rumor has it that butler's pantries are back in style. Here's the left side...

Butler's Pantry

And here's the right side. Walking through the butler's pantry from the kitchen leads to the formal dining room.

Butler's Pantry

The other end of the kitchen leads to a little alcove, currently the Marzipan office...more unpacking to do!!

kitchen

The first item to unpack was the coffee and the French press. Next were my favorite cookbooks. Oh I missed you when you were packed away!

Cookbooks

Here's where the new stove will be. I can hardly wait!

kitchen

I'll be baking and blogging again soon and I look forward to showing you the cleaned-up kitchen and my new range...but first, there's cleaning to do...and, of course, unpacking.

Cleaning Supplies

Wednesday, July 14, 2010

Baby Shower Cookies

Onesie Cookies

Things are getting crazy again around here. We're moving to a new house which is actually quite an old house. Yesterday, there were painters, plumbers and electricians there, not to mention the gas company has been outside on the street with large equipment blocking the road and jackhammering away at the street. It's utter chaos. I'm trying to pack up an entire house with 10 years of accumulation almost singlehandedly. My back aches from lifting boxes and I'm not sleeping well...waking up earlier and earlier every morning (today it was 3:30!) I just can't stop my mind from racing.

There's no baking going on in my kitchen at the moment (and in the forseeable future!), so please understand if my posts are few and far between for a while. But I do have a few things I haven't shown you yet. These are cookies I made for a friend who was throwing a baby shower. I didn't want to spend a week decorating them, so I opted for simpler designs and I think they turned out pretty well.

Instead of piping and flooding the background color, I just spread the icing on with the back of a spoon. If the consistency is just right, the icing will cling to the shape of the cookie without running off the side. This saves an enormous amount of time - something I don't have much of these days!

Pretty soon, I'll give you a peek at our new house and I hope to share the process of our kitchen renovation with you along the way. Wish me luck!

Onesie Cookie Mosaic

Sunday, July 4, 2010

Fourth of July Lemon Layer Cake

Lemon Flag Cake

Happy 4th of July! Celebrate with this Lemon Layer Cake all decked out in red, white and blue.

I'll make this quick since we all want to get to our picnics!

The cake, with 1 tablespoon of lemon zest added, baked in two 9-inch round pans which were lined with parchment paper and sprayed with cooking spray. Each layer is sliced in half horizontally when completely cooled to make a total of four layers.

The icing, flavored with vanilla extract and 2T lemon zest. Use the icing in a piping bag to make a "well" for the lemon curd filling between the layers. Ice the outside of the cake, with only a thin layer on the top. Use the piping bag with an Ateco #846 tip or similar to pipe the white stripes and stars and also the bottom border.

The lemon curd filling. Spread a 1/4" layer inside each layer's "well". Tip: zest the lemons before you cut and squeeze them for use in the icing and cake. Make the lemon curd a day in advance to give it time to chill.

Place the blueberries and raspberries on the top of the cake in a flag pattern, fill in with icing stripes pipe the stars right over the blueberries. Garnish the bottom border with more fruit.

Thursday, July 1, 2010

A Trio of Scones for Afternoon Tea

Trio of Scones

I love this buttermilk scone recipe from Baking with Julia. Use the basic recipe and customize it to make your favorite flavor. From left to right above are some of my favorite combinations: Cranberry-Orange, Cinnamon-Pecan, and Lemon Blueberry. You could also use fresh wild blackberries, if that's what your thing.

I made these scones for an afternoon tea at a local church. Actually, I made 72 of them, doubling the recipe three times, and adding a different mix-in to each double recipe. In order for the scones to be as fresh as possible, I made the scone batter, cut the circle of batter into wedges, and refrigerated them, unbaked and covered with plastic wrap, overnight. The next morning, bake up the scones and enjoy with clotted cream and tea.

Buttermilk Scones
adapted from a Marion Cunningham recipe from Baking with Julia
Makes 12 scones

3 cups all-purpose flour
1/3 cup sugar
2 1/2 teaspoons baking powder
1/2 teaspoon baking soda
3/4 teaspoon salt
1 1/2 sticks (6 ounces) cold unsalted butter, cut into small pieces
1 cup buttermilk
1 tablespoon of lemon or orange zest, or one teaspoon cinnamon
1/2 cup frozen blueberries or dried cranberries, or chopped pecans

Preheat the oven to 425 degrees F.

In a medium bowl, whisk to combine the flour, sugar, baking powder, baking soda, and salt. Add the cold butter pieces and using your fingertips, work the butter into the flour mixture until the mixture resembles coarse cornmeal with a few larger pieces. Add 1 cup buttermilk, fruit or pecans, and zest or cinnamon, and mix with a fork until ingredients are just moistened. If the dough looks dry, add another tablespoon of buttermilk. Gather the dough into a ball, pressing it gently so that it holds together, and turn it out onto a lightly floured surface. Knead it briefly, about 10 times or so, and then cut the dough in half.

On a lightly floured surface, roll one piece of dough into a 1/2-inch thick circle that is about 7 inches across. If you are going to bake the scones right away:

For the lemon-blueberry scones, brush the dough with heavy cream and sprinkle with coarse or regular sugar
For the cranberry-orange scones, brush the dough with heavy cream only (glaze with orange glaze after scones have cooled - recipe follows)
For the cinnamon-pecan scones, top generously with cinnamon streusel topping (recipe follows)

Cut the circle into 6 wedges. Place the scones on an ungreased cookie sheet (I use a Silpat mat). Repeat with the other half of the dough. Bake the scones for 10-12 minutes until the tops and bottoms are golden brown. Transfer the scones to a rack to cool slightly before serving.

To make ahead the night before:
Cut the dough circle into 6 wedges. Transfer the triangles to a cookie sheet and cover with plastic wrap and refrigerate overnight. In the morning, top the scones according to the variations as above. Bake 10-12 minutes or until golden brown.

To make days ahead: Freeze the dough circles, wrapped in a double layer of plastic wrap for up to two weeks. Thaw the circles overnight in the refrigerator, cut into wedges and proceed as above.

Orange Glaze

2 cups sifted confectioners' sugar
2 tablespoons or so of orange juice
fine zest of one orange

Place the sugar in a bowl. Add the orange zest and enough orange juice to make the icing thin enough to drizzle. Add more sugar if too thin and add more juice if too thick. Using a spoon, drizzle the icing over the scones.

Scones with Cinnamon-Pecan Streusel Topping
adapted from a recipe from Baking By Flavor by Lisa Yockelson posted on Daydreamer Desserts

Make the recipe above with the pecans and cinnamon options in place of the zest and fruit. Just before baking the scones, carefully pile some of the streusel (recipe follows) on top and bake as directed.

for the Streusel:
3/4 cup unsifted bleached all-purpose flour
1/2 teaspoon ground cinnamon
1/3 cup plus 3 tablespoons firmly packed light brown sugar, sieved if lumpy
pinch of salt
6 tablespoons (3/4 stick) unsalted butter, cold, cut into chunks
3/4 teaspoon pure vanilla extract
1 cup chopped pecans

Thoroughly combine the flour, cinnamon, light brown sugar, and salt in a medium-size mixing bowl.

Scatter over the butter chunks and drizzle over the vanilla extract. Using a pastry blender or two round-bladed table knives, cut the butter into the flour-sugar mixture until reduced to marble-size bits.

Scatter over the chopped pecans and mix them in.

With your fingertips work the mixture until moist clumps of streusel are formed, pressing and crumbling it into large and small lumps.

LinkWithin

Related Posts Widget for Blogs by LinkWithin