Showing posts with label My Portfolio. Show all posts

Friday, July 1, 2011

Displaying your Cupcakes


So you've made your cupcakes, now how do you display them ? Here are a couple of ideas to get you started.

This black and white display uses styrofoam cake forms for each base layer and smaller rectangular pieces in between for height (one pillar between the first and second tiers and three pillars between the second and third tiers). Each styrofoam piece is wrapped in white paper like you would wrap a gift, and then a ribbon is glued around the circumference of each tier. The pieces are glued together for stability. The numbers and letters were black felt outlined in white and were purchased at a local party supply store.

A classic and elegant display.


I made this black and red cupcake tower out of white cake boards and a large piece of white foam board. This tower holds a few more cupcakes than the tower above.


There may be a better way to construct this, but here's what I did. I cut the foam board with a ruler and utility knife (use a cutting mat for this) into 4-inch wide strips and cut two pieces for each tier 4" shorter than the tier they were to support. For example, the supports for the 10" tier would be cut into 6" by 4" wide strips. I cut a 2" slit at the halfway mark on each support piece and then fitted them together at right angles to make the supports. (For a more permanent display, the supports might be better if made out of plywood or something similar.)


The sizes of cake rounds I used were 8", 10", 12", 14", and 16". I used a glue gun to glue the supports to the cake boards and also to glue the ribbons around each tier. The wooden letters, numbers and 4 skewers were spray-painted red. I glued the numbers to the skewers with hot glue and pushed the skewers down into the top tier, securing with hot glue behind the top tier supports.

I hope these ideas will help you get started! Feel free to email me with any questions you might have.

Monday, May 16, 2011

Marzipan Desserts May Madness


It's a crazy time of the year, and lots of things are coming out of my kitchen! I wanted to share some of them with you.

First, my son turned 12 and he requested a chocolate cake with mocha buttercream - not hard to believe since he loves the mocha frappe from Starbucks. It was really good! It's the same chocolate cake recipe used in the Grasshopper Cake from the Baked Cookbook. I've decided that it's now my favorite dark chocolate cake. The cake freezes quite well when double wrapped in plastic wrap. Still moist and good as the day it was made.

To make the buttercream, add 4 ounces of melted and cooled chocolate and 2 teaspoons of espresso powder to Vanilla Swiss Meringue Buttercream. Chocolate and espresso is a marriage made in heaven.


I went to the Penn Avenue Fish Market in the Strip last week and got some sushi grade salmon. The fishmonger was nice enough to give me refresher on how to cut it for sushi. We had some great sushi and salmon rolls for dinner that night - sushi rice, salmon, cucumbers, carrots, red peppers and a little wasabi paste. The first roll was delicious, but the nori wasn't big enough and they fell apart. The second try turned out pretty well I think! 


My friend Jen had a birthday too. She requested these coconut cream filled coconut cupcakes. I'd forgotten how good they are. And don't they look pretty in these multi-colored cupcake papers?


Finally, the senior lacrosse players at our school had their senior dinner and I made each senior a lacrosse jersey sugar cookie decorated with their number and name. Congratulations Seniors!

Happy Baking!

Deanna

Wednesday, January 27, 2010

Hockey Cookies and a Chocolate Chip Cookie Cake

Hockey Cookies

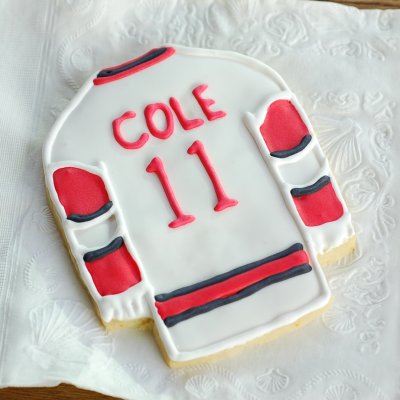
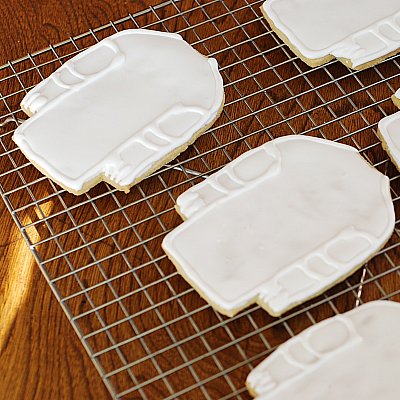
A friend asked me to make these hockey jersey cookies for her son, Cole, who was turning 11. They turned out really good but I had to laugh because they looked a lot like the puffy shirt from Seinfeld before the colored icing was applied - not exactly the tough hockey look I was going for! But add a little red and black and they came together nicely.

Hockey Cookies

Last week, I was also asked to make a chocolate chip cookie cake for my friend's daughter's birthday.

Chocolate Chip Cookie Cake

I took my basic chocolate chip cookie recipe and pressed all the dough into a parchment-lined and greased 14" straight-sided All-Clad saute pan, baked it at 375 until it looked nicely browned and done in the center. It was thicker and definitely better tasting than the cookie cakes you buy at the store and I was told it was delicious and the kids loved it. The flowers and butterflies were made of colored and rolled fondant to match the plates and napkins for the party. The outlining decoration was made of vanilla Swiss Buttercream icing. I didn't have ideal lighting for this photo, but you get the picture! Happy Birthday Cole and Julia!

Monday, October 19, 2009

Chocolate Espresso or Chocolate Mint Glazed Brownie Buttons


This recipe for Brownie Buttons is from Dorie Greenspan's Baking From My Home to Yours Cookbook. I covered half the brownies with a chocolate ganache glaze flavored with espresso powder and half flavored with mint.  Both versions were delicious!


One year ago: Mint Brownies

Brownie Buttons
from Baking, From My Home to Yours by Dorie Greenspan
Makes 16 (I tripled the recipe)

Ingredients:
1/4 cup plus 2 tablespoons all-purpose flour
Pinch of salt
1/2 stick (4 tablespoons) unsalted butter, cut into 4 pieces
2 1/2 ounces bittersweet chocolate, coarsely chopped
1/3 cup (packed) light brown sugar
1/2 teaspoon pure vanilla extract
1 large egg
Ganache glaze for topping (recipe below)

Center a rack in the oven and preheat the oven to 350 degrees F. Lightly butter two miniature muffin pans, each with a dozen cups, and place them on a baking sheet. (Or line mini muffins cups with paper liners.)
Whisk together the flour and salt and set aside.
Melt the butter, chocolate and brown sugar in a medium heavy-bottomed saucepan over very low heat, stirring frequently with a heatproof spatula and keeping an eye on the pan so nothing overheats or burns. When the mixture is smooth, remove from the heat and cool for a minute or two.
Stir the vanilla and egg into the chocolate mixture. When the mixture is well blended, add the flour and stir only until it is incorporated. You should have a smooth, glossy batter.
Spoon the batter into 16 of the muffin cups, using about a teaspoon of batter to fill each cup three-quarters full. (I used my smallest cookie scoop.)
Bake for 14 to 16 minutes, or until the tops of the buttons spring back when touched. Transfer the pans to racks to cool for 3 minutes before carefully releasing the buttons. Cool to room temperature on the racks. When the brownies are completely cool, glaze with chocolate espresso ganache.

Chocolate Espresso or Mint Ganache
adapted from Baked: New Frontiers in Baking by Matt Lewis and Renato Polafito

6 Ounces / 170g Dark Chocolate (60 to 72% Cacao), coarsely chopped
1/2 Cup Heavy Cream
 1 tsp espresso powder or 1/2 tsp peppermint extract

 1. Put the chocolate in a medium bowl and set aside. Whisk together the cream and espresso powder (omit espresso powder for mint ganache) in a small saucepan and bring just to a boil and pour over the chocolate. Let the mixture sit for 2 minutes before gently mixing the chocolate and cream together until completely smooth.  For peppermint ganache, stir in the peppermint extract once the ganache is smooth.

2. Let the ganache sit for about 15 minutes.

3. If the ganache has cooled enough to become solid, microwave (for only a few seconds) or gently heat the ganache until pourable.

LinkWithin

Related Posts Widget for Blogs by LinkWithin