Showing posts with label Decorated Cookies. Show all posts

Friday, June 20, 2014

Cookies for a Texas Barbecue


What would a Texas barbecue be without some Texas sheetcake and these great Texas-sized cookies? I placed silver dragees on the stars to give them some bling and added a few hats and boots to the mix.  These cookies were made for the day-after-the-wedding family picnic a friend had recently for her newlywed daughter and son-in-law.  Congrats and YEE HAW to the newlyweds who will be spending the next chapter of their life in Texas!

Friday, June 6, 2014

Twins! Baby Face Cookies


These are super cute cookies for a baby shower.  The mother-to-be was expecting twin boys and the guests were all couples.  Each couple went home with two cookies packaged in a cellophane bag together and tied with blue ribbon!  So adorable!  


Wednesday, July 10, 2013

Margarita and Lime Cookies


Hello and Happy Summer - my favorite time of the year!  I hope you are enjoying the warm temperatures and having a margarita or two.  I'm dusting off my camera and hope to bring you more yummy photos to look at.   Are you baking or working on any fun projects, reading any good books, how is your garden growing?  Let me know in the comments!

Tuesday, August 21, 2012

Back to School Cookies


Are you ready for school?

We've got a short two weeks left and we are making the most of it.   I've been waiting all summer for our trip to Tuscany (Siena) and Rome, Italy.  Mark is in Siena now and the way he describes it makes me think I may not want to come back! - olive groves, 700-year-old architecture, and pain au chocolat for breakfast.  I'll be joining him tomorrow.  Here's a photo of Siena...


I'll tell you all about it when I get back!
Enjoy the rest of your summer!


Sunday, March 11, 2012

Angry Bird Cookies


Note to Mom:  "Angry Birds" is a popular game that many kids are playing on their electronic devices these days.

Note to everyone else:  I make these notes to my mom because she is retired and vacationing in Florida and has no clue nor does she have any desire to get a clue about any new electronic gadgets.  She is, however, with the help of my dad who enjoys his electronic gadgets, one of the few who reads this blog faithfully.  (Hi Mom!)

For detailed instruction on how to decorate these cookies, check out Sweet Sugarbelle's blog here.
For helpful tips on rolling out dough, check out my blog post here.

Vanilla-Almond Sugar Cookie Cut-outs
Adapted from Baked: New Frontiers in Baking by Matt Lewis and Renato Poliafito

4 cups all-purpose flour
1/2 teaspoon salt
1/2 teaspoon baking powder
3 sticks butter, softened to cool room temperature
4 tablespoons vegetable shortening
1 1/3 cup sugar
2 large eggs
1 teaspoon vanilla extract
1 teaspoon almond extract

In a medium bowl, whisk together the flour, salt, and baking powder and set aside.

In the bowl of an electric mixer fitted with a paddle attachment, beat the butter, shortening, and sugar together until light and fluffy. Add the eggs and vanilla and beat until combined, scraping the bowl as needed. Add the flour mixture and mix until incorporated. Wrap the dough in plastic and refrigerate for at least 4 hours.

Preheat the oven to 350 degrees. Line two baking sheet with Silpat mats or parchment paper.

Dust a work surface liberally with flour. Unwrap the chilled dough, sprinkle with more flour and roll with a rolling pin to 1/4 inch thick (or a little thinner). Lift the dough and add a bit more flour underneath and on top if the dough gets sticky. If the dough is too hard to work with and wants to crack, break the dough into tennis ball sized pieces and knead each piece briefly to make the dough pliable, then knead all the pieces together one or two times, then you can roll out to an even thickness with a rolling pin.

Transfer the cookies to the cookie sheets with a thin metal spatula. Place the cookie sheets in the freezer for at least 15 minutes (this keeps the cookies from spreading during baking), then bake the cookies for about 10-12 minutes. I peek into the oven and give the cookies a quick touch with my finger. The cookies are done if they provide resistance to your fingertip and are starting to brown around the edges. They are not quite done if your finger sinks into the cookie and leaves an impression. I set the timer for 10 minutes and check every minute after that until the cookies are done. Let the cookies cool for 5 minutes on the baking sheet, then transfer to a cooling rack to cool completely.

Royal Icing
from Joyofbaking.com

2 large (60 grams) egg whites
2 teaspoons fresh strained lemon juice
3 cups (330 grams) confectioners (powdered or icing) sugar, sifted


Place egg whites in the bowl of a stand mixer fitted with the paddle attachment.  Beat eggs on medium-high speed until frothy.  Add lemon juice, reduce mixer speed to medium-low and slowly add the confectioners sugar.  Once all the sugar is added, increase the mixer speed to medium and beat for 6-7 minutes or until the mixture reaches medium-stiff to stiff peaks.  Transfer to an airtight container at room temperature until ready to use if you will be using the icing the same day (recommended).  Refrigerate unused portions for up to one week.


Saturday, October 29, 2011

Leaf Cookies Decorated with Wilton Color Mist and Pearl Dust


The show of leaves here in Pennsylvania is spectacular right now. The beautiful maple trees are all dressed in shades of gold, orange and red. But those leaves were hard to duplicate on a cookie, until I read about using color mist.

Color mist is a spray on food coloring made by Wilton. I found it at Michael's and it comes in a rainbow of colors.


I added another dimension by applying some gold pearl dust around the edges of the cookie.


Step-by-step, here's how I decorated these cookies:

1. Pipe around the edges and flood the cookie with royal icing colored with Americolor Gold gel food color and allow to dry at least 4 hours or overnight.

2. Pipe the veins using the same gold royal icing and a small round tip. Let dry at least an hour.

3. Protect your table with newspaper, place some waxed paper or parchment on top and arrange the cookies on the paper. Spray the cookies with red and orange color mist and let dry.

4. Dip a dry, for-food-only paintbrush in the pearl dust and apply directly to the cookie. You can choose to dust the entire cookie or just the edges.

Friday, August 12, 2011

Summertime Cookies - Peaches and Watermelon


Peaches and Watermelon are two of my favorite fruits this time of year. Sweet...juicy...delicious.  These aren't the juicy variety, but delicious all the same! Enjoy the season while it lasts!

To decorate the peaches:
1. Frost peach with royal icing colored with one part copper and two parts lemon yellow gel food coloring
2. Frost stem with chestnut-colored icing and the leaf with leaf green-colored icing
3. Let dry 8 hours.
4. In each of 2 small bowls, mix about 3 tablespoons of water with one drop of peach or orange gel color in one bowl and one drop red gel color in the other bowl.
5. With a food-only paintbrush, brush lightly all over the peach with peach colored water and then highlight the left side with red colored water.
6. Before the water dries, sprinkle all over with white sanding sugar.


Happy Summer!


Sunday, February 20, 2011

Tips for Rolling Out Cookie Dough


If you're making a lot of cookies, it helps to have a method for keeping them the same thickness, so they look uniform and cook evenly.

There are other tools you can buy for rolling out dough but I'll tell you why they don't work for me:

1. rolling pin rings - I don't like the rolling pin rings because I like to be able to roll up and down as well as diagonally and well, they just get into the way and I end up making ring marks right across the dough. And then I get annoyed!

2. adjustable pastry board - at a whopping $75, it is expensive and would take up valuable space in the kitchen. I think it would be awkward to use and would limit the size of dough you could roll out.


Here's what works for me. The components you'll need are:

1. Inexpensive Wood Pieces: I went down to my local Home Depot and scoured the place for some wood pieces that were approximately 1/4" thick. They had to be square or rectangular shapes so they wouldn't roll around on the table under my rolling pin. I found a couple of things I thought might work and had the guy at Home Depot cut them for me about 18 inches long. (See both in the first photo.) The thinner, wide pieces are exactly 1/4" or .6 cm thick and those are the ones I use the most. The thicker square dowels are 3/8" or 1 cm thick. I think I spent $5 or less for all the pieces.

2. Silicone Rolling Mat: This is not necessary, but nice to have. As you can see, mine has been well used! It 's a little pricey at $30 from King Arthur Online, but I've also seen similar ones at Bed, Bath, and Beyond and with a coupon you could probably get it for about $20.

The silicone rolling mat is bigger than a cookie sheet Silpat liner and also great for rolling out pie dough. If my dough gets too soft while I'm rolling or cutting, I can slip the whole mat, with the dough on top, onto a cookie sheet and place it in the freezer for a few minutes. Soft, warm dough is difficult to cut-out and transfer to cookie sheets.

3. French Style Rolling Pin - I found this rolling pin while browsing a Sur la Table store on vacation. My kitchen is chock full of gadgets and accessories, so when I start browsing a kitchen store I really need to ask myself, "Do I need it? Do I have a place to put it? Do I already have it?" Most things I see I don't need, don't have a place for, or already have anyway! But when I saw this rolling pin, I grabbed it and ran to the register and never looked back! It is absolutely worth the $17 price tag. I love this rolling pin because it is long enough that I can even roll diagonally a little and doesn't have tapered edges, so it works perfectly for getting evenly rolled out cookies.


Other tips for rolling out cookies:

1. Chill the dough in the refrigerator for at least an hour. After it has been chilled, dust your work surface with flour, break the dough into tennis ball-sized pieces (I use a metal dough scraper) and then knead them together briefly to get a smooth, but still cold (but not too cold) ball of dough. I find this process makes the dough a lot easier to work with and prevents jagged edges and cracks along the outer edges of the rolled out dough.

2. Sprinkle the mat or counter and the surface of the dough with flour to keep it from sticking.


3. Start rolling to flatten the dough, and once or twice during the rolling process, lift the dough off the surface and throw a little more flour underneath the dough. You can flip the dough as well, which will help prevent any cracks from forming on the underside of the rolled dough. Flour and cold dough are the keys to keep the dough from sticking to things.

4. After the shapes are cut out and placed on the baking sheet, put the entire baking sheet (uncovered is fine) in the freezer for at least 15 minutes. The baking sheet can go right from the freezer into a preheated oven. This freezer time helps the cookies to retain their shape.


5. You can make the dough ahead of time, wrap it in a double layer of plastic wrap and refrigerate for up to two days, of freeze for up to a week. I keep a stack of peel-off address labels and a Sharpie in the kitchen for labeling things that go into the fridge or freezer and I make sure to include the date on the label. If the dough has been frozen, thaw in the refrigerator overnight to thaw.

6. Below: see how this method produces a consistent and even cookie! You can find my sugar cookie recipe here. 


Thursday, November 25, 2010

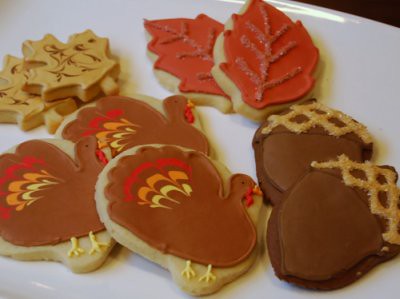
Happy Thanksgiving!

Thanksgiving Cookies

Happy Thanksgiving!

A little Thanksgiving Trivia for you to ponder as you sit down to eat your Thanksgiving dinner...

Sarah Josepha Hale, born in New Hampshire in 1788, was a teacher, a writer, and a supporter of women's rights. She was also a single mother of five children after her husband died during the pregnancy of their fifth child. She spent 40 years writing to congressmen, lobbying five presidents, and writing numerous editorials in her campaign to create an national official day of thanks. Before then, it was only celebrated in New England states. President Lincoln was the first president to declare Thanksgiving a national holiday in 1863 as a result of Sarah's efforts. Thank you Sarah Hale!


LinkWithin

Related Posts Widget for Blogs by LinkWithin