Showing posts with label Main Dishes. Show all posts

Sunday, July 26, 2020

Zucchini Pie with Quinoa Crust


After 20 years of gardening I finally have a zucchini crop to write home about.  I grew these from seed and I'm so proud of how they have grown.  The weeds also look pretty healthy. {sigh}


But now I have refrigerator full of zucchini and I'm trying to get creative with ways to use it all.  For sure I'll be making my all time favorite Zucchini Soup and I found a great recipe for zucchini bread using coconut flour with a cinnamon walnut and a double chocolate variation which I'll be sharing soon.  And I have several other great zucchini recipes I've written about over the years.  Search "zucchini" in the search bar to find them.


But this zucchini pie is definitely a great way to use a couple of them, along with corn and tomatoes which are coming into full swing as well.  You can make the quinoa crust or use a store-bought pastry crust, or even omit the crust altogether and bake in a casserole dish.  So delicious!

Zucchini Pie with Quinoa Crust
Serves 4

Quinoa crust:
2 cups cooked quinoa (from about 1/2 cup uncooked)
1 egg
Salt/pepper

Filling:
4 cups zucchini, thinly sliced 
1/2 cup corn cut from about 3 ears of fresh corn on the cob
1 cup sweet onion, diced 
1 tablespoon olive oil
1 ⁄ 4 cup flat leaf parsley, chopped 
2 garlic cloves, chopped 
1 teaspoon dried herbes de provence or 1-2T fresh herbs (oregano, thyme, savory, rosemary)
1 teaspoon kosher salt
1/2 teaspoon black pepper, freshly ground
pinch cayenne pepper (optional)
1 tablespoon Dijon mustard 
2 eggs 
5 ounces mozzarella, shredded 
1 ounce parmesan cheese, grated
2 ounces ricotta cheese
Two medium tomatoes, thinly sliced


Preheat oven to 375 degrees. Combine cooked quinoa, egg, salt and pepper in a bowl.  Spread onto the bottom and sides of a 10" pie pan.  Cook for 20 minutes, remove from oven, and let cool.  Saute zucchini, corn, onions and garlic in olive oil until soft. Stir in parsley, herbes de provence, salt and pepper. Remove from heat and transfer to a large bowl to cool slightly. Beat the eggs and then add the cheeses to the beaten eggs. Pour into the veggies and combine. Spread dijon mustard on bottom of pie crust. Add zucchini mixture to crust. Arrange tomato slices on top and drizzle with additional olive oil and salt and pepper.  Bake for 35-40 minutes.

Wednesday, July 24, 2013

Delicious Homemade Chicken Enchiladas


I was first introduced to these awesome enchiladas by my friend Jen from Hope Studios.  Jen is a great cook and baker and everything she makes is delicious!  She's really great at adding those extra touches to make a dish look great too.  Above are the enchiladas I made and below are the enchiladas Jen made.


This is Mexican comfort food at it's best!  I loved all the toppings she prepared so we could personalize them.  My favorites are avocado, lettuce, just a smidge of sour cream, and lots of cilantro.  Serve these enchiladas with Mexican Rice with Black Beans.  If there are any leftovers, I like to freeze one or two in a container with leftover rice and after a few minutes in the microwave, voila! - instant yummy lunch for one!


Chicken Enchiladas
adapted from The New Best Recipe by Cook's Illustrated
serves 6

1 medium onion, diced 
3 garlic cloves, minced
3 tablespoons chili powder
3 teaspoons cumin
2 teaspoons sugar
16 ounces canned tomato sauce
1 cup water
1 pound boneless skinless chicken breasts, whole
2 cups shredded cheddar cheese
3 tablespoons pickled jalapeno, chopped
1 fresh jalapeno, minced
1/2 cup cilantro, minced
12 6 inch corn tortillas

Coat the bottom of a large saucepan with olive oil and heat over medium low heat. add the onions, cover, and cook until the onions are soft, about 8 minutes.

Stir in the garlic, chili powder, cumin, and sugar and cook until fragrant, about 30 seconds.

Stir in the tomato sauce and water and bring to a simmer. cook until thickened, about 5 minutes.

Place the chicken in the sauce. reduce heat to low, cover, and cook until the chicken is cooked through, about 10 minutes.

Transfer the chicken to a plate and set aside. 

Strain the sauce to remove solids and season with salt and pepper.

When the chicken is cool enough to handle, shred into bite size pieces. toss the chicken with about 1/2 cup of the sauce, 1 cup cheddar cheese, jalapenos, and cilantro and season with salt and pepper.

Preheat your oven to 300F. spray a 9x13 inch pan with non stick spray. set aside.

Warm the tortillas in the microwave so they are pliable. place about 1/3 of a cup of the chicken mixture in each tortilla. roll each and place them seam side down in the pan. continue until the pan is full.

Pour the remaining sauce evenly over the enchiladas. sprinkle with the remaining 1 cup cheddar cheese. cover with foil and bake about 25 minutes, or until the enchiladas are heated through.

Tuesday, April 3, 2012

Escarole with Cannellini Beans


Sometimes I just need warm and healthy and wholesome and filling and slow-cookin', but not heavy.  This dish fills the requirement perfectly.

Start the night before and soak your beans in cold water overnight.  Then drain and rinse the beans.  Add the beans to a stockpot with some chicken or vegetable stock, water, and olive oil.  Add some onions, carrots, garlic, and sage and simmer away until the beans are tender (1 1/2 - 2 hours).


When the beans are tender, remove from the heat and remove and discard any large pieces of onion, garlic, and sage.


In a large skillet, heat the remaining olive oil, then add the garlic, red pepper flakes and pancetta, then the escarole.  Cook 5 minutes until escarole is wilted.


Add the tomatoes and seasoning...


...then the beans.  Sprinkle with lemon and adjust seasonings.  Serve with a drizzle of olive oil and parmesan shavings and feel good!


Escarole with Cannellini Beans


  • 1 lb. dried cannellini beans or Great Northern beans
  • 2 cups chicken or vegetable broth
  • 1/2 cup olive oil, plus more for serving
  • 2 yellow onions, quartered
  • 2 carrots, cut into 2-inch pieces
  • 8 garlic cloves, 4 left whole, 4 minced
  • 2 fresh sage sprigs
  • 1/4 tsp red pepper flakes (I used a scant 1/4 tsp)
  • 2 oz. pancetta or unsmoked bacon, chopped (optional)
  • 2 heads escarole, about 2 lb. total, cut crosswise into strips 2 inches wide
  • 1 can (14 1/2 oz.) diced plum tomatoes, preferably San Marzano, drained
  • 1 tsp. salt, plus more, to taste
  • 1/2 tsp. freshly ground pepper, plus more, to taste
  • Juice of 1 lemon
  • Extra-virgin Olive oil for drizzling and shaved parmesan for garnish


Pick over the beans, removing any misshapen beans or grit. Rinse under cold running water. Put the beans in a large bowl, add cold water to cover by at least 2 inches and let stand at room temperature overnight. Alternatively, for a quick soak, put the beans in a large pot, add water to cover by at least 2 inches and bring to a boil. Remove from the heat, cover and let soak for 1 hour. Drain and rinse the beans.

Stovetop method: In a large Dutch oven, combine the beans, the broth and 1/4 cup of the olive oil. Add cold water to cover the beans by about 1 1/2 inches. Add the onions, carrots, whole garlic cloves and sage. Bring to a boil over high heat, reduce the heat to low, partially cover and simmer gently until the beans are very tender, 1 1/2 to 2 hours. Remove the onions, garlic cloves and sage and discard.

Slow-cooker method: In a slow cooker, combine the beans, the broth and 1/4 cup of the olive oil. Add cold water to cover the beans by about 1 1/2 inches. Add the onions, carrots, whole garlic cloves and sage. Cover and cook according to the manufacturer's instructions until the beans are very tender, about 4 hours on high or 8 hours on low. Remove the onions, garlic cloves and sage and discard.

About 30 minutes before the beans are done, in a large fry pan over medium-high heat, warm the remaining 1/4 cup olive oil. Add the minced garlic, red pepper flakes and pancetta and sauté until fragrant, about 30 seconds. Add the escarole and sauté until the leaves begin to wilt, about 1 minute. Add the tomatoes, the 1 tsp. salt and the 1/2 tsp. pepper and cook, stirring occasionally, until the leaves have softened and the mixture is reduced to about one-third, 5 to 7 minutes.

When the beans are done, add the escarole mixture and stir, breaking up some of the beans with the back of the spoon to thicken the mixture slightly. Stir in the lemon juice. Season with salt and pepper. Serve immediately, passing the remaining olive oil and shaved parmesan at the table. Serves 6 to 8.

Friday, September 2, 2011

Delicious Soft Flatbread


I love this soft flatbread. It's one of the easiest yeast breads you can make. You don't even need to turn on the oven, so it's a great bread to make when the weather is hot.

Wraps are wonderful if you need a quick and healthy dinner before the kids rush off to their activities after school. And the bonus - no forks required! You can fill a wrap with just about anything - salads like Greek Salad with Chicken or Fattoush, grilled steak and vegetables, the fixins for burritos or any leftovers you have lying around. Still warm from the pan, the wrap and fillings make a delicious combination. I hope you try it!

Soft Flatbread
adapted from the King Arthur Flour website

3 cups King Arthur Unbleached All-Purpose Flour
1 1/4 cups boiling water
1/4 cup potato flour OR 1/2 cup potato buds or flakes
1 1/4 teaspoons salt
2 tablespoons vegetable oil
1 teaspoon instant yeast

1) Place 2 cups of the flour into a bowl. Pour the boiling water over the flour, and stir till smooth (it will be very dry). Cover the bowl and set the mixture aside for 30 minutes.

2) In a separate bowl, using a fork, whisk together the potato flour (or flakes or buds) and the remaining 1 cup of flour with the salt, oil and yeast until a crumbly mixture forms.

3) Add this to the cooled flour/water mixture, stir, then knead for several minutes by hand to form a soft dough. The dough should form a ball, but will remain somewhat sticky. Add additional flour only if necessary and keep your hands and work surface lightly oiled to prevent sticking.

4) Let the dough rise, covered, for 1 hour.

5) Divide the dough into 8 pieces (each about the size of a handball, around 3 ounces), cover, and let rest for 15 to 30 minutes. The dough may be wrapped or placed in a baggie and then refrigerated or frozen after dividing if desired. Bring to room temperature before starting the next step.

6) Roll each piece into a 7"- to 8"-circle (a rolling pin helps here), and dry-fry them (fry without oil) over medium heat for about 1 minute per side, until they're puffed and flecked with brown spots. Adjust the heat if they seem to be cooking either too quickly, or too slowly; cooking too quickly means they may be raw in the center, while too slowly will dry them out.

7) Transfer the cooked breads to a rack, stacking them to keep them soft. Serve immediately (recommended), or cool completely before storing in a plastic bag.

Thursday, August 18, 2011

Provençal Tomato Tart with a Crunchy Savory Tart Crust


This is a wonderful way to use the abundance of tomatoes from your garden or farm market. I wouldn't exactly call it a quiche, although it does have a little egg custard to bind the filling together. The main stars are the tomatoes, and the Gruyere cheese, and the herbs. There's also a little Dijon mustard in there, but it's not noticeable - it just adds a little extra flavor.

And the crust! I loved the slight crunch from the addition of semolina flour. It is the perfect complement to the savory filling.

The tart calls for a bit of herbes de Provence, but since my bottle of herbes de Provence is getting old, I thought I'd chop up a combination of herbs from my garden - thyme, oregano, rosemary, sage, and summer savory (new to my garden this year). It's delicious, fresh, seasonal, and pretty too.

Provençal Tart with Gruyere and Herbes de Provence
from Once Upon a Tart by Frank Mentesana and Jerome Audureau
one par-baked 9-inch Crunchy Savory Tart Crust (recipe below)
12-15 plum tomatoes cut into 1/4-inch thick rounds
2 tablespoons Dijon mustard
1 cup grated Gruyere cheese
1 teaspoon herbes de Provence (I used a tablespoon of chopped fresh herbs - rosemary, thyme, sage, summer savory, and oregano)
2 large eggs
1/4 cup light cream
1 teaspoon salt
freshly ground black pepper
Preheat oven to 375 degrees F.
Place the tomato slices in a colander and place it in the sink. Let the tomatoes drain their excess water for 15 minutes.
Spread the mustard evenly over the tart shell, then sprinkle the cheese and half of the herbs. Lay the tomato slices in overlapping concentric circles until the crust is entirely covered.
Whisk the eggs in a bowl with the cream, salt, and pepper. Pour the mixture evenly over the tomatoes until it comes to about 1/4 inch from the top edge of the crust. Pour a little cream on top if there is not enough to fill the tart.
Bake for 1 hour to 1 hour and 20 minutes, or until the custard is set. Remove the tart from the oven and allow it to cool slightly. Serve warm or at room temperature.

Crunchy Savory Tart Crust
from Once Upon a Tart by Frank Mentesana and Jerome Audureau
2 1/2 cups unbleached all-purpose flour
3 tablespoons semolina flour
1 teaspoon salt
12 tablespoons (1 1/2 sticks or 6 ounces) cold unsalted butter, cut into 1/4-inch cubes
3 tablespoons cold solid vegetable shortening
a glass of ice water

Put flours and salt in the bowl of a food processor fitted with a metal blade and pulse to combine.

Add the butter and shortening and pulse several time until the mixture resembles coarse crumbs with some butter chunks still visible.

Remove the blade from the food processor and dump the dough into a large bowl. Sprinkle 4 tablespoons of ice water evenly over the dough, then use your hands or a wooden spoon to bring the dough together to form a ball. The dough should be just past crumbly, but holding together. Add more water as needed, a tablespoon at a time, if necessary to get the dough to come together.

Cut the dough in half, shape each half into a disk, and wrap each disk in plastic wrap. Refrigerate at least 30 minutes before rolling out.

Preheat the oven to 400 degrees F. Roll out dough to 1/4 inch thickness, fit it into your tart pan, and trim the edges. Chill 30 minutes. Prick the bottom of the tart with the tines of a fork, line the tart with parchment or foil and fill with pie weights or dried beans.

Place the tart shell on the center rack of the oven and bake for 10 minutes. Remove the paper and weights from the pan and return the tart crust to the oven. Bake another 5-10 minutes for a par-baked shell (crust is golden brown and no doughy areas remain), or bake for 10-20 minutes for fully-baked tart shell (golden brown all over). Cool on a wire rack.

Wednesday, August 3, 2011

Delicious Multi-Grain Sourdough Pizza Dough


Homemade pizza makes a regular rotation at our house. The kids love to top their own. They put the pepperoni on so that it makes a smiley face and they can put as little or as much sauce on as they like. I usually like to top my pizza with healthier toppings like roasted red peppers and mushrooms and other vegetables. Sometimes I use basil pesto in place of traditional pizza sauce. The possibilities are endless when you make your own pizza.

When I came across this recipe for multi-grain pizza dough, I thought I'd try it and see if I could make the kids' pepperoni pizza a little bit healthier too. It's a gamble - you just never know if the kids will go for it, or if they'll turn their noses up at a healthier version of the original, push their plates aside, and promptly ask for ice cream for dessert.

This time the gamble was worth it, because we all loved this pizza dough.  The flavor was wonderful and it baked up beautifully. I like it too, because it creates a use for the unfed sourdough starter in my fridge that would otherwise be thrown away. {Find the all-white-flour sourdough pizza dough recipe here at King Arthur Flour.}

Tips for making pizza:

  • Pizza dough should be soft and not too stiff. Only add as much flour as you need to keep it from sticking to your hands while kneading. You can always use a little more flour when shaping the pizza if it's a little sticky.
  • If you have a clear plastic straight-sided canister like this one from Rubbermaid or this one from King Arthur Flour, place the unrisen dough in the canister and mark the level with a piece of tape. It's easier to see when the dough has doubled.
  • Use a preheated pizza stone for best results - allow at least 45 minutes for the stone to heat up. Alternately, use a preheated cookie sheet. The cookie sheet will be preheated whenever the oven comes to temperature.
  • You can shape, top and bake the pizza directly on parchment paper - just slide the paper right onto the pizza stone from a cookie sheet or pizza peel
  • For traditional pizzas like pepperoni, I prefer a mixture of shredded provolone and mozzarella cheeses. I also prefer to use part-skim mozzarella - it's drier than whole-milk mozzarella or fresh mozzarella so it doesn't get as liquidy when baked. Fresh mozzarella, however, is great on a Margherita Pizza with fresh tomatoes and basil.
  • Lightly saute any vegetables to desired tenderness before placing on the pizza and sprinkle the cheese on top.

Multigrain Sourdough Pizza Crust
adapted from Jen at My Kitchen Addiction

Makes 2 medium pizzas

• 3/4 cup warm water
• 1/2 teaspoon dry active yeast
• 1/2 teaspoon granulated sugar
• 1 cup unfed sourdough starter
• 1/4 cup extra virgin olive oil
• 1 heaping tablespoon pizza dough flavor (optional- I omitted)
• 2 teaspoon Kosher salt
• 1/2 cup whole wheat flour (or use white whole wheat flour)
• 1/2 cup whole rye (pumpernickel) flour
• 1/2 cup milled golden flax seed
• About 1 1/2 cups all purpose flour

Whisk together the warm water, yeast, and sugar in a large mixing bowl. Add in the sourdough starter, olive oil, pizza dough flavor, and Kosher salt. Mix until well combined.

Add the whole wheat flour, rye flour, and flax seed to the bowl, and beat vigorously (with a dough whisk or a wooden spoon) to combine. The mixture will be thick and sticky. Gradually add in the all purpose flour, stirring to incorporate the flour. When the dough pulls from the sides of the bowl, use your hands to knead in the remaining flour until smooth (about 5 minutes). Use just enough flour to keep the dough from sticking to your hands and the bowl.

Shape the dough into a ball, and transfer it to an oiled bowl. Cover and let rise in a warm place until the dough has doubled in size (this could take 2 - 4 hours). At this point, the dough may be divided, lightly oiled, and refrigerated for 2 days or frozen for one month in a zip top plastic bag. Remove the dough from the plastic baggie while still cold, then bring the dough to room temperature before shaping and baking.

When you are ready to bake the pizzas, preheat a pizza stone in the oven to 475°F. Split the dough in half and shape each half on a piece of parchment paper. Top with your favorite toppings and bake on the pizza stone for about 10 – 12 minutes, until the crust is golden.

Friday, January 21, 2011

Spaghetti and Meatballs


After a very busy December, I am enjoying the slower pace of life. I have never liked cold weather or the shorter days, but I think I've finally made my peace with it. The lack of sunlight doesn't affect me like it used to and I've learned to embrace the grayness that is winter in Pittsburgh. And when the bright sun does happen to come out, I take notice and appreciate it that much more.

Unlike in the summer, I have an excuse to stay inside, within the coziness of a warm kitchen while the snow falls quietly outside the kitchen window. So while I am hibernating this month, I am taking the opportunity to make some of my family's longtime favorite recipes (like this one), along with trying some new ones, and freezing the leftovers when possible for that inevitable day when things are crazy again and there is no time to cook.


Homemade marinara sauce freezes wonderfully and the best way to freeze meatballs is right in the sauce, so make a double batch of this recipe and freeze the rest in quart sized containers. Square Ziploc containers are my favorite for freezing. I use a permanent marker on peel-off address labels to label the containers with the contents and date. When thawing, either take the container out of the freezer and place in the refrigerator overnight, or run hot water over the bottom of the container and transfer the sauce and meatballs to a bowl to heat in the microwave, or to a pot to reheat over the stove. (Never heat plastic containers in the microwave, especially with tomato sauce. The plastic will get pitted and stained.)

Spaghetti and Meatballs
adapted from a little pamphlet-type cookbook called Pasta Favorites

Note: My kids like a smooth sauce with absolutely no chunks, so often I will use only garlic and spices in the sauce and omit the onion. Alternatively, if you are not chunky-averse, you could also add a diced carrot or two along with the onion to increase the veggie content of the recipe. Just be sure to cook the carrots until they are pretty soft before adding the garlic and spices.

For the Sauce:
3 Tablespoons olive oil
1 onion, chopped (see note above)
2 large cloves garlic (more if desired)
1/4 teaspoon crushed red pepper (optional)
28-ounce can crushed tomatoes in puree
2 16-ounce cans plain tomato sauce (not marinara sauce)
1 teaspoon sugar
1 teaspoon dried oregano, rubbed between your fingers to release flavor
3/4 teaspoon salt
1/2 teaspoon pepper
1 bay leaf (if you have it on hand)

For the Meatballs:
Note: my supermarket sells packaged ground meat labeled meatloaf mix which is a combination of beef, pork and veal side by side in one package. It works quite well in this recipe.  You could also use any combination of only beef and pork.

1 pound lean ground chuck
1/4 pound ground veal
1/4 pound ground pork
1 large egg
1/2 cup fresh or dried plain breadcrumbs
2 tablespoons grated parmesan cheese
2 tablespoons fresh parsley, finely chopped
1 teaspoon basil
1/2 teaspoon salt
1/4 teaspoon pepper

1 pound of spaghetti

To make the sauce:
Heat the oil in a large saucepan. Add the onion and carrots, if using (see note above), and cook over low heat until the onion is translucent and the carrots are soft, about 5 minutes or so. Add the garlic and red pepper flakes and cook for one minute more. Add the remaining sauce ingredients and simmer, uncovered, for 15 minutes while you make the meatballs. This is a good time to start heating the water for the pasta.

To make the meatballs:
Place all of the meatball ingredients into a large bowl. Using clean hands, gently mix and fold the ingredients until they are well combined, but be careful not to overwork the mixture. It should stay relatively loose. Form the mixture into balls about 1 1/2 inches in diameter (or use a medium cookie scoop to portion the meatballs). Gently place the meatballs directly into the simmering sauce. When all of the meatballs are added, carefully push any exposed meatballs down into the sauce so that all the meatballs are covered. Continue to simmer, partially covered if the sauce is thick enough or uncovered if the sauce still needs to thicken more, for 15 minutes or until the meatballs are cooked through. Remove and discard the bay leaf and spoon off any excess fat that rises to the surface. Serve over hot cooked spaghetti with some grated parmesan cheese for sprinkling.


Thursday, August 26, 2010

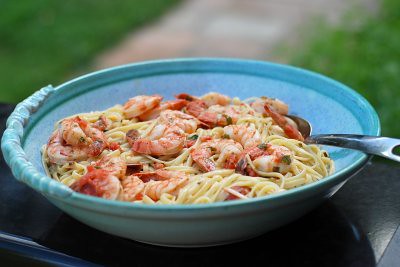
Fettuccine with Shrimp in Basil Cream Sauce

Fettuccini with Shrimp in Basil Cream Sauce

I know some of your kids have gone back to school already. My kids have a precious 10 days left. We are trying our best to enjoy the last days of summer before crazy school schedules take over. We're squeezing in a trip to Kennywood tomorrow (our local amusement park) and we are planning a long weekend to Maryland's eastern shore next week. The back to school angst always seems to be in the back of my mind though. I'll miss these carefree days!

We've had some beautiful weather this week - cooler temperatures and light breezes - and we've been eating outside on the patio every night. A nice breeze funnels through our outdoor dining area and the whole family has a chance to catch up with each other. And when everyone enjoys the meal I spent time making, well that's a bonus!

This is a wonderful pasta dish which takes full advantage of the two things that you probably have in great supply right now if you have a garden or belong to a CSA - basil and tomatoes. I have made it twice this week - the first time with grilled chicken tenderloins and this time with shrimp. My family loved it and ate it all - both times!

This recipe is from one of the cookbooks I owned before I really started collecting cookbooks. The Junior League Centennial Cookbook was given to me by a friend who recommended it wholeheartedly. I still refer to it from time to time and it rarely lets me down. I think I was looking for a fettuccini alfredo recipe and happened upon this one. It will now be a recipe in my regular rotation for this "basil and tomatoes" time of year. I hope you will try it too!

If this recipe sounds good to you, check out these other family favorite recipes for Shrimp fra Diavolo and Linguine with Shrimp Scampi too!

Fettuccine with Shrimp in Basil Cream Sauce
adapted from The Junior League Centennial Cookbook

3 tablespoons olive oil
3 tablespoons butter
2 garlic cloves, minced
1/4 to 1/2 teaspoon red pepper flakes, optional
8-10 fresh roma or other small tomatoes, peeled, seeded and chopped, or a 15-ounce can whole tomatoes, chopped
1/2 cup dry white wine, such as Sauvignon Blanc
1/2 cup finely chopped fresh basil leaves
salt and pepper to taste
about 15-18 large uncooked tail-on shrimp
1/2 cup heavy cream
1 pound fettuccine or linguine, fresh or dried
freshly grated Parmesan cheese

In a large pot, cook the pasta in boiling salted water until al dente.

Meanwhile, heat the oil and butter in a large saute pan over medium heat. Gently saute the garlic and red pepper flakes, if using, until fragrant, about one minute.

Increase the heat to medium high and add the tomatoes, wine, basil, and salt and pepper. Bring to a simmer and add the shrimp. Cook the shrimp, turning them halfway through, until they have turned pink and begin to curl. Try not to overcook them or the shrimp may become tough. Remove the shrimp and keep warm in a covered bowl. Continue to simmer the sauce 5-10 more minutes or until the sauce has thickened. Add the heavy cream and simmer a few more minutes, adding the shrimp back to the pan during the final minutes to warm through. Adjust seasonings if necessary. Add cooked pasta to the saute pan and toss to coat. Transfer to a serving bowl, sprinkle with grated parmesan, and serve immediately.


Sunday, August 8, 2010

Lemon and Basil Pasta with Grilled Chicken

Lemon Basil Chicken and Pasta

Summertime is the time to make simple, light meals made from fresh ingredients - perfect for eating outside on the patio when the hot days are just beginning to cool a bit.


This recipe uses fresh basil and has bright notes of freshly squeezed lemon. It's a dish the entire family will love!

Grilled Chicken with Lemon and Basil Pasta
Adapted from The Pioneer Woman
Serves 6

For the grilled chicken:
6 Chicken cutlets pounded to an even thickness or
about 12 chicken tenderloins - make more and use the leftovers to put over salad the next day
1/3 cup olive oil
Juice of four lemons
1 tablespoon Dijon mustard
A tiny bit of honey
A dash of salt

Marinate the chicken for at least an hour or overnight in the fridge. Cook over a hot grill and keep warm until the pasta is ready.

For the pasta:

1 pound Penne Pasta or Linguine, Cooked Until Al Dente
6 Tablespoons Butter
3-4 whole Lemons, Juiced
1 cup Heavy Cream
¼ cup Half-and-half
1-½ cup Grated Parmesan Cheese (or Romano)
Salt And Freshly Ground Black Pepper, To Taste
20 whole Basil Leaves, Chopped

Cook pasta, reserving 1 cup of hot pasta water when you drain. Set pasta aside in a colander.
In the same pot, melt butter over medium heat. Squeeze in the juice of 3 to 4 lemons. Whisk together. Pour in cream and half-and-half. Whisk together and simmer until it starts to thicken. Add the cheese and whisk until melted. Add salt and pepper. Check consistency, adding some of the hot pasta water to loosen the sauce if needed.
Pour pasta and sauce into a large serving bowl. Sprinkle basil all over the top, then add sliced chicken breasts. Serve immediately.

Wednesday, May 26, 2010

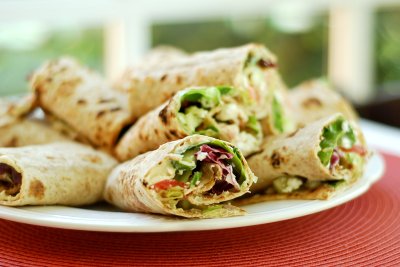
Whole Wheat Hummus and Veggie Wrap

Hummus Wraps

I am deviating from the sweet side of Marzipan to bring you a sample of what I like to eat when I'm not licking the batter from the bowl. These wraps are amazing and they're vegetarian and I like them so much that I've eaten one for lunch every day this week! And I served them at the girls' Confirmation/Communion Party. All of the ingredients were purchased at Costco but I know you can find them at your well-stocked supermarket as well.

Whole Wheat Hummus and Veggie Wraps
Makes one wrap

Ingredients:

Whole wheat lavash wrap
3 tablespoons of your favorite hummus - I used the Pine Nut Hummus by Sabra from Costco
a handful of Organic Baby Lettuce leaves
a handful of Diced Seedless Cucumber
a handful of Diced Tomatoes, seeds removed
a sprinkling of thinly sliced scallions (aka green onions), to taste
a sprinkling of crumbled Feta Cheese

Place the wrap on your work surface with the long side toward you. Spread with entire wrap with hummus and sprinkle with the other ingredients, leaving a border without filling along the far end. A little goes a long way, and too much filling will make it hard to wrap up. Starting with the edge closest to you, start rolling the wrap tightly. Cut in half and enjoy a healthy, delicious lunch!

Wednesday, November 25, 2009

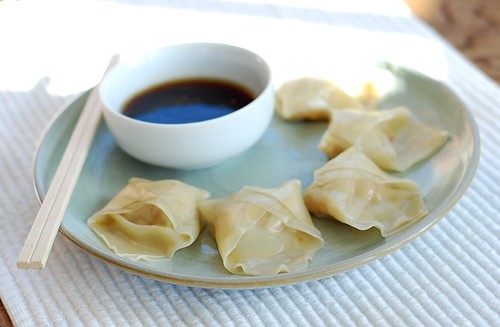
Pork Potstickers with Sesame-Ginger Dipping Sauce - A Great Holiday Appetizer

Pork Wontons

I used to watch Alton Brown on the Food Network. If I hadn't, I probably would never have tried these potstickers. But sometimes it just takes watching someone else making something to realize, "Hey, I could do that!" Finding the wonton wrappers in the grocery store might just be the hardest part! (You can find wonton wrappers in the produce section of the grocery store in a refrigerated case.)

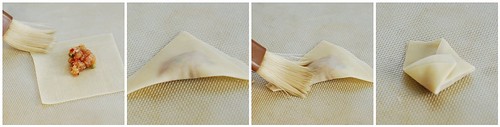
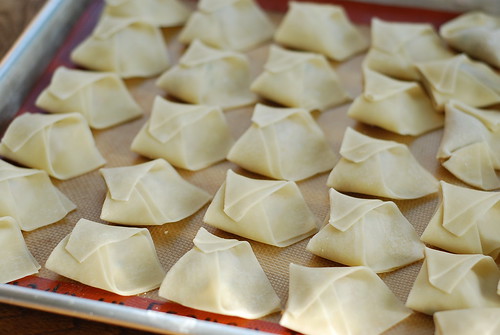
There are many ways to shape potstickers and this is how I assemble them...
1. Place about a teaspoon of filling in the center of the wonton wrapper.
2. Fill a small bowl with water. Dip a pastry brush in water and brush along two sides of the wrapper. This will act as the "glue"
3. Fold the wonton in half, lifting the unmoistened sides over the filling to meet the moistened sides. Press the sides together with your fingers while trying to remove any air that is inside the potsticker.
4. Brush across the top of the folded potsticker and fold the two points over to make the little envelope shape.

Pork Wontons

Line your wontons on a baking sheet lined with parchment or a silicone mat. Cover these with a damp cloth until ready to cook, or you can place them in single layers in an airtight container, placing plastic wrap between each layer. I don't recommend freezing them in a freezer bag because the "tips" of the shaped potstickers get brittle when frozen and will break off when jostled around in the freezer. You can cook the potstickers right from the freezer without thawing but I would add a minute or two to the cooking. This makes these little morsels perfect for a make-ahead holiday appetizer.

Pork Wontons

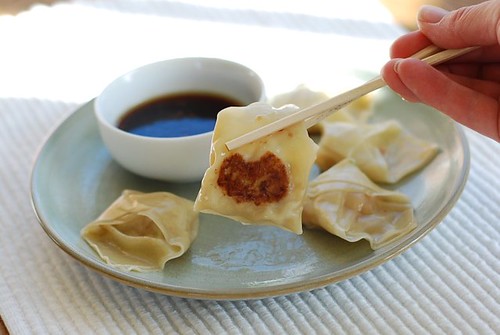
Carefully follow Alton's directions for cooking these and you'll get perfect potstickers with a nicely browned underside. Serve warm with dipping sauce and chopsticks. Delicious!

Pork Wontons

Perfect Potstickers
From Alton Brown's Good Eats, 2004Makes 35 to 40 potstickers

Ingredients
1/2 pound ground pork
1/4 cup finely chopped scallions
2 tablespoons finely chopped red bell pepper
1 egg, lightly beaten
2 teaspoons ketchup
1 teaspoon yellow mustard
2 teaspoons Worcestershire sauce
1 teaspoon light brown sugar
1 1/2 teaspoons kosher salt
1/2 teaspoon freshly ground black pepper
1/4 teaspoon cayenne pepper
35 to 40 small wonton wrappers
Water, for sealing wontons
3 to 4 tablespoons vegetable oil, for frying
1 1/3 cups chicken stock or water, divided (I use water)

Directions
Preheat oven to 200 degrees F.
Combine the first 11 ingredients in a medium-size mixing bowl (pork through cayenne). Set aside.
To form the dumplings, remove 1 wonton wrapper from the package, covering the others with a damp cloth. Brush 2 of the edges of the wrapper lightly with water. Place 1/2 rounded teaspoon of the pork mixture in the center of the wrapper. Fold over, seal edges, and shape as desired. Set on a sheet pan and cover with a damp cloth. Repeat procedure until all of the filling is gone.

Heat a 12-inch saute pan (not a non-stick pan) over medium heat. Brush with vegetable oil once the pan is nice and hot. Just a thim coating of oil is needed. Add 8 to 10 potstickers at a time to the pan and cook for 2 minutes, without touching or moving the potstickers (this is important!). Once the 2 minutes are up, gently add 1/3 cup chicken stock or water to the pan, turn the heat down to low, cover, and cook for another 2 minutes. Remove wontons to a heatproof platter and place in the warm oven. Clean the pan in between batches by pouring in a little water and allowing the pan to deglaze, then wipe clean with a paper towel. Repeat until all the wontons are cooked. Serve immediately.

Soy Ginger Dipping Sauce
from Cooking Light

2 tablespoons rice wine vinegar
2 tablespoons low-sodium soy sauce
1 tablespoon water
1 tablespoon dark sesame oil
1 teaspoon minced, peeled fresh ginger
1/4 tsp crushed red pepper
1 garlic clove, minced

Combine all ingredients, stirring well with a whisk.

Tuesday, October 27, 2009

Chicken Parmesan

Chicken Parmesan

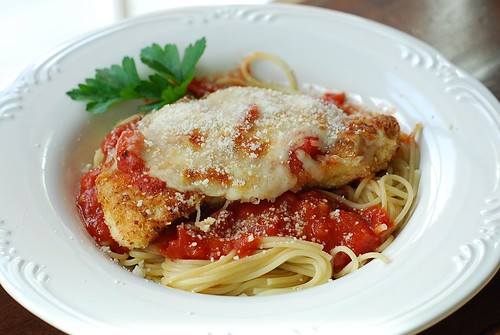
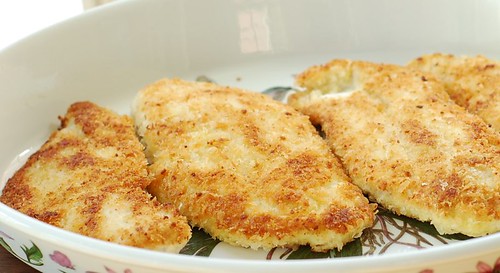
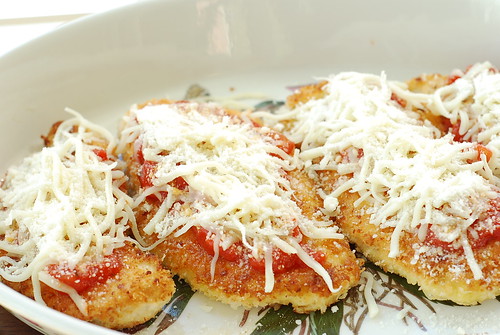
If you are the family cook, you need to have this recipe in your arsenal. It's a family favorite and easy to make. You can substitute your favorite jarred tomato sauce if you prefer, but I encourage you to try this super-easy sauce from scratch, using a large can of crushed tomatoes. Here are the cutlets as they should look after frying...

Chicken Parmesan

Panko breadcrumbs make a huge difference in the breading.  Feel free to use only panko, only fine breadcrumbs, or a combination. I found that the combination works well to get maximum bread crumb coverage. Top the breaded and fried cutlets with a little sauce and some cheese and slide them into the oven to finish off. Serve with a green salad for a delicious and easy weeknight meal.

October 2009 092

Chicken Parmesan
adapted from The New Best Recipe by Cook's Illustrated

For the Tomato Sauce:
2 cloves of garlic, minced
1/4 cup extra virgin olive oil
1 28-oz can crushed tomatoes
1/2 tsp dried basil
1/2 tsp dried oregano
1/4 tsp sugar
1/2 tsp salt
1/4 tsp ground black pepper
For the Chicken Cutlets:
4-6 boneless, skinless chicken breasts, tenderloins removed and reserved for another use
3/4 cup panko Japanese-style bread crumbs
1/4 plain dry bread crumbs
1/4 cup grated Parmesan cheese
1/2 cup all-purpose flour
2 large eggs
olive oil for frying
For Finishing:
3/4 pound spaghetti or linguine
3/4 shredded mozzarella cheese
1/4 grated Parmesan cheese

Heat the garlic and oil together in a large saucepan until the garlic becomes fragrant. Stir in the tomatoes, sugar, and spices and simmer at least 10 minutes. Taste and adjust seasonings if needed. Keep sauce warm until ready to use.

Bring a large pot of water to a boil. Heat oven to 375 degrees F.

Place chicken breasts on a cutting board between two sheets of plastic wrap. Using the smooth side of a meat tenderizer, pound the chicken breasts to an even 1/2 inch thickness. Pat chicken dry with paper towels.

Set up your breading assembly line by lining up three shallow bowls. Place the flour in the first bowl. Whisk the eggs with a splash of water in the second bowl. Mix together the panko, dry breadcrumbs and Parmesan cheese in the third bowl.
Sprinkle the chicken cutlets with salt and pepper, then dip both sides of the cutlets in flour (shake off excess), then dip cutlets in the egg, then into the breadcrumbs, pressing the breadcrumbs on lightly with your hands.

Heat a 12" non-stick skillet over med-high heat with about 3 tablespoons of olive oil until very hot but not smoking (the chicken should sizzle right away after you add them to the pan). Add the chicken cutlets to the pan without crowding them. (You may have to do this in batches, wiping out the pan and adding oil with each batch.) Cook until the cutlets are a deep golden brown, then turn the cutlets over and cook the other side until nice and golden. Add oil if the pan seems too dry. Remove the chicken from the skillet and place in a casserole dish big enough to fit all the cutlets in a single layer.

Add the pasta to the boiling water and cook to al dente.

Top each cutlet with a spoonful of tomato sauce, then some mozzarella cheese, then a sprinkling of Parmesan. Bake in the oven, uncovered, until cheese is melted and beginning to brown, about 10 minutes. Serve on top of, or alongside, the spaghetti and sauce.

Monday, October 5, 2009

Chili-Mac: Perfect Sunday Football Fare


A few weeks ago, my son got the itch for cooking. His sisters had been watching Jon and Kate plus 8...again...and in that episode, Emeril came for a visit. He made this Chili-Mac and I think it made him hungry for it. The boy is always hungry! We Googled the recipe, got all the ingredients at the store and together we made it for dinner.  This would be the perfect make-ahead recipe for a tailgate or Sunday Football game. Before we went to New Jersey, I made this recipe and instead of baking it, I refrigerated it and took it with us. We baked it at the beach and it fed all 16 of us with couple of servings leftover. If you don't have a crowd, you can always freeze the leftovers or cut the recipe in half.

Chili-Mac
from Emeril Lagasse

Ingredients:
2 teaspoons olive oil
2 medium onions small diced, about 3 cups
2 jalapenos, stemmed and minced, optional
1 tablespoon salt, plus more for pasta cooking water
2 pounds extra lean ground beef
5 tablespoons Mexican chili powder (I used about 3 tablespoons)
1 tablespoon Mexican oregano
2 tablespoons minced garlic
1 (28 ounce) can whole plum tomatoes, broken with your hands, with juices
2 cans kidney beans, drained
1 pound elbow macaroni
1 pound medium cheddar cheese (I used a little less)
Sour cream for serving, if desired

Instructions:
Heat olive oil over medium-high heat in a 6-quart soup pot. Add onions, jalapenos (if desired), and 2 teaspoons of the salt and cook until soft, 2 minutes. Add ground beef, chili powder, oregano, and garlic and cook, breaking up any clumps of meat with a spoon, for 5 minutes. Add tomatoes, beans, and ½ cup of water, stir, and bring chili to a boil. Reduce heat to a simmer and cook until thickened to chili consistency, about 20 minutes. Taste and add 1 more teaspoon salt, if needed.
Preheat oven to 400 degrees F.
While the chili is simmering, cook macaroni according to package directions in boiling salted water, drain in a colander, rinse under cool running water and set aside. Grate cheddar cheese and set aside.
Place a 9 x 13.5-inch or other 3-quart casserole dish on a baking sheet. Once chili has finished cooking, fold in the cooked macaroni and 1/3 of the cheddar cheese. Transfer chili-mac to the baking dish and top with remaining cheese. Bake until heated through and cheese is melted, about 10 minutes. Remove from oven and let cool 5 minutes before serving. Serve each portion garnished with a dollop of sour cream, if desired.
Yield: 6 to 8 servings

Thursday, October 1, 2009

A Roadtrip, A Birthday Party and THE Best Marinade for Steak


The roadtrip was from Pittsburgh to Surf City, NJ. My two brothers and I decided we would all try to get together at the house where my parents spend a week each summer and surprise my dad with a surf and turf birthday celebration for his 75th birthday, which is actually today - Happy Birthday Dad! I just love watching the kids play at the water's edge. It was a bit chilly and windy but that didn't stop them from getting soaked. Kids don't care that it's freezing - it's just too much fun. So in the above photo, they are chasing the waves...


And now the waves are chasing them! They could do this all day - all I have to do is sit in my chair and watch all the fun!

We borrowed my in-law's RV for the trip. The house my parents were staying in had one bath and two bedrooms (3 if you count the attic) and there were 16 of us. That RV was a lifesaver! It even had just enough room in the kitchen to assemble this Vanilla Buttermilk Cake with Fudge Icing for my dad's birthday surprise.


The biggest conversation piece was how I cut the cake by cutting a circle in the middle and then slicing pieces all around. The cake is quite tall and cutting it this way makes the pieces more manageable and you don't have the wedges falling apart as you serve the pieces.


The surf and turf birthday menu included lobster, filet mignon, cajun-spiced corn-on-the-cob, baked potatoes with a cheese-broccoli sauce, and a complementary Pinot Giescheno. Don't look for this vintage in the wine shop - my brother made this wine himself and it was perfect. I was in charge of the steaks and turned to THE best marinade for steaks I've ever had. We use this marinade every time we cook steak and ALWAYS get ooohs and ahhhs from our guests and requests for the recipe. This time was no exception.

Use fresh herbs if you can and marinate the steak for at least an hour or two (longer is even better). Grill the steaks to your preferred doneness, a little bit of pink is perfect. The flavor is just incredible - you won't believe the difference it makes!


Garlic and Herb Marinade for Steaks
from Cook's Illustrated May 2003
Makes enough for 2 pounds of steaks
1/3 cup soy sauce
1/3 cup olive oil
3 medium cloves garlic, minced
1 tablespoon minced fresh rosemary
1 tablespoon minced fresh thyme leaves
1 tablespoon dark brown sugar
1 tablespoon tomato paste
1 teaspoon ground black pepper

Combine all ingredients in a bowl and whisk until sugar is dissolved. Place the steaks in a zip top plastic bag and pour marinade over the steaks, making sure all the steaks are covered evenly with marinade. Marinate in the refigerator for at least an hour. Take the steaks out of the refrigerator about 45 minutes before grilling to allow them to warm up a bit. Discard leftover marinade.

Wednesday, July 15, 2009

Barbequed Baby Back Ribs


Our Fourth of July menu included these scrumptious ribs. I used the recipes from The New Best Recipe by Cook's Illustrated and the cooking method described by Hope Studios in her post here. I'm not sure why ribs intimidate me, but this method is so easy that I'll never hesitate to make them again. The rub and sauce recipes make enough for lots of ribs, so I'll be cooking these again before the summer is through. Perfect sides to serve with this are corn-on-the-cob and coleslaw - and maybe some Rosemary Oven-Roasted Potatoes. Happy Grilling!

Dry Rub for Barbeque
from The Best New Recipe by Cook's Illustrated
Makes 1 cup

Mix all of the following ingredients in a small bowl.
1/4 cup sweet paprika
2 T chili powder
2 T ground cumin
2 T dark brown sugar
2 T salt
1 T dried oregano
1 T granulated sugar
1 T ground black pepper
1 T ground white pepper
1-2 teaspoons cayenne pepper

Quick Barbeque Sauce
from The Best New Recipe by Cook's Illustrated
Makes 1 1/2 cups

1 medium onion, peeled and quartered
1/4 cup water
1 cup ketchup
2 T cider vinegar
2 T Worcestershire sauce
2 T Dijon mustard
5 T molasses
1 tsp hot pepper sauce
1/4 tsp ground black pepper
1 1/2 tsp liquid smoke, optional (I omitted)
2 T vegetable oil
1 medium garlic clove, minced
1 tsp chili powder
1/4 tsp cayenne pepper

1. Process the onion with the water in a food processor until pureed and the mixture resembles slush, about 30 seconds. Strain the mixture through a fine-mesh strainer into a liquid measuring cup, pressing on the solids with a rubber spatula to obtain 1/2 cup juice. Discard the solids.
2. Whisk the onion juice, ketchup, molasses, vinegar, Worcestershire, mustard, liquid smoke (if using), hot pepper sauce, and black pepper together in a medium bowl.
3. Heat the oil in a large nonreactive saucepan over medium heat until shimmering but not smoking. Add the garlic, chili powder, and cayenne and cook until fragrant, about 30 seconds. Whisk in the ketchup mixture and bring to a boil; reduce the heat to medium-low and simmer gently, uncovered, until the flavors meld and the sauce is thickened, about 25 minutes. Cool the sauce to room temperature before using. (The sauce can be refrigerated in an airtight container for up to 1 week.)

The Cooking Method
adapted from Jennifer at Hope Studios

Place about 1 T of dry rub on each side of the baby back ribs and rub it in with your fingertips. Wrap the ribs tightly in heavy duty foil and refrigerate at least one hour or overnight. Bake the ribs in foil in the oven set at 325 degrees F for 2 1/2 hours. Remove from oven and place on your grill set at medium heat for 20 minutes. Brush with barbeque sauce and cook another 5 minutes on each side. Serve with extra BBQ sauce.

LinkWithin

Related Posts Widget for Blogs by LinkWithin