Showing posts with label Ice cream. Show all posts

Saturday, October 5, 2013

Butterscotch Pecan Ice Cream


It's October and we're having a heat wave!  I love it, but my kids are ready for it to be cool and fall-like.  Of course, it doesn't need to be hot to enjoy delicious ice cream.

This is butter pecan ice cream with a twist - the scotch whiskey added to this recipe gives the ice cream a grown-up flavor which is hard to resist.   I think this ice cream would pair well with a fall dessert like spice cake or pumpkin pie.  Hot weather or not, you should try this ice cream!


Butterscotch Pecan Ice Cream
from The Perfect Scoop by David Lebovitz

5 Tablespoons butter
3/4 cup packed dark brown sugar
1/2 teaspoon coarse salt
2 cups heavy cream
3/4 cup whole milk
6 large egg yolks
1/2 teaspoon vanilla extract
1 tablespoon scotch whiskey (optional, or use a little less to taste)
Buttered Pecans, coarsely chopped (recipe follows)

Melt the butter in a saucepan, stir in brown sugar and salt, then whisk in 1 cup of the cream and the milk.  Warm the mixture and pour the remaining cream into a large bowl and set a mesh strainer on top.

In  separate bowl, whisk together the egg yolks.  Ladle about half of the warmed sugar mixture into the egg yolks while whisking constantly.  Scrape the egg mixture back into the saucepan and heat the mixture while stirring constantly until the mixture thickens and coats the spoon.  Pour the custard through the strainer and stir it into the cream.  Add the vanilla and scotch and allow to cool.  Chill the mixture in the refrigerator for at least 3 hours.  Freeze the chilled custard in an ice cream machine and during the last few minutes of churning, add the buttered pecans.

Buttered Pecans

1 1/2 tablespoons butter
1 1/2 cups pecan halves
1/4 teaspoon coarse salt

Preheat the oven to 350 degrees F.  Melt the butter in a skillet.  Remove from heat and toss the pecans with the butter and sprinkle with the salt.  Spread the pecans on a baking sheet and bake for 10-12 minutes, stirring halfway through baking.  Remove from oven and let cool.


Sunday, January 6, 2013

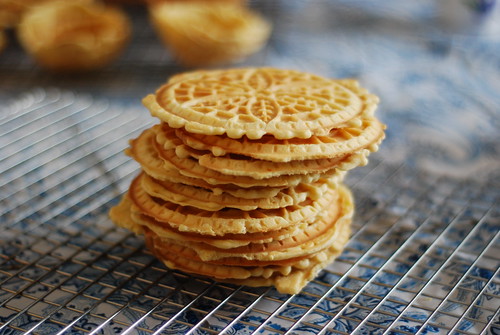
Pizzelles and Making Ice Cream Cups

DSC_0401

I'm getting ready to show you my temporary kitchen, but before I do that, I'd like to share with you a cookie that requires NO oven - the pizzelle!  My daughter missed having pizzelles at Christmas this year, so we spent a little time yesterday making them.

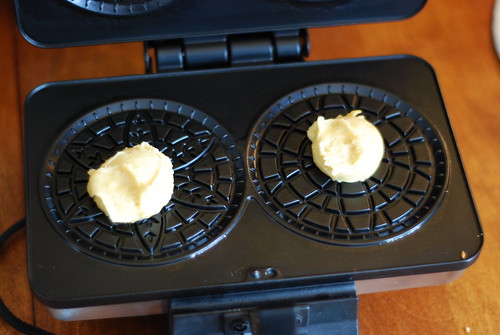
The only caveat is that you need a pizzelle iron, or ice cream cone maker.  Pizzelle irons make small 4" rounds and ice cream cone makers make 7" rounds.  Otherwise they are essentially the same thing.  For this recipe it is also useful to have a small cookie scoop for portioning the batter.

DSC_0396

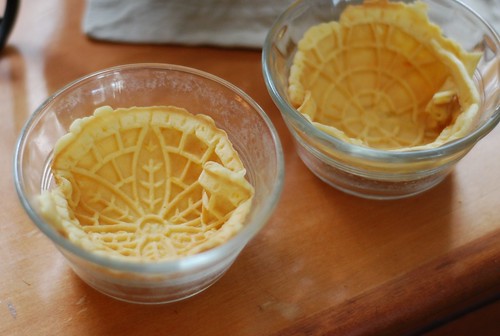
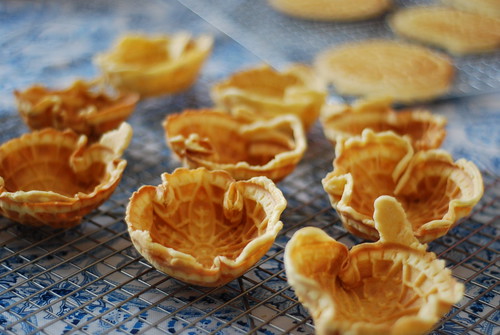
I liked the idea of having these cookies with ice cream, but the rounds were too small to make cones so we improvised a bit and made small ice cream cups.  I used small custard cups to mold them, but you could use a bigger bowl like a cereal bowl or even drape the cookie over the bottom of the upside-down bowl to make bigger, wider cups.   The trick is to immediately place the warm cookie right from the iron into the bowl.  Keep the bowls next to the iron and don't hesitate, because as soon as the cookies cool for a few seconds, they get crispy and are unable to press into the bowl without cracking.

Pizzelle Bowls

After the cups cool, they will hold their shape.  You can change the flavorings in the recipe to suit your taste and to suit the ice cream flavors and toppings you will serve it with.  For eating just plain cookies, I like to use anise and vanilla extracts with lemon and orange zests.  The anise is not at all overpowering and it will smell stronger in the batter than it will in the finished cookie.  For eating with vanilla ice cream, strawberries and chocolate sauce like we did, you might want to omit all flavorings except the vanilla so the flavors don't compete.  These little cups take your ice cream dessert to a whole new level and provides an impressive presentation with very little effort - and without turning on your oven!

DSC_0399 

Pizzelles
Makes about 20-25 cookies

3/4 cup sugar
1/2 cup unsalted butter, melted and cooled slightly
3 eggs
1 tsp anise extract
zest of 1/2 a lemon
zest of 1/2 an orange
1 T vanilla
1 1/2 cups flour
1 1/2 tsp baking powder
1/4 tsp salt

Whisk together the flour, baking powder and salt and set aside.  Cream together the sugar and melted butter.  Add the eggs, one at a time, and mix well.  Add the extracts and zests.   Add the flour mixture and stir until just incorporated.  Scoop batter onto pizzelle iron with a small cookie scoop or according to your pizzelle maker's instructions and bake until golden.  Transfer to a cooling rack.  Cookies will become crispy as they cool.

If shaping your pizzelles into bowls, immediately place the hot pizzelle into a bowl, pressing very gently, but working very quickly before the cookie has a chance to cool.  Let cool in the bowl before removing.  Store cooled pizzelles in an airtight container up to 5 days.

Friday, April 1, 2011

Gianduja-Stracciatella Gelato


Gianduja-Stracciatella Gelato...say that three times fast! I would myself, except I have to look up how to pronouce gianduja first...and google says you pronounce it john-DOO-yah or zhahn-DOO-yah to be more Italian-esque.

Now on to vocabulary...

Gianduja - is simply chocolate (usually milk chocolate) combined with hazelnut paste most commonly, but any nut paste can be used. Nutella, the original gianduja, is spreadable, but you can also find it in a solid block form as well, like this one from Callebaut 

Stracciatella - the super-thin chocolate "chips" in ice cream produced by pouring melted chocolate in a thin stream into the ice cream machine at the very end of the churning period. The stream of chocolate instantly freezes into very thin chocolate pieces which readily melt in your mouth, giving a burst of chocolate flavor in each spoonful.

Gelato - refers to Italian-style ice cream which has less milkfat, less air incorporated into it, and is stored and served at a slightly higher temperature than ice cream so that it is softer and more dense. The lower milkfat is achieved by using a higher ratio of milk to cream than full fat ice creams. Cream can mute the flavors in ice cream, so gelato is thought to allow the flavors to be experienced more fully. High milkfat ice creams can also leave an undesirable film in the mouth after the bite has been swallowed. I'm not sure if this recipe is officially a gelato, as it has more cream than other recipes I've seen for gelato. Looks like I'll have to make a few more gelatos for the sake of research. (drats!)

This gelato/ice cream is full of chocolatey goodness with a hint of hazelnuts, and a subtle crunch from the stracciatella and hazelnut paste, but I still found myself wanting a stronger hazelnut flavor. The next time I make this, I might try to use Nutella instead of the chocolate and hazelnuts to make the recipe a little easier, or make a Nutella Stracciatella - now say that 3 times fast!

Gianduja-Stracciatella Gelato
from The Perfect Scoop by David Lebovitz

1-1/2 cups (185 grams) toasted hazelnuts

1 cup (250 ml) whole milk

2 cups (500 ml) heavy cream

3/4 cup (170g) sugar

1/4 tsp coarse salt

4 oz milk chocolate (at least 30% cacao solids), chopped

5 large egg yolks

1/8 tsp vanilla extract

For the Stracciatella:
5 ounces semi-sweet chocolate, finely chopped (not chocolate chips)

1. Toast the hazelnuts in a 350 degree oven for 10 minutes, until fragrant and lightly toasted. Place them in a kitchen towel after roasting to remove as much of the papery skin as possible. Discard the skins. Chop the hazelnuts in a food processor or blender until finely chopped.

2. Warm the milk with 1 cup of the cream, sugar, and salt in a saucepan. Once warm, remove from heat and add the chopped toasted hazelnuts. Cover and let steep for 1-1/2 hours.

3. Put the milk chocolate pieces in a large bowl. Heat the remaining 1 cup of cream in a medium saucepan until it begins to boil. Pour the cream over the milk chocolate pieces and stir until the chocolate is completely melted and smooth. Set a mesh strainer over the top of the bowl.

4. Pour the hazelnut-infused milk through a strainer into a medium saucepan. Squeeze the nuts with your hands to extract as much of the flavorful liquid as possible. Discard the hazelnuts.

5. Rewarm the halzenut-infused mixture. In a separate bowl, whisk together the egg yolks. Slowly pour the warm hazelnut mixture into the egg yolks, whisking constanly, then scrape the warmed egg yolks back into the saucepan.

6. Stir the mixture constanly over medium heat with a wooden or heatproof plastic spatula, scraping the bottom as you stir, until the mixture thickens and coats the spatula. Pour the custard through the strainer and stir it into the melted milk chocolate. Add the vanilla and stir until cool over an ice bath.

7. Chill mixture thoroughly in the refrigerator, then freeze in your ice cream maker according to the manufacturer’s instructions.

8. While the ice cream is freezing, melt the chocolate in a heat-proof bowl over a pan of simmering water or in the microwave, stirring every 30 seconds until melted. At the end of the ice cream churning, pour the melted chocolate directly into the ice cream machine in a thin stream.

8. Serve immediately for a soft, smooth gelato or place gelato in a container and freeze for several hours for a firmer gelato.

Makes about 1 quart of gelato

Friday, August 20, 2010

Peppermint Brownie Chunk Ice Cream


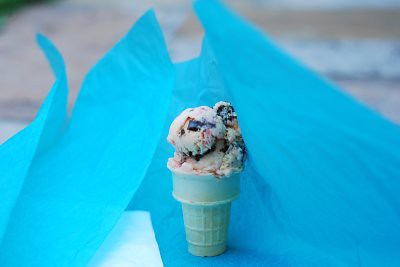
Eating ice cream in August - easy. Photographing ice cream in August - not so easy. Allow me to paint the picture for you...

It's 88 degrees and the light is best outside, but I've got a plan.
I scoop out the ice cream and place it just so in the cone and then place it very carefully back in the freezer.
I set up the backdrop, in this case a piece of colorful tissue paper. I take the cone out of the freezer and to the back yard to photograph. But what's happening? My camera is not working as it should! I mess around with the settings for what seems like an eternity and finally fix the problem (don't ask me which button I pushed) and now the ice cream is melting and dripping all over. gah!

Back to the freezer. Dish out another cone, ignore the oven timer as it starts ringing, take the cone outside, cover up the drippings with a white napkin, and shoot. I snap a few pictures and things are going fine - the ice cream is starting to melt, but it's not major. Then a breeze blows the tissue paper around and I start to panic that the cone will tip, but the cone stood still and suddenly I have the Marilyn Monroe shot of ice cream. Cool.

Peppermint Brownie Chunk

I think peppermint ice cream might be my favorite flavor - you know, the kind with little bits of crunchy peppermint candy throughout? It's hard to pick a favorite ice cream flavor, but I think peppermint might be it for me.

I have really good memories of eating some delicious peppermint ice cream in Annapolis at the harbor when we sailed there on my dad's boat. That was maybe 25 years ago? Is that even possible? Man, I feel old.

Anyway, it's been too long! I had this idea to make peppermint ice cream with those fudgy brownies that I talked about the other day. The combination was wonderful! And I only spent about 5 minutes searching for the candy canes that I hauled from the old house to the new house (a true miracle considering I've been looking for my stick blender for days now...)

The cream-colored ice cream base (made with egg yolks) mixed with red candy canes, made the ice cream sport a bit of a peachy hue. This confused the troops when I asked them to fetch the peppermint ice cream from the freezer. "Mom, I can't find it! All I see is this orange stuff!" Ok then...

I'll tell you the troops didn't mind the orange color after they took a taste. It was pronounced the best ice cream yet!

The fudgy brownies stayed chewy in the ice cream and when combined with the cool crunch of peppermint, this made for the perfect combination of rich and refreshing! Did I mention that eating ice cream in August is easy? oh yeah!

Peppermint Brownie Chunk Ice Cream
adapted from Christmas Sweets by Georgeanne Brennan via Cookstr

2 cups heavy cream
2 cups whole milk
3/4 cup granulated sugar
1/4 tsp salt
4 egg yolks
1 teaspoon peppermint extract
4 ounces hard peppermint candies, or about 6 candycanes, crushed into small pieces
about a cup or so of chopped brownies (mine were frozen)

In a medium, heavy saucepan, combine the cream, milk, sugar, and salt. Cook over med-high heat, stirring often, until the sugar has dissolved and the mixture is hot but not boiling.

In a medium bowl, whisk the yolks until their color lightens to a lemon color. Whisk the egg yolks while gradually adding about 1 cup of the hot milk into the yolks. Then whisk the hot milk while pouring the yolk mixture back into the hot milk mixture. Continue to cook and stir constantly until the mixture thickens enough to coat the back of a spoon.

Pour the mixture through a strainer into a container with a lid. Refrigerate for 3 or more hours. Add the peppermint extract and mix to combine.

Freeze the mixture in an ice-cream maker (mine took about 20 minutes). The ice cream will be frozen but very soft. Add the crushed peppermint candies and the brownie pieces and stir to combine. Transfer to a container and freeze until hardened, about 4 hours.

Monday, June 21, 2010

Mint Bliss Ice Cream with Mint Ganache Sauce

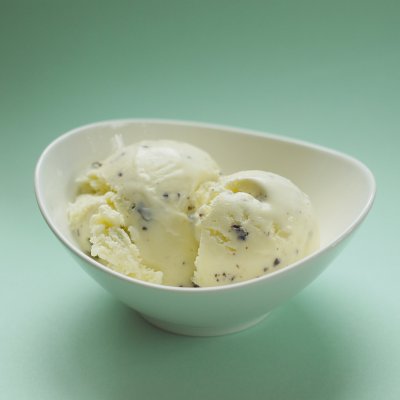
Mint Bliss Ice Cream

Homemade mint ice cream...

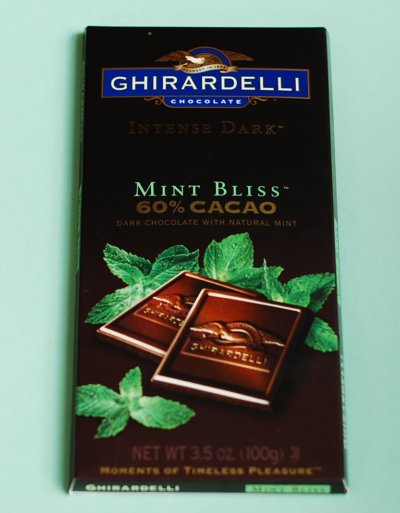
Mint Bliss

...a chopped Mint Bliss chocolate bar...


...and a ganache sauce with creme de menthe...pure heaven!

Mint Chip Ice Cream
from Alton Brown courtesy of The Food Network

3 cups half and half
1 cup heavy cream
8 large egg yolks
9 ounces sugar
1 teaspoon pure peppermint extract
3 ounces chopped Ghirardelli Mint Bliss chocolate, or Andes candies, or semisweet chocolate chunks

Place the half-and-half and the heavy cream into a medium saucepan, over medium heat. Bring the mixture just to a simmer, stirring occasionally, and remove from the heat.

In a medium mixing bowl whisk the egg yolks until they lighten in color. Gradually add the sugar and whisk to combine. Temper the cream mixture into the eggs and sugar by gradually adding small amounts, until about 1/3 of the cream mixture has been added. Pour in the remainder and return the entire mixture to the saucepan and place over low heat. Continue to cook, stirring frequently, until the mixture thickens slightly and coats the back of a spoon and reaches 170 to 175 degrees F. Pour the mixture into a container and allow to sit at room temperature for 30 minutes. Add the peppermint extract and stir to combine. Place the mixture into the refrigerator and once it is cool enough not to form condensation on the lid, cover and store for 4 to 8 hours or until it reaches 40 degrees F or below.

Pour the mixture into an ice cream maker and process according to the manufacturer's directions. This should take approximately 25 minutes. In the last minute or so of freezing, add the chopped chocolate to the ice cream machine. Serve as is for soft serve or freeze for another 3 to 4 hours to allow the ice cream to harden.


Mint Chocolate Ganache
from Baked: New Frontiers in Baking by Matt Lewis and Renato Polafito

6 Ounces / 170g Dark Chocolate (60 to 72% Cacao), coarsely chopped
1/2 Cup Heavy Cream
1 Tblsp Creme de Menthe
1/2 Tsp Peppermint Extract

1. Put the chocolate in a medium bowl and set aside. Bring the cream just to a boil and pour over the chocolate. Let the mixture sit for 2 minutes before gently mixing the chocolate and cream together until emulsified. Add the flavorings and stir to combine.

2. Mix for a couple more minutes to help cool then let the ganache sit for about 15 minutes.

3. If the ganache has cooled enough to become solid, microwave (for only a few seconds) or gently heat the ganache until pourable.

4. Drizzle over Mint Bliss ice cream.

Tuesday, August 4, 2009

Strawberry Sour Cream Ice Cream


Got extra strawberries? Try this recipe for Strawberry Sour Cream Ice Cream from David Lebovitz' Perfect Scoop. It's perfectly refreshing and slightly tangy.


Strawberry Sour Cream Ice Cream
from The Perfect Scoop by David Lebovitz

1 pound fresh strawberries, rinsed and hulled
3/4 cup sugar
1 tablespoon vodka or kirsch
1 cup sour cream
1 cup heavy cream
1/2 teaspoon freshly squeezed lemon juice

Slice the strawberries and toss them in a bowl with the sugar and vodka or kirsch, stirring until the sugar begins to dissolve. Cover and let stand at room temperature for 1 hour, stirring occasionally.

Pulse the strawberries and their liquid with the sour cream, heavy cream, and lemon juice in a blender or food processor until almost smooth but still slightly chunky.

Refrigerate for 1 hour, then freeze in your ice cream maker according to the manufacturer's instructions.

Transfer to a container and freeze to harden the ice cream further.

Thursday, July 30, 2009

I'm Now The Parent of a Teenager and Frozen Mocha Toffee Crunch Terrine


Yes, she's 13! Our firstborn is now a teenager! Another milestone has been reached and, as usual, I have mixed emotions. I'm so proud that she's becoming a compassionate and responsible young lady, but at the same time I don't want her to grow up. And just being honest here, I'm scared of what these teenage years will bring. Everyone always says how hard it is. But every day I look at her and can't believe that she's as tall as I am and now owns her own cell phone! Yes, she is now one of those "texting teens".


I will never forget the day our baby Ellen Rose was born. We tried for 3 weeks to keep her from being born so early, but she just couldn't wait. The doctors gave me every nasty drug possible to keep her inside, but alas, I was only 6 months pregnant and she was only 2 pounds 15 ounces when she arrived in this world. She spent almost 9 weeks in the hospital, growing and becoming stronger each day. She was barely 5 pounds when we brought her home, heart monitor and all. So where did the past 13 years go? It all seems a blur now...


So fast forward 13 years and let's talk about food! Ellen saw this frozen dessert on the cover of an old Everyday Food magazine I picked up from a yard sale. She loves mocha and she loves chocolate and she loves toffee, so what could be better to make for her birthday celebration? I didn't even have to turn the oven or the stove on to make this one (Bonus!). So while Ellen was at the Jonas Brothers concert, I was at home making her birthday dessert. By the way, in case you didn't know, Ellen LOVES Nick! He was born in New Jersey, he lives in Dallas, and his birthday is September 16. If you need to know more Nick Jonas trivia, my daughter is the one to call -I mean text.

Frozen Mocha Toffee-Crunch Terrine

Adapted from Martha Stewart's Everyday Food Magazine

19 chocolate wafer cookies (I used Oreo Cookies with filling removed)
11 ounces mascarpone or cream cheese, or a combination
1/2 cup sugar
1 tablespoon vanilla extract
1 1/4 cups heavy cream
1/2 cup toffee bits (I used 2-3 chopped Heath bars)
1/3 cup semisweet chocolate, chopped, melted and cooled
1 tablespoon unsweetened cocoa powder
2 tsp espresso powder


Line a 9-by-5-inch loaf pan with 2 sheets of plastic wrap, with long sides overhanging by about 3 inches. (I would probably try waxed or parchment paper cut to size to avoid the wrinkles in the final product that the plastic caused.) Arrange 3 wafers, flat side up, in a row in the bottom of the pan.
In a large bowl, beat mascarpone and sugar until light and fluffy. Stir in vanilla. In another bowl, beat cream until it holds soft peaks. In three additions, fold the whipped cream into the sweetened mascarpone with a rubber spatula.
In a bowl, mix 1 1/3 cups mascarpone mixture with toffee bits. In a separate bowl, mix another 1 1/3 cups mascarpone mixture with chocolate and cocoa powder. Dissolve the coffee in 1 teaspoon hot water; stir into the remaining mascarpone mixture.
Spread coffee mixture in prepared pan. Cover with 8 wafers, overlapping if necessary. Spoon chocolate mixture into pan; cover with 8 wafers. Spoon toffee mixture into pan.
Wrap pan with overhanging plastic; freeze at least 4 hours and up to 2 weeks. To serve, invert onto a serving platter. Remove plastic. Let terrine sit 5 minutes, then cut into slices.

Tuesday, March 3, 2009

Rice Gelato


Nevermind that it's 20 degrees outside - I'm making ice cream! This recipe is from The Perfect Scoop by David Lebovitz. It's a gorgeous cookbook with all the traditional ice creams and sorbets. Some, however, are more unusual, like this recipe. It's essentially a frozen rice pudding. I wasn't sure if I liked it better than rice pudding at first, until I sprinkled a little cinnamon on top, and then it started to grow on me. I bet I'd like it even better if it were 80 degrees outside and not a bitter 20!

Rice Gelato
from The Perfect Scoop by David Lebovitz

1/2 cup arborio rice
3 cups whole milk
3/4 cup sugar
pinch of salt
1 vanilla bean, split in half lengthwise
two 1-inch wide strips of orange zest
5 large egg yolks
1 cup half-and-half or cream
pinch of freshly grated nutmeg

To cook the rice, preheat the oven to 350 degrees F. In a 2-quart baking dish, stir together the rice, milk, 1/4 cup of the sugar, and the salt. Add the vanilla bean and strips of orange zest. Cover the dish snugly with aluminum foil and bake for one hour.
Remove the rice from the oven and remove the foil. Stir in the remaining 1/2 cup sugar, then continue to bake the rice, uncovered, for another 30 minutes, until it is tender. There should be about 1/2 inch of milk covering the rice.
Remove the rice from the oven, remove the vanilla bean and orange zest, and briskly whisk in the egg yolks all at once. Then whisk in the half-and-half and nutmeg.
Puree half of the rice mixture in a blender or food processor until chopped quite fine, then stir it back into the cooked rice.
Chill the mixture thoroughly in the refrigerator, then freeze it in your ice cream maker according to the manufacturer's instructions.
(The ice cream is hard to scoop right out of the freezer, so I place the container in the microwave for a few seconds, until it is scoopable. This also softens the grains of rice for a little yummy chewiness.)

Tuesday, April 15, 2008

Madison's Ice Cream Parlor


Don't these ice cream cones look yummy? Annie's best friend Madison made these a few days ago on a warm early Spring day with only one ingredient - chalk!

Her artwork was the inspiration for this raspberry frozen yogurt.  This was my first attempt to make frozen yogurt and it was really good! It is much easier to make than traditional custard-type ice cream. The flavor is a little tangier- and we all enjoyed it.  You can adjust the amount of sugar in the recipe according to your tastes.  Use the best organic whole milk yogurt you can find, or make your own.


Raspberry Frozen Yogurt
adapted from 101cookbooks.com
makes about 1 quart

3 cups (720g) strained yogurt or Greek-style yogurt (see note below)
3/4 cup (150g) sugar
1/2 cup raspberry puree
1 teaspoon vanilla extract

Mix together the yogurt, sugar, raspberry puree and vanilla (if using). Stir until the sugar is completely dissolved. Refrigerate 1 hour, then freeze in your ice cream maker according to the manufacturer's instructions.  Transfer to a container and freeze to harden the ice cream further if desired.

Note:   If you are starting with standard yogurt, it will need to be strained.  Line a sieve with cheesecloth and set it over a bowl.  Fill the lined sieve with yogurt, cover and let sit for several hours in the refrigerator, or until desired thickness is achieved.  The whey will separate from the yogurt and collect in the bowl.  I like to save the whey in a jar and add to smoothies for a probiotic boost.  You will need about 5-6 cups of yogurt to get 3 cups of the strained yogurt needed for this recipe

LinkWithin

Related Posts Widget for Blogs by LinkWithin