Saturday, December 15, 2012
Goodbye Old Kitchen
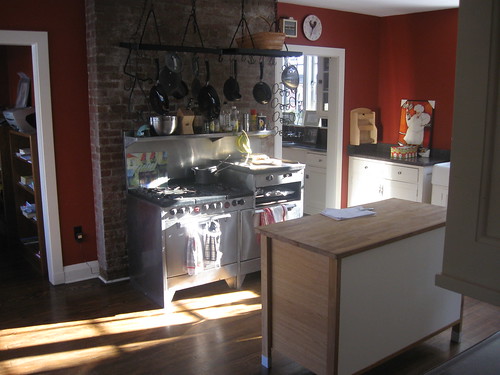
Take a look inside my old kitchen. Above is a photo I took before we bought the house. The owners had a small island in the center. The family had already moved out, so everything was pretty barebones.
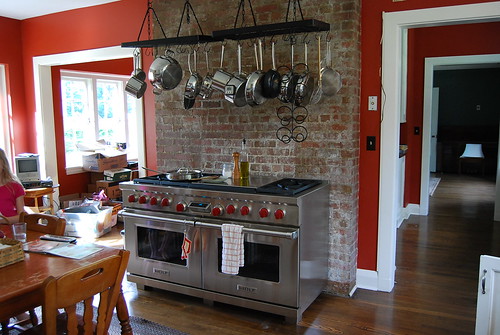
After we moved in, the first thing I did was replace the range. The old Magic Chef was a classic, but knobs were missing and it was in pretty bad shape - and not what I needed for all the baking I do. I love everything about my Wolf range!
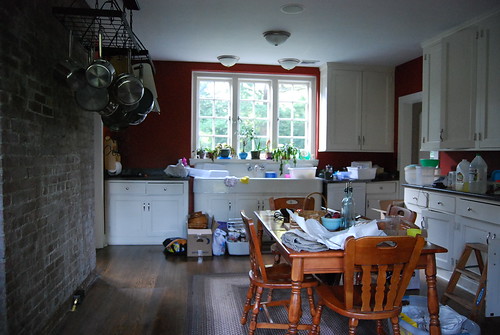
Above is a photo of the kitchen while we were moving in (two and half years ago). We think the cabinets are original to the house, which means they are 80 years old. They held up pretty well considering their age, but most of the doors were warped and wouldn't close completely and many of the drawers were broken or didn't slide well anymore.
The lighting was simply awful! So many times I looked up to the ceiling to see if the lights were on. They were - it was just so dark! Fortunately during the daytime, there is a lot of natural light coming in from both sides of the room.
The one thing I came to love was the old enamel farmhouse sink. The faucet dripped but I loved the large bowl with drainboards on both sides. I love to look out on the back garden when I wash the dishes (which is quite often).
Still unpacking...to the left of the range, I made my office in a small alcove. Anyone in the market for a metal green ivy chandelier? I'm sure that would be right up someone's alley - it's just not my style. I have to say, it provided some much needed carryover light into the kitchen, so I was grateful for it.
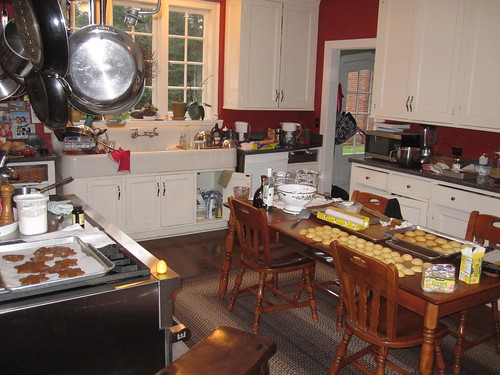
Here's the old kitchen in action. Hey, just keepin' in real - this was Dec 23rd of last year and I had orders to fill - making trifles and orange cookies, and gingerbread cookies - things were crazy that day!
Perhaps you've been wondering if I dropped off the face of the earth - well there's not much baking going on here lately, and therefore not much to blog about because...
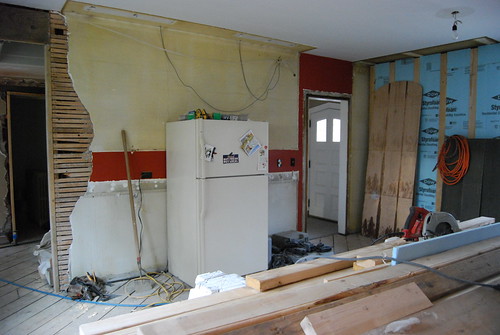
...here's my kitchen today - completely gutted! To the right of the window you can see where the door to the outside used to be. It now leads into the new the family room. The new addition was phase one and its progression is ahead of the kitchen (phase two). It's all very exciting!
Above is where the range was. We are keeping the brick wall exposed and the range will have a home there once again.
In this photo, you can see how the walls were constructed. The walls are hard as rock, which is why the contractor decided to keep them mostly intact and build over them.
Above and below are photos of the space that used to be my office. We have great plans for this space, but you'll have to check back to see what we do with it! My new office will be in a separate room just off the kitchen.
Did I mention that we're living in the house during all this construction? Most of my living is done just on the other side of that very thin piece of plastic over the doorway. There's noise (sometimes so loud you can't hear yourself talk) from 7 am sharp to 3:30. Somehow I've managed not to lose it, although I've had moments of temporary insanity. In my next post, I'll show you my temporary kitchen set-up!
Thursday, September 20, 2012
Rome Cooking Class Part 2: View from the Rooftop and Fried Pizza Dough with Tomato-Basil Dipping Sauce
The hands-on cooking portion of our class in Rome was held at the gorgeous private apartment of chef Violetta. After climbing up the winding and narrow stairs to the 3rd story of the building, we were led into her beautiful apartment and out to one of her rooftop patios. This patio you see in the photo above was draped with flowy white linens to tame the hot sun and lined with pots and pots of lavender and rosemary and small citrus trees.
Looking out from the patio, we were surrounded by views of cathedrals and buildings, many with their own rooftop gardens. It was hard to believe that we were in the heart of the city because it seemed so peaceful there.
Back inside the kitchen, Violetta fried some pizza dough which she had purchased from a pizza shop and served it with a delicious chunky tomato basil dipping sauce. So simple, yet so delicious. It was probably my favorite of all the delicious things we ate that day.
I couldn't wait to reproduce it at home because I knew the kids would love it. I also wanted to make it when the tomatoes were at their prime and fresh basil was abundant in the garden, and that is right now - so there was no delaying! Of course you can also buy pizza dough already made from your local pizzeria, but you can also easily make it yourself with the recipe below or use your favorite pizza dough recipe. The tomatoes in the dipping sauce should be of the small sweet variety and do not need to be peeled or seeded. Try this appetizer and you can imagine that you are in the heart of Italy, eating a specialty of Rome!
Neo-Neopolitan Pizza Dough
adapted from American Pie by Peter Reinhart
Makes 2 10-inch pizzas or about 24 fried pizza balls
2 1/2 cups all purpose flour
1 1/2 Tablespoons honey or sugar
1 teaspoon sea salt
1/2 teaspoon instant yeast
1 Tablespoon olive oil
7/8 cup room-temperature water
Peanut or vegetable oil for frying
Combine flour, salt, and yeast in a mixing bowl. Combine the honey, olive oil, and water in a cup and add to the flour mixture. Stir with a wooden spoon until combined. Set the dough aside to rest for 5 minutes.
Turn dough out onto work surface and knead for 5-10 minutes, adding more flour if necessary to keep the dough from sticking too much. Or knead using the dough hook in your mixer bowl. Generally speaking, you want the dough to be wetter and stickier than your typical bread dough. It should be dry enough that it holds together and pulls away from the side of the bowl when you mix it, but it will still be a bit sticky.
Place the dough in an oiled bowl, turning the dough so that the oil is on all sides of the dough and cover with plastic wrap. Let the bowl sit at room temperature for 15 minutes, then refrigerate overnight. If you want to make the fried dough that day, then let the dough sit at room temperature one hour and then refrigerate at least two hours. Remove the dough from the refrigerator two hours before using. The dough can sit in the refrigerator up to two days or placed in an oiled tiptop baggie and frozen for up to 3 months.
Heat 3 inches of oil to 350 degrees F in a pot (I used a small pot and therefore less oil). Break off golf ball-sized rounds of dough and drop the dough into oil and fry on both sides until golden brown. Remove with a slotted spoon onto a paper towel-lined plate. Serve warm or at room temperature with dipping sauce.
Tomato-Basil Dipping Sauce
Makes enough for 24 Pizza dough balls or one recipe of the above dough
1/4 cup extra virgin olive oil
2 cloves garlic, crushed with the side of a knife, but still whole
2 pints small sweet plum tomatoes, chopped
salt and pepper to taste
About 20 small fresh basil leaves, preferably torn, not chopped, into small pieces
Heat olive oil in a sauté pan with the garlic until the garlic is fragrant but not browned. Remove the garlic and discard it. Add the tomatoes and salt and pepper and simmer until thickened to desired consistency. Remove from the heat and add the basil leaves. Serve warm or at room temperature.
Monday, September 3, 2012
Rome Cooking Class Part One: Campo Di Fiori
During our visit to Italy, one of the highlights was a cooking class that was arranged for our group. The class included a walk around the Campo di Fiori, a well-known produce market in the heart of Rome, to choose our fresh ingredients for the class. We then took a short walk to the chef's personal home where we learned to make a fresh tomato compote with fried pizza dough, an eggplant cake, and a raspberry tart before sitting on the rooftop patio to eat lunch and enjoy the spectacular view.
I will share the recipes and photos of the class in the upcoming days, but first enjoy the rainbow of colors we saw at the Campo Di Fiori. We cooked with local, in-season ingredients which we found in abundance at the market. In Rome, late summer is the season for figs, eggplant, tomatoes and peaches (much like it is here in Pennsylvania). The market was small compared to the huge markets of Istanbul, but you could find everything you needed to make a delicious Italian meal.
You could find dried pastas of every shape and color, olive oils, spices and Italian cookies. Surrounding the temporary stalls of produce are small specialty shops where they sell delicious meats and cheeses, and other items for cooking. I picked up some figs (green and brown for taste testing), balsamic vinegar, soft amaretti cookies, Acacia honey, a bag of lentils and some dried borlotti beans to bring home.
My suitcase was filled with things for the kitchen! The airline security in Chicago didn't like the looks of my lentils and beans and pulled me aside to test the packages for traces of chemicals and ran them through the security x-ray twice. Finally they determined that the lentils were safe and we were on our way home. I guess I just need to decide what I want to make with my imported ingredients! I'd love any suggestions you might have!
Tomorrow I will share a simple and fantastic appetizer recipe we learned at the class!
Tuesday, August 21, 2012
Back to School Cookies
Are you ready for school?
We've got a short two weeks left and we are making the most of it. I've been waiting all summer for our trip to Tuscany (Siena) and Rome, Italy. Mark is in Siena now and the way he describes it makes me think I may not want to come back! - olive groves, 700-year-old architecture, and pain au chocolat for breakfast. I'll be joining him tomorrow. Here's a photo of Siena...
I'll tell you all about it when I get back!
Enjoy the rest of your summer!
Friday, July 20, 2012
Christening Cake with Sleeping Lamb and Baby Blocks
This is a cake I made for a baby boy's Christening. I sculpted the lamb out of marshmallow fondant mixed with a little tylose powder so that it would harden when dry. To make the lamb's wool I rolled out little ropes of fondant, then rolled them into swirls and attached them with a little water. The black details are Americolor edible marker.
I printed out the letters and numbers onto paper in the chosen font, set the paper over the strip of fondant, and used a pin to mark where the letters should go. Then I piped the letters with royal icing, using the pin marks as a guide. It worked like a charm!
The blocks are solid marshmallow fondant with royal icing letters. I weighed the fondant on a scale so that each block would be the same size, then molded them into shape (not as easy as you might think!) Next time, I would insert wooden skewers into the cake and then place the blocks onto the skewers to give the blocks a bit more support. I also would have rolled the fondant a but thicker to make it more opaque. Every project is a learning experience!
Tuesday, July 17, 2012
Pink and Orange Graduation Dessert Table
I just love this pink and orange dessert table. The colors just pop against the white icing and the hot pink tablecloth.
There were lemon cupcakes with vanilla buttercream, red velvet cupcakes with cinnamon-vanilla buttercream, chocolate cupcakes with vanilla buttercream, and brownie pops - a lot of them!
It didn't hurt that the weather was simply gorgeous that day!
Here are some behind the scenes pics of the finished pops.
And my snapware cupcake carriers from Costco came in mighty handy once again. Costco doesn't have them anymore, but I think Martha Stewart has caught on and she is selling them at Macy's. I also think you can get them online. I simply love them and use them for everything.
More pops. Save the styrofoam from the purchases you make - they are indispensible for letting the coating dry on the brownie pops.
Brownie pops swirls - my favorite way to decorate pops!
Sunday, July 15, 2012
Decorating Cupcakes Using Royal Icing Transfers
1. Find a font type and size of the numbers you want to place on the cupcake and print them out on paper.
2. Tear out strips of waxed paper and place the paper with the printed number underneath the waxed paper where you want to pipe.
3. Using stiff royal icing and a small tip such as a PME #1.5, pipe the outline of the number. Make sure there are no gaps in your outline. Slide the printed number underneath the waxed paper and repeat the outlining until you've piped the desired number of outlined numbers.
4. Fill in the outlines with flood consistency royal icing and let dry overnight. If you are using the same color to outline and flood, you do not need to wait for the outline to dry before you flood.
5. Once dry, carefully peel the number from the waxed paper. I used a small, thin offset spatula to help loosen the number from the waxed paper. Make extra, because a few may break.
6. Ice cupcakes and set the number on top. And voila! Cute cupcakes!
Thursday, May 10, 2012
Mexican Rice with Black Beans
Happy Decimo de Mayo! Ok, I'm five days late in posting this recipe for Cinco de Mayo. It's the story of my life these days, especially when it comes to this poor neglected blog. Would someone please stop time so I can get caught up?! Thank you.
I was pleasantly surprised when my cilantro patch survived the mild winter we had this year. I love cilantro, so I've been trying to cook as much as I can with it before it bolts in this Spring heat wave.
I made this Mexican rice to serve with enchiladas (recipe coming soon!). I don't think I'll need to go out for Mexican food anymore - I can make it at home - quite easily it turns out. The most tedious part of the Enchiladas with Mexican Rice was washing all the dishes - it made quite the mess of my kitchen. But it was worth it. It's delicioso!
{This recipe makes a good amount, but the leftovers freeze well.}
Mexican Rice with Black Beans
adapted slightly from Best International Recipes by the editors of Cook’s Illustrated
2 ripe tomatoes (about 12 ounces), cored and quartered
1 medium onion, preferably white, peeled, trimmed of root end, and quartered
3 medium jalapeno chiles
2 cups long grain white rice
1/3 cup canola oil
4 cloves garlic, minced or pressed through garlic press
2 cups low-sodium chicken broth
1 tablespoon tomato paste
1 ½ teaspoons table salt
1 15-oz can black beans, rinsed and drained
½ cup minced fresh cilantro leaves
1 lime, cut into wedges for serving
Adjust oven rack to middle position and heat oven to 350 degrees. Process tomatoes and onion in food processor until smooth and thoroughly pureed, about 15 seconds, scraping down bowl if necessary. Transfer mixture to liquid measuring cup; you should have 2 cups (if necessary, spoon off excess so that volume equals 2 cups).
Remove ribs and seeds from 2 jalapeños and discard; mince flesh and set aside. Mince remaining jalapeño, including ribs and seeds; set aside.
Place rice in large fine-mesh strainer and rinse under cold running water until water runs clear, about 1 1/2 minutes. Shake rice vigorously in strainer to remove all excess water.
Heat oil in heavy-bottomed oven-safe 12-inch straight-sided sauté pan or Dutch oven with tight-fitting lid over medium-high heat, 1 to 2 minutes. Drop 3 or 4 grains rice in oil; if grains sizzle, oil is ready. Add rice and fry, stirring frequently, until rice is light golden and translucent, 6 to 8 minutes. Reduce heat to medium, add garlic and seeded minced jalapeños; cook, stirring constantly, until fragrant, about 1 1/2 minutes. Stir in pureed tomatoes and onions, chicken broth, tomato paste, and salt; increase heat to medium-high and bring to boil.
Cover pan and transfer to oven; bake until liquid is absorbed and rice is tender, 30 to 35 minutes. Stir in the black beans about halfway through the baking time.
Stir in cilantro and reserved minced jalapeño with seeds to taste. Serve immediately, passing lime wedges separately.
Saturday, April 21, 2012
Miette and Marshmallows
Last summer, we took a family vacation out west to California and Oregon. We spent a few days in San Francisco sightseeing. Whenever I'm going to a new place, I always look for bakeries and farmer's markets to pop in and visit if there's an opportunity. When I mention hitting up a local bakery, my kids roll their eyes and groan, but really, there are worse things I could ask them to do!
The Ferry Building was on the top of my must-visit list. There's the Farmer's Market outside and inside, a beautiful bakery called Miette Patisserie. There were beautiful pastel cake stands and wonderful treats residing in every nook of the store. The painted furniture, the wallpaper, the packaging... it just melded together perfectly. We tried a cupcake and a hazelnut macaron and both were delicious.
When we came home from that vacation, I promptly put the Miette cookbook on my Christmas list. And Mark surprised me with one of the cake stands for my birthday - a small 6-inch cake stand in the prettiest pink. It's one my favorites.
The cookbook arrived in my stocking for Christmas and I was so excited to try some recipes.
I tried the mini oatmeal chocolate chip cookies which proved to be addicting. They were gone before I remembered to snap a photo!
And I tried the Miette marshmallows.
These Miette marshmallows are more like the marshmallows you can buy at the store. In fact, the texture was exactly the same - more substantial, more dense. I think these could easily be roasted over a fire with no problem, although I haven't tried to yet. I cut them into circles with a cookie cutter, placed them on a lollipop stick and dipped them in chocolate, sprinkles, crushed candy canes and unsweetened coconut (my favorite).
I liked both recipes for marshmallows, but I think I prefer the Miette marshmallows for eating out of hand or roasting on the fire. For hot chocolate, I may prefer the Epicurious marshmallows. So maybe I should call these "Summer Marshmallows", and the other ones "Winter Marshmallows". Either way, try homemade marshmallows - they are delicious!
And if you find yourself in San Francisco, don't miss the Ferry Building and Miette Patisserie!
Miette Marshmallows
Makes about 48 1 1/2-inch square marshmallows
1/2 cup cornstarch
1/2 cup sifted powdered sugar
3 Tablespoons plus 2 teaspoons unflavored gelatin powder (4 packets or one ounce)
1/3 cup water, plus 1/2 cup
2 cups granulated sugar
1/2 cup light corn syrup
1/2 vanilla bean (I omitted)
3 large egg whites
1 Tablespoon vanilla extract
Pinch of cream of tartar
1/4 teaspoon kosher salt
Have ready a 9×13 inch pan lightly coated with cooking spray. In a small bowl, stir together the corn starch and powdered sugar. Dust the bottom and sides of the pan with the mixture. Tap off the excess and reserve.
In a small bowl, sprinkle the gelatin over the surface of the 1/3 cup water. Set aside to soften.
In a small saucepan, combine the granulated sugar, corn syrup, and 1/2 cup water. Cut the vanilla bean in half lengthwise and scrape the seeds into the sugar. (Save the pod for another use.) Clip a candy thermometer to the side of the pan. Over medium-low heat, cook the mixture to 246 degrees F.
Meanwhile, in the bowl of a stand mixer fitted with the whisk attachment, combine the egg whites, vanilla, cream of tartar, and salt. When the syrup reaches 230 degrees F, start to whisk the egg whites on low speed. When it reaches 246 degrees F, immediately remove the syrup from the heat and whisk in the softened gelatin until no lumps remain. Pour the syrup through a fine mesh sieve into another pan or a heatproof bowl.
With the mixer still on low speed, pour in a small amount of the syrup, away from the whisk so the hot syrup doesn’t splash. Continue to add the syrup in a thin stream; when all the syrup has been added, raise the speed to medium-high. Continue to whisk until the meringue has cooled to room temperature and stiff peaks form.
Scrape it out into the prepared pan and smooth the top. Dust the top with some of the remaining cornstarch mixture. Cover the pan and allow the marshmallows to set for approximately 6 hours. To cut, slip an offset spatula between the marshmallow and the sides of the pan. Invert the slab onto a cutting board dusted with the cornstarch mixture. Using a lightly oiled knife, cut the marshmallows into 1 1/2 inch squares. Dust the cut edges with the cornstarch mixture and store in an airtight container or bag for up to 5 days.
Tuesday, April 3, 2012
Escarole with Cannellini Beans
Sometimes I just need warm and healthy and wholesome and filling and slow-cookin', but not heavy. This dish fills the requirement perfectly.
Start the night before and soak your beans in cold water overnight. Then drain and rinse the beans. Add the beans to a stockpot with some chicken or vegetable stock, water, and olive oil. Add some onions, carrots, garlic, and sage and simmer away until the beans are tender (1 1/2 - 2 hours).
When the beans are tender, remove from the heat and remove and discard any large pieces of onion, garlic, and sage.
In a large skillet, heat the remaining olive oil, then add the garlic, red pepper flakes and pancetta, then the escarole. Cook 5 minutes until escarole is wilted.
Add the tomatoes and seasoning...
...then the beans. Sprinkle with lemon and adjust seasonings. Serve with a drizzle of olive oil and parmesan shavings and feel good!
Escarole with Cannellini Beans
Adapted from Williams-Sonoma Essentials of Slow Cooking
- 1 lb. dried cannellini beans or Great Northern beans
- 2 cups chicken or vegetable broth
- 1/2 cup olive oil, plus more for serving
- 2 yellow onions, quartered
- 2 carrots, cut into 2-inch pieces
- 8 garlic cloves, 4 left whole, 4 minced
- 2 fresh sage sprigs
- 1/4 tsp red pepper flakes (I used a scant 1/4 tsp)
- 2 oz. pancetta or unsmoked bacon, chopped (optional)
- 2 heads escarole, about 2 lb. total, cut crosswise into strips 2 inches wide
- 1 can (14 1/2 oz.) diced plum tomatoes, preferably San Marzano, drained
- 1 tsp. salt, plus more, to taste
- 1/2 tsp. freshly ground pepper, plus more, to taste
- Juice of 1 lemon
- Extra-virgin Olive oil for drizzling and shaved parmesan for garnish
Pick over the beans, removing any misshapen beans or grit. Rinse under cold running water. Put the beans in a large bowl, add cold water to cover by at least 2 inches and let stand at room temperature overnight. Alternatively, for a quick soak, put the beans in a large pot, add water to cover by at least 2 inches and bring to a boil. Remove from the heat, cover and let soak for 1 hour. Drain and rinse the beans.
Stovetop method: In a large Dutch oven, combine the beans, the broth and 1/4 cup of the olive oil. Add cold water to cover the beans by about 1 1/2 inches. Add the onions, carrots, whole garlic cloves and sage. Bring to a boil over high heat, reduce the heat to low, partially cover and simmer gently until the beans are very tender, 1 1/2 to 2 hours. Remove the onions, garlic cloves and sage and discard.
Slow-cooker method: In a slow cooker, combine the beans, the broth and 1/4 cup of the olive oil. Add cold water to cover the beans by about 1 1/2 inches. Add the onions, carrots, whole garlic cloves and sage. Cover and cook according to the manufacturer's instructions until the beans are very tender, about 4 hours on high or 8 hours on low. Remove the onions, garlic cloves and sage and discard.
About 30 minutes before the beans are done, in a large fry pan over medium-high heat, warm the remaining 1/4 cup olive oil. Add the minced garlic, red pepper flakes and pancetta and sauté until fragrant, about 30 seconds. Add the escarole and sauté until the leaves begin to wilt, about 1 minute. Add the tomatoes, the 1 tsp. salt and the 1/2 tsp. pepper and cook, stirring occasionally, until the leaves have softened and the mixture is reduced to about one-third, 5 to 7 minutes.
When the beans are done, add the escarole mixture and stir, breaking up some of the beans with the back of the spoon to thicken the mixture slightly. Stir in the lemon juice. Season with salt and pepper. Serve immediately, passing the remaining olive oil and shaved parmesan at the table. Serves 6 to 8.
Sunday, March 11, 2012
Angry Bird Cookies
Note to everyone else: I make these notes to my mom because she is retired and vacationing in Florida and has no clue nor does she have any desire to get a clue about any new electronic gadgets. She is, however, with the help of my dad who enjoys his electronic gadgets, one of the few who reads this blog faithfully. (Hi Mom!)
For detailed instruction on how to decorate these cookies, check out Sweet Sugarbelle's blog here.
For helpful tips on rolling out dough, check out my blog post here.
Vanilla-Almond Sugar Cookie Cut-outs
Adapted from Baked: New Frontiers in Baking by Matt Lewis and Renato Poliafito
4 cups all-purpose flour
1/2 teaspoon salt
1/2 teaspoon baking powder
3 sticks butter, softened to cool room temperature
4 tablespoons vegetable shortening
1 1/3 cup sugar
2 large eggs
1 teaspoon vanilla extract
1 teaspoon almond extract
In a medium bowl, whisk together the flour, salt, and baking powder and set aside.
In the bowl of an electric mixer fitted with a paddle attachment, beat the butter, shortening, and sugar together until light and fluffy. Add the eggs and vanilla and beat until combined, scraping the bowl as needed. Add the flour mixture and mix until incorporated. Wrap the dough in plastic and refrigerate for at least 4 hours.
Preheat the oven to 350 degrees. Line two baking sheet with Silpat mats or parchment paper.
Dust a work surface liberally with flour. Unwrap the chilled dough, sprinkle with more flour and roll with a rolling pin to 1/4 inch thick (or a little thinner). Lift the dough and add a bit more flour underneath and on top if the dough gets sticky. If the dough is too hard to work with and wants to crack, break the dough into tennis ball sized pieces and knead each piece briefly to make the dough pliable, then knead all the pieces together one or two times, then you can roll out to an even thickness with a rolling pin.
Transfer the cookies to the cookie sheets with a thin metal spatula. Place the cookie sheets in the freezer for at least 15 minutes (this keeps the cookies from spreading during baking), then bake the cookies for about 10-12 minutes. I peek into the oven and give the cookies a quick touch with my finger. The cookies are done if they provide resistance to your fingertip and are starting to brown around the edges. They are not quite done if your finger sinks into the cookie and leaves an impression. I set the timer for 10 minutes and check every minute after that until the cookies are done. Let the cookies cool for 5 minutes on the baking sheet, then transfer to a cooling rack to cool completely.
Royal Icing
from Joyofbaking.com
3 cups (330 grams) confectioners (powdered or icing) sugar, sifted
Place egg whites in the bowl of a stand mixer fitted with the paddle attachment. Beat eggs on medium-high speed until frothy. Add lemon juice, reduce mixer speed to medium-low and slowly add the confectioners sugar. Once all the sugar is added, increase the mixer speed to medium and beat for 6-7 minutes or until the mixture reaches medium-stiff to stiff peaks. Transfer to an airtight container at room temperature until ready to use if you will be using the icing the same day (recommended). Refrigerate unused portions for up to one week.
Royal Icing
from Joyofbaking.com
2 large (60 grams) egg whites
2 teaspoons fresh strained lemon juice
Place egg whites in the bowl of a stand mixer fitted with the paddle attachment. Beat eggs on medium-high speed until frothy. Add lemon juice, reduce mixer speed to medium-low and slowly add the confectioners sugar. Once all the sugar is added, increase the mixer speed to medium and beat for 6-7 minutes or until the mixture reaches medium-stiff to stiff peaks. Transfer to an airtight container at room temperature until ready to use if you will be using the icing the same day (recommended). Refrigerate unused portions for up to one week.
Wednesday, February 29, 2012
Sweet and Salty Caramel Brownies
Would you just look that these brownies! They were delicious - maybe the best ever. Fudgy chocolatey goodness with caramel oozing out the center and drizzled on top, sprinkled with sea salt and coarse sugar. A glass of milk with these is not optional.
I had given some away...
...but there were plenty for us too.
The ones hanging around were devoured, and then the kids, realizing that they were all gone, had that surprised, shocked, sad, disappointed look on their faces when they asked, "Who ate the last brownie?".
No one confessed. I suppose I'll just have to make more.
Sweet & Salty Brownie
from Baked Explorations by Matt Lewis and Renato Poliafito
Makes one 9x13 pan of brownies - how many you decide to cut from that is a personal decision!
For the caramel filling:
1 cup sugar
2 tablespoons light corn syrup
1/2 cup heavy cream
1 teaspoon fleur de sel, or other mild sea salt
1/4 cup sour cream
For the Brownie:
1 1/4 cups all purpose flour
1 teaspoon salt
2 tablespoons dark unsweetened cocoa powder
11 ounces quality dark chocolate (60 to 72 %), coarsely chopped
1 cup (2 sticks) unsalted butter, cut into 1-inch cubes
1 1/2 cups sugar
1/2 cup firmly packed light brown sugar
5 large eggs, at room temperature
2 teaspoons vanilla extract
For Assembly:
1 1/2 teaspoons fleur de sel
1 teaspoon coarse sugar
Make the Caramel:
In a medium saucepan, combine the sugar and corn syrup with 1/4 cup water, stirring them together carefully so you don't splash the sides of the pan. Cook over high heat until and instant read thermometer reads 350 degrees F, or until the mixture is dark amber in color (keep a close eye on the caramel at all times, as it goes from golden brown to black and burnt very quickly), 6 to 8 minutes. Remove from the heat, and slowly add the cream (careful, it will bubble up ) and then the fleur de sel. Whisk in the sour cream. Set aside to cool.
Make the Brownie:
Preheat the oven to 350 degrees F.
Butter the sides and bottom of a glass or light colored metal 9 by 13 inch pan. Line the bottom with a sheet of parchment paper, and butter the parchment.
In a medium bowl,whisk together the flour,salt and cocoa powder.
Place the chocolate and butter in the bowl of the double boiler set over a pan of simmering water, and stir occasionally until the chocolate and butter are completely melted and combined. Turn off the heat, but keep the bowl over the water of the double boiler, and add both sugars. Whisk until completely combined and remove the bowl from the pan. The mixture should be at room temperature.
Add three eggs to the chocolate mixture and whisk until just combined. Add the remaining eggs and whisk until just combined. Add the vanilla and stir until combined. Do not over beat the batter at this stage, or your brownies will be cakey.
Sprinkle the flour mixture over the chocolate. Using a spatula, fold the dry ingredients into the wet ingredients until there is just a trace amount of the flour mixture visible.
Assemble the Sweet & Salty Brownie:
Pour half of the brownie mixture into the pan and smooth the top with a spatula. Drizzle about 3/4 cup of the caramel sauce over the brownie layer in a zigzag pattern, taking care to make sure the caramel does not come in contact with the edges of the pan or it will burn. Use your offset spatula to spread the caramel evenly across the brownie layer. In heaping spoonfuls, scoop the rest of the brownie batter over the caramel layer. Smooth the brownie batter gently to cover the caramel layer.
Bake the brownies for 30 minutes, rotating the pan halfway through the baking time, and check to make sure the brownies are completely done by sticking a toothpick into the center of the pan. The brownies are done when the toothpick comes out with a few moist crumbs.
Remove the brownies from the oven, drizzle on desired amount of extra caramel and sprinkle with fleur de sel and coarse sugar.
Cool the brownies completely before cutting and serving.
The brownies can be stored, tightly wrapped at room temperature, for up to 4 days.
Subscribe to:
Posts (Atom)