Friday, October 30, 2009

Zucchini Gingerbread

Zucchini Gingerbread

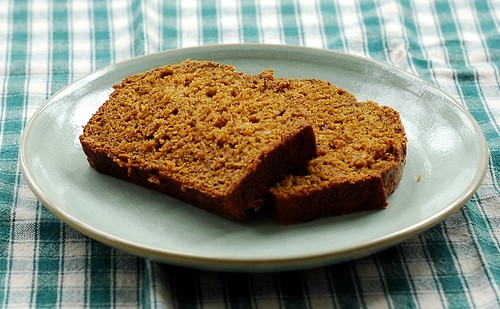
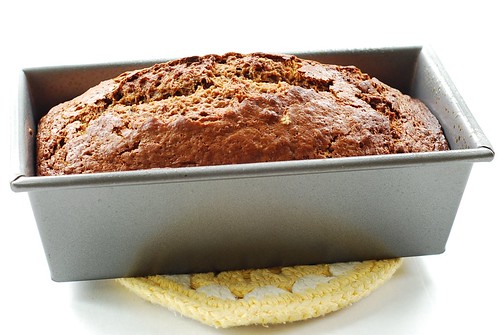
Here's a welcome departure from your typical Zucchini Bread. It's tastes more like gingerbread with a nice depth of flavor from the molasses and spices. The addition of healthy oatmeal gives it more substance, and it blends right in so you can't tell it's there at all.

Zucchini Gingerbread

My favorite way to eat it is toasted with some butter or cream cheese. It would also make a nice addition to the Thanksgiving dessert table. So if you're tired of the same ole zucchini bread, try this one. You won't be disappointed!

Zucchini Gingerbread
Adapted from this recipe on dlynz.com

2 cups finely grated zucchini
1 tsp kosher salt
1 cup oatmeal
3 1/2 cups all-purpose flour
1 cup granulated sugar
1 teaspoon baking powder
1 teaspoon baking soda
1 teaspoon cinnamon
1/2 teaspoon allspice
1 teaspoon ground ginger
3/4 cup dark molasses
3 eggs, slightly beaten
1/2 cup vegetable oil
2 teaspoon vanilla
1 tablespoon lemon zest (optional)

Preheat the oven to 350 degrees.In a medium bowl, combine the zucchini, salt and oats and let the mixture sit for about 30 minutes. In a separate large bowl, combine the flour, sugar, baking powder, baking soda, cinnamon, allspice and ginger. Add molasses, eggs, oil, vanilla, and lemon zest to the zucchini mixture and stir to combine. Add the wet ingredients to the dry mixture and stir to combine. Divide evenly between 2 greased 5 x 8 bread pans. Bake for about an hour or so until a toothpick inserted near the center comes out clean. Cool 10 minutes in pans, then remove from pans and cool completely on a wire rack.

Tuesday, October 27, 2009

Chicken Parmesan

Chicken Parmesan

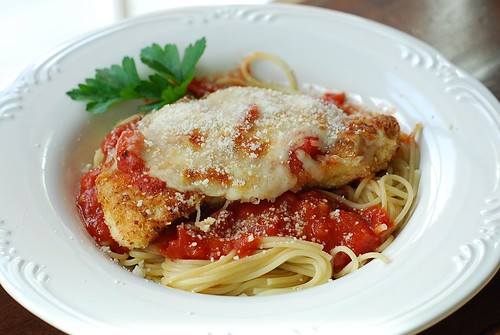
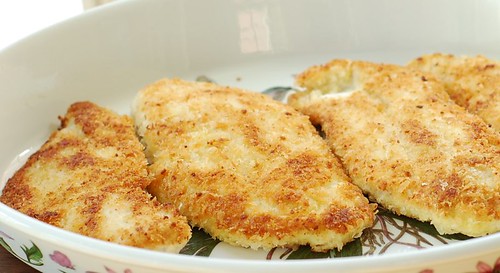
If you are the family cook, you need to have this recipe in your arsenal. It's a family favorite and easy to make. You can substitute your favorite jarred tomato sauce if you prefer, but I encourage you to try this super-easy sauce from scratch, using a large can of crushed tomatoes. Here are the cutlets as they should look after frying...
Chicken Parmesan

Panko breadcrumbs make a huge difference in the breading.  Feel free to use only panko, only fine breadcrumbs, or a combination. I found that the combination works well to get maximum bread crumb coverage. Top the breaded and fried cutlets with a little sauce and some cheese and slide them into the oven to finish off. Serve with a green salad for a delicious and easy weeknight meal.
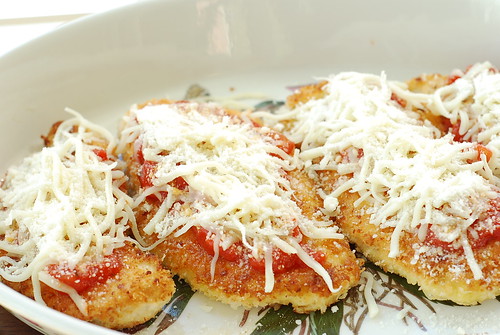
October 2009 092

Chicken Parmesan
adapted from The New Best Recipe by Cook's Illustrated

For the Tomato Sauce:
2 cloves of garlic, minced
1/4 cup extra virgin olive oil
1 28-oz can crushed tomatoes
1/2 tsp dried basil
1/2 tsp dried oregano
1/4 tsp sugar
1/2 tsp salt
1/4 tsp ground black pepper
For the Chicken Cutlets:
4-6 boneless, skinless chicken breasts, tenderloins removed and reserved for another use
3/4 cup panko Japanese-style bread crumbs
1/4 plain dry bread crumbs
1/4 cup grated Parmesan cheese
1/2 cup all-purpose flour
2 large eggs
olive oil for frying
For Finishing:
3/4 pound spaghetti or linguine
3/4 shredded mozzarella cheese
1/4 grated Parmesan cheese

Heat the garlic and oil together in a large saucepan until the garlic becomes fragrant. Stir in the tomatoes, sugar, and spices and simmer at least 10 minutes. Taste and adjust seasonings if needed. Keep sauce warm until ready to use.

Bring a large pot of water to a boil. Heat oven to 375 degrees F.

Place chicken breasts on a cutting board between two sheets of plastic wrap. Using the smooth side of a meat tenderizer, pound the chicken breasts to an even 1/2 inch thickness. Pat chicken dry with paper towels.

Set up your breading assembly line by lining up three shallow bowls. Place the flour in the first bowl. Whisk the eggs with a splash of water in the second bowl. Mix together the panko, dry breadcrumbs and Parmesan cheese in the third bowl.
Sprinkle the chicken cutlets with salt and pepper, then dip both sides of the cutlets in flour (shake off excess), then dip cutlets in the egg, then into the breadcrumbs, pressing the breadcrumbs on lightly with your hands.

Heat a 12" non-stick skillet over med-high heat with about 3 tablespoons of olive oil until very hot but not smoking (the chicken should sizzle right away after you add them to the pan). Add the chicken cutlets to the pan without crowding them. (You may have to do this in batches, wiping out the pan and adding oil with each batch.) Cook until the cutlets are a deep golden brown, then turn the cutlets over and cook the other side until nice and golden. Add oil if the pan seems too dry. Remove the chicken from the skillet and place in a casserole dish big enough to fit all the cutlets in a single layer.

Add the pasta to the boiling water and cook to al dente.

Top each cutlet with a spoonful of tomato sauce, then some mozzarella cheese, then a sprinkling of Parmesan. Bake in the oven, uncovered, until cheese is melted and beginning to brown, about 10 minutes. Serve on top of, or alongside, the spaghetti and sauce.

Friday, October 23, 2009

Friday Favorite - Marzipan...

Chocolate Covered Marzipan

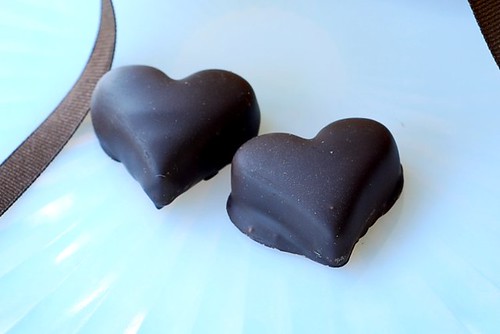
...chocolate covered marzipan actually. Inside this little box contains my very favorite treat. I'll tell you that it's not easy to find. I ask for it in every candy shop - even Godiva stores - and they never have it. But my wonderful husband always seems to find me some. And these chocolate marzipan hearts were the absolute best birthday present ever!

Chocolate Covered Marzipan


Chocolate Covered Marzipan

Marzipan is essentially almonds ground to a paste with sugar and egg whites or corn syrup to act as a binder. It is used in candy and pastries such as petit fours. It can also be tinted and shaped into edible fruits and other shapes to adorn cakes. I first tasted marzipan in Germany when I was in college and traveled with friends around Europe. I fell in love when I tasted it.  If you happen to see it covered in chocolate, you've got to try it! What is your favorite sweet indulgence?

Wednesday, October 21, 2009

Apple Cranberry Muffins


The reason for the get-together: to plan the next get-together, of course. Do you need a better reason than that to invite the girls over? School is well underway and we're overloaded with housework, and homework, and after-school chauffeuring. But our girl-time is sacred. Time with the girls is the best stress-relief known to "mom". We discussed school activities and the swine flu (none of our families have had it - yet). We talked about movies and wine and books we've read. The more tech-savvy shared ideas for photo editing. And oh, the delicious goodies we had for breakfast - a delicious pumpkin tiramisu and these freshly baked Apple Cranberry Muffins. It was perfect! The next get-together will be a weekend get-away - a whole weekend of food, fun, shopping and crafts with the girls. I can hardly wait!


Apple Cranberry Muffins
adapted from King Arthur Flour

1 cup (4 ounces) King Arthur 100% White Whole Wheat Flour
1 cup (4 1/4 ounces) King Arthur Unbleached All-Purpose Flour
1 teaspoon baking powder
1 teaspoon baking soda
1/4 teaspoon salt
1 tablespoon cinnamon
1/2 cup (1 stick, 4 ounces) unsalted butter, at room temperature
1/2 cup (3 1/2 ounces) granulated sugar
1/2 cup dark brown sugar, divided
1 large egg, lightly beaten
1 cup (8 ounces) buttermilk
2 large apples, peeled, cored, and coarsely chopped
1/2 cup dried cranberries

Preheat the oven to 425°F (see note above). Grease and flour a 12 cup muffin tin and set aside.
Mix together the flours, baking powder, baking soda, salt, and cinnamon, and set aside.
In a separate bowl, cream the butter and add the granulated sugar and 1/4 cup of the brown sugar. Beat until fluffy.
Add the egg and mix well; stop once to scrape the sides and bottom of the bowl. Mix in the buttermilk gently. (If you over-mix, the buttermilk will cause the mixture to curdle.) Stir in the dry ingredients and fold in the apple chunks and cranberries.
Divide the batter evenly among the prepared muffin cups, sprinkling the remaining 1/4 cup brown sugar on top. Bake for 10 minutes, turn the heat down to 375°F, and bake for an additional 15 to 20 minutes, or until a toothpick inserted into the center of a muffin comes out clean. Cool the muffins for 5 minutes in the tin, then turn them out onto a wire rack to cool completely. Yield: 12 muffins.

Monday, October 19, 2009

Chocolate Espresso or Chocolate Mint Glazed Brownie Buttons


This recipe for Brownie Buttons is from Dorie Greenspan's Baking From My Home to Yours Cookbook. I covered half the brownies with a chocolate ganache glaze flavored with espresso powder and half flavored with mint.  Both versions were delicious!


One year ago: Mint Brownies

Brownie Buttons
from Baking, From My Home to Yours by Dorie Greenspan
Makes 16 (I tripled the recipe)

Ingredients:
1/4 cup plus 2 tablespoons all-purpose flour
Pinch of salt
1/2 stick (4 tablespoons) unsalted butter, cut into 4 pieces
2 1/2 ounces bittersweet chocolate, coarsely chopped
1/3 cup (packed) light brown sugar
1/2 teaspoon pure vanilla extract
1 large egg
Ganache glaze for topping (recipe below)

Center a rack in the oven and preheat the oven to 350 degrees F. Lightly butter two miniature muffin pans, each with a dozen cups, and place them on a baking sheet. (Or line mini muffins cups with paper liners.)
Whisk together the flour and salt and set aside.
Melt the butter, chocolate and brown sugar in a medium heavy-bottomed saucepan over very low heat, stirring frequently with a heatproof spatula and keeping an eye on the pan so nothing overheats or burns. When the mixture is smooth, remove from the heat and cool for a minute or two.
Stir the vanilla and egg into the chocolate mixture. When the mixture is well blended, add the flour and stir only until it is incorporated. You should have a smooth, glossy batter.
Spoon the batter into 16 of the muffin cups, using about a teaspoon of batter to fill each cup three-quarters full. (I used my smallest cookie scoop.)
Bake for 14 to 16 minutes, or until the tops of the buttons spring back when touched. Transfer the pans to racks to cool for 3 minutes before carefully releasing the buttons. Cool to room temperature on the racks. When the brownies are completely cool, glaze with chocolate espresso ganache.

Chocolate Espresso or Mint Ganache
adapted from Baked: New Frontiers in Baking by Matt Lewis and Renato Polafito

6 Ounces / 170g Dark Chocolate (60 to 72% Cacao), coarsely chopped
1/2 Cup Heavy Cream
 1 tsp espresso powder or 1/2 tsp peppermint extract

 1. Put the chocolate in a medium bowl and set aside. Whisk together the cream and espresso powder (omit espresso powder for mint ganache) in a small saucepan and bring just to a boil and pour over the chocolate. Let the mixture sit for 2 minutes before gently mixing the chocolate and cream together until completely smooth.  For peppermint ganache, stir in the peppermint extract once the ganache is smooth.

2. Let the ganache sit for about 15 minutes.

3. If the ganache has cooled enough to become solid, microwave (for only a few seconds) or gently heat the ganache until pourable.

Friday, October 16, 2009

Cheesecake Swirl Brownies


They almost look Black and Gold...I made these for a Steeler pre-game tailgate for Mark and some of his friends from work.  The brownie layer is rich and fudgy and the cheesecake layer was the perfect complement.

Cheesecake Swirl Brownies
from Classic Stars Desserts by Emily Luchetti

5 ounces bittersweet chocolate, coarsely chopped
2 ounces unsweetened chocolate, coarsely chopped
7 ounces (14 tablespoons) unsalted butter, at room temperature
2 cups granulated sugar, divided
5 large eggs
3/4 cup all-purpose flour
pinch of kosher salt
1 1/4 pounds cream cheese, room temperature
1 teaspoon vanilla extract

Preheat the oven to 325 degrees F. Butter a 9x13-inch baking pan.

Melt the chocolates together in a double boiler. Whisk until smooth and let cool until warm.
Combine the butter and 1 1/4 cups of the sugar in the bowl of a stand mixer fitted with the paddle attachment and beat on medium speed until smooth, about 30 seconds. Add 3 of the eggs, one at a time, mixign well after each addition. Reduce the speed to low, add the melted chocolate, and mix until smooth. Mix in the flour and salt. Measure out about 1 cup of the chocolate batter and set aside. Spread the remaining batter in the prepared pan.

Combine the cream cheese and the remaining 3/4 cup sugar in a clean mixer bowl and beat on medium speed until smooth. Add the remaining 2 eggs and the vanilla and again beat until smooth. Spread the cream cheese mixture in an even layer over the chocolate batter. Scatter spoonfuls of the reserved chocolate batter over the cream cheese layer. With a knife, swirl the chocolate batter into the cream cheese layer to create a marbled effect.

Bake until a toothpick inserted into the center comes out with a moist crumb, about 50 minutes. Let cool for at least 30 minutes. Cut into 24 squares.

Note: when I made the chocolate batter, it was too thick to swirl through the cheesecake layer, so I placed the reserved batter in the microwave for a few seconds at a time until the chocolate batter was more of a pourable consistency. This made it easier to make the chocolate swirls.

Thursday, October 8, 2009

Tomatillo Chicken and Bean Stew


Tomatillos look like green tomatoes, but they are quite different. When they grow, they have a thin papery husk around them. They are green when fully ripened and used mainly in Latin American cooking. Tomatillos are the basis of Salsa Verde or "green sauce". They are crisper than a tomato and have a tart taste with a hint of lime flavor.


I'd never heard of or tried a tomatillo until they showed up in my CSA box a few years ago.  The internet is a great resource for recipes using unusual ingredients. Elise at Simply Recipes has posted several recipes which use tomatillos. Her latest was a Tomatillo Chicken Stew...I added a can of Cannellini beans and I liked the added texture provided by the beans. The tomatillo sauce was a little spicy for me - I guess the jalapenos I used were pretty hot. I added lots of cilantro and took Elise's advise and served it with white rice and a dollop of sour cream to cool it down a bit. It was delicious with a touch of unusual!


Tomatillo Chicken Stew
from Simply Recipes
Tomatillo Sauce:
1 1/2 lbs tomatillos
1-2 jalapeƱo chile peppers, or 2-3 serrano chili peppers (include the seeds if you want the heat, remove them if you don't want the heat), stems discarded, chopped
1 clove garlic, chopped
1 teaspoon salt
2 Tbsp lime (or lemon) juice
Pinch of sugar
Stew:
2 lbs boneless, skinless chicken thighs or breasts, trimmed of excess fat, cut into 1-inch cubes
Salt and pepper
Olive oil
2 yellow onions, chopped
2 cloves garlic, minced
1 teaspoon ground cumin
1 teaspoon ground coriander
1 1/2 cup chicken stock
1 15-ounce can white beans, drained and rinsed (optional)
2 cups tomatillo sauce
1 teaspoon dry oregano or 1 tablespoon fresh, chopped
1/2 cup packed chopped cilantro (about one bunch, rinsed and chopped, stems and leaves)

1 Make the tomatillo sauce. Remove the papery husks from the tomatillos and rinse well. Cut the tomatillos in half and place them cut-side down on an aluminum foil-lined roasting pan. Broil for 5-7 minutes until blackened in spots. Let cool enough to handle. Place the tomatillos, any juice they have released, chile peppers, garlic, salt, lime juice and sugar in a blender, and pulse until well blended. If you make ahead, refrigerate until needed.

2 Heat a couple tablespoons of olive oil in a large, thick-bottomed pot on medium high heat until almost smoking. Pat dry the cubed chicken parts with paper towels. Sprinkle salt and pepper over them. Working in batches so as not to crowd the pan, and adding more olive oil when necessary, brown the chicken pieces on two sides. When you place the pieces in the pan, make sure there is room between them (otherwise they will steam and not brown), and don't move them until they are browned on one side. Then use tongs or a metal spatula to turn them over and don't move them again until they are browned on the other side. Do not cook through, but only brown. Remove the chicken pieces from the pan and lower the heat to medium. There should be a nice layer of browned bits at the bottom of the pan.

3 Add the onions to the pan, and a tablespoon or two more olive oil if needed (likely). Add ground cumin and coriander. Cook a few minutes, stirring occasionally until onions are softened and the browned bits from the chicken have been picked up by the onions and are no longer sticking to the pan. Add the garlic and cook for 30 seconds more, until fragrant.

4 Add the browned chicken, the tomatillo sauce, chicken stock, beans and oregano to the pan. Stir to combine. Bring to a boil and reduce to a simmer. Cook, partially covered, for 20 minutes until chicken is cooked through. Add the cilantro to the stew in the last minute or so of cooking.
Serve over white rice, accompanied with sour cream if needed to offset the heat from the chiles. The stew will thicken as it cools.

LinkWithin

Related Posts Widget for Blogs by LinkWithin