Saturday, December 15, 2012

Goodbye Old Kitchen


044

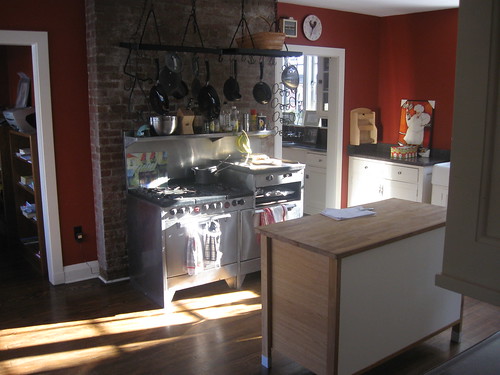
Take a look inside my old kitchen.  Above is a photo I took before we bought the house.  The owners had a small island in the center.  The family had already moved out, so everything was pretty barebones.
DSC_0362

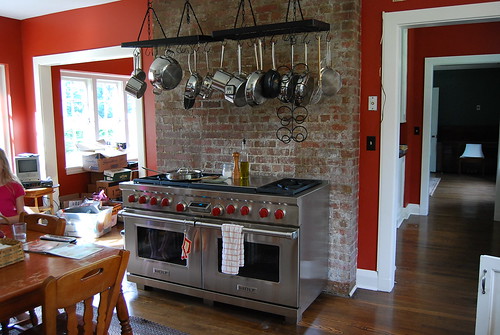
After we moved in, the first thing I did was replace the range.  The old Magic Chef was a classic, but knobs were missing and it was in pretty bad shape - and not what I needed for all the baking I do.  I love everything about my Wolf range!
DSC_0352

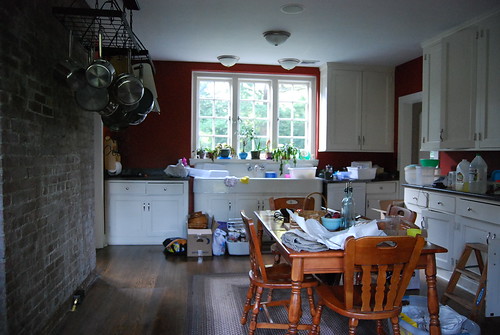
Above is a photo of the kitchen while we were moving in (two and half years ago).  We think the cabinets are original to the house, which means they are 80 years old.  They held up pretty well considering their age, but most of the doors were warped and wouldn't close completely and many of the drawers were broken or didn't slide well anymore.

The lighting was simply awful!  So many times I looked up to the ceiling to see if the lights were on.  They were - it was just so dark!  Fortunately during the daytime, there is a lot of natural light coming in from both sides of the room.

The one thing I came to love was the old enamel farmhouse sink.  The faucet dripped but I loved the large bowl with drainboards on both sides.  I love to look out on the back garden when I wash the dishes (which is quite often).
kitchen

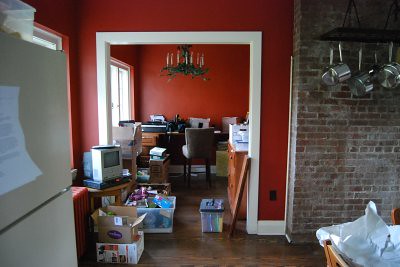
Still unpacking...to the left of the range, I made my office in a small alcove.  Anyone in the market for a metal green ivy chandelier?  I'm sure that would be right up someone's alley - it's just not my style.  I have to say, it provided some much needed carryover light into the kitchen, so I was grateful for it.
IMG_0108

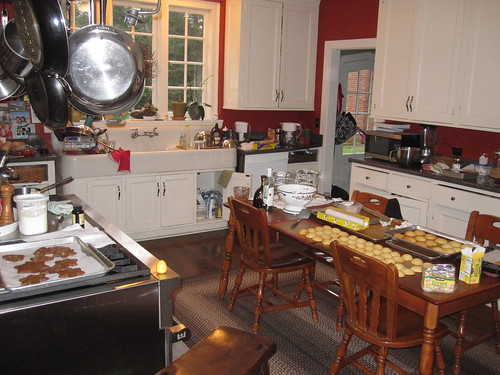
Here's the old kitchen in action.  Hey, just keepin' in real - this was Dec 23rd of last year and I had orders to fill - making trifles and orange cookies, and gingerbread cookies - things were crazy that day!
Perhaps you've been wondering if I dropped off the face of the earth - well there's not much baking going on here lately, and therefore not much to blog about because...
DSC_0247

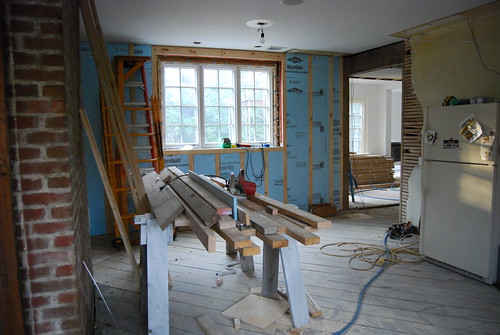
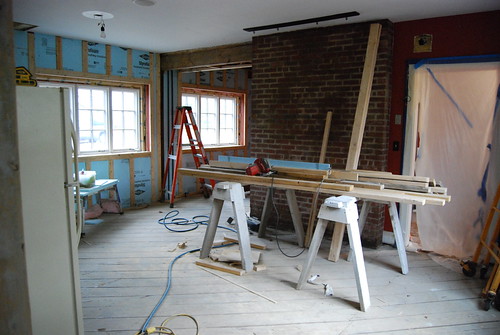
...here's my kitchen today - completely gutted! To the right of the window you can see where the door to the outside used to be.  It now leads into the new the family room.  The new addition was phase one and its progression is ahead of the kitchen (phase two).  It's all very exciting!
DSC_0246

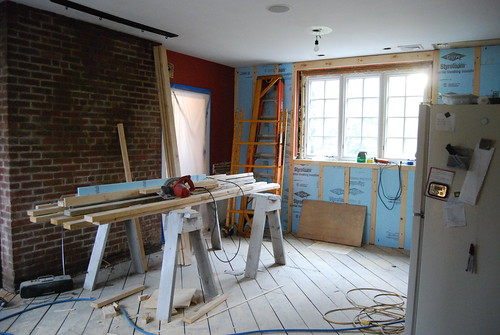
Above is where the range was.  We are keeping the brick wall exposed and the range will have a home there once again.
DSC_0245

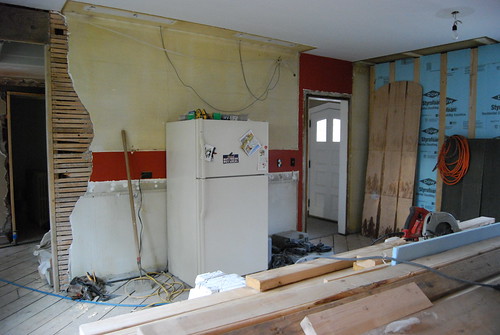
In this photo, you can see how the walls were constructed.  The walls are hard as rock, which is why the contractor decided to keep them mostly intact and build over them.
DSC_0244

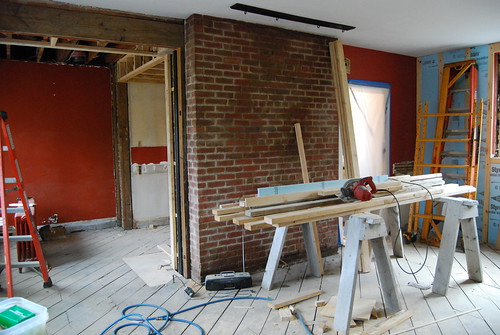
Above and below are photos of the space that used to be my office.  We have great plans for this space, but you'll have to check back to see what we do with it!  My new office will be in a separate room just off the kitchen.
DSC_0243

Did I mention that we're living in the house during all this construction?   Most of my living is done just on the other side of that very thin piece of plastic over the doorway.  There's noise (sometimes so loud you can't hear yourself talk) from 7 am sharp to 3:30.  Somehow I've managed not to lose it, although I've had moments of temporary insanity.   In my next post, I'll show you my temporary kitchen set-up!

Thursday, September 20, 2012

Rome Cooking Class Part 2: View from the Rooftop and Fried Pizza Dough with Tomato-Basil Dipping Sauce


The hands-on cooking portion of our class in Rome was held at the gorgeous private apartment of chef Violetta.  After climbing up the winding and narrow stairs to the 3rd story of the building, we were led into her beautiful apartment and out to one of her rooftop patios.  This patio you see in the photo above was draped with flowy white linens to tame the hot sun and lined with pots and pots of lavender and rosemary and small citrus trees. 


Looking out from the patio, we were surrounded by views of cathedrals and buildings, many with their own rooftop gardens.  It was hard to believe that we were in the heart of the city because it seemed so peaceful there.


Back inside the kitchen, Violetta fried some pizza dough which she had purchased from a pizza shop and served it with a delicious chunky tomato basil dipping sauce.  So simple, yet so delicious.  It was probably my favorite of all the delicious things we ate that day.  

I couldn't wait to reproduce it at home because I knew the kids would love it.  I also wanted to make it when the tomatoes were at their prime and fresh basil was abundant in the garden, and that is right now - so there was no delaying!  Of course you can also buy pizza dough already made from your local pizzeria, but you can also easily make it yourself with the recipe below or use your favorite pizza dough recipe.  The tomatoes in the dipping sauce should be of the small sweet variety and do not need to be peeled or seeded.  Try this appetizer and you can imagine that you are in the heart of Italy, eating a specialty of Rome!


Neo-Neopolitan Pizza Dough
adapted from American Pie by Peter Reinhart
Makes 2 10-inch pizzas or  about 24 fried pizza balls

2 1/2 cups all purpose flour
1 1/2 Tablespoons honey or sugar
1 teaspoon sea salt
1/2 teaspoon instant yeast
1 Tablespoon olive oil
7/8 cup room-temperature water
Peanut or vegetable oil for frying

Combine flour, salt, and yeast in a mixing bowl.  Combine the honey, olive oil, and water in a cup and add to the flour mixture.  Stir with a wooden spoon until combined.  Set the dough aside to rest for 5 minutes.

Turn dough out onto work surface and knead for 5-10 minutes, adding more flour if necessary to keep the dough from sticking too much.  Or knead using the dough hook in your mixer bowl.  Generally speaking, you want the dough to be wetter and stickier than your typical bread dough. It should be dry enough that it holds together and pulls away from the side of the bowl when you mix it, but it will still be a bit sticky.

Place the dough in an oiled bowl, turning the dough so that the oil is on all sides of the dough and cover with plastic wrap.  Let the bowl sit at room temperature for 15 minutes, then refrigerate overnight.  If you want to make the fried dough that day, then let the dough sit at room temperature one hour and then refrigerate at least two hours.  Remove the dough from the refrigerator two hours before using.  The dough can sit in the refrigerator up to two days or placed in an oiled tiptop baggie and frozen for up to 3 months.

Heat 3 inches of oil to 350 degrees F in a pot (I used a small pot and therefore less oil).  Break off golf ball-sized rounds of dough and drop the dough into oil and fry on both sides until golden brown.  Remove with a slotted spoon onto a paper towel-lined plate.  Serve warm or at room temperature with dipping sauce.


Tomato-Basil Dipping Sauce
Makes enough for 24 Pizza dough balls or one recipe of the above dough

1/4 cup extra virgin olive oil
2 cloves garlic, crushed with the side of a knife, but still whole
2 pints small sweet plum tomatoes, chopped
salt and pepper to taste
About 20 small fresh basil leaves, preferably torn, not chopped, into small pieces

Heat olive oil in a sauté pan with the garlic until the garlic is fragrant but not browned.  Remove the garlic and discard it.  Add the tomatoes and salt and pepper and simmer until thickened to desired consistency.  Remove from the heat and add the basil leaves.  Serve warm or at room temperature.

Monday, September 3, 2012

Rome Cooking Class Part One: Campo Di Fiori


During our visit to Italy, one of the highlights was a cooking class that was arranged for our group.  The class included a walk around the Campo di Fiori, a well-known produce market in the heart of Rome, to choose our fresh ingredients for the class.  We then took a short walk to the chef's personal home where we learned to make a fresh tomato compote with fried pizza dough, an eggplant cake, and a raspberry tart before sitting on the rooftop patio to eat lunch and enjoy the spectacular view.


I will share the recipes and photos of the class in the upcoming days, but first enjoy the rainbow of colors we saw at the Campo Di Fiori.  We cooked with local, in-season ingredients which we found in abundance at the market.  In Rome, late summer is the season for figs, eggplant, tomatoes and peaches (much like it is here in Pennsylvania).  The market was small compared to the huge markets of Istanbul, but you could find everything you needed to make a delicious Italian meal.


You could find dried pastas of every shape and color, olive oils, spices and Italian cookies.  Surrounding the temporary stalls of produce are small specialty shops where they sell delicious meats and cheeses, and other items for cooking.  I picked up some figs (green and brown for taste testing), balsamic vinegar, soft amaretti cookies, Acacia honey, a bag of lentils and some dried borlotti beans to bring home.  


My suitcase was filled with things for the kitchen!  The airline security in Chicago didn't like the looks of my lentils and beans and pulled me aside to test the packages for traces of chemicals and ran them through the security x-ray twice.  Finally they determined that the lentils were safe and we were on our way home.   I guess I just need to decide what I want to make with my imported ingredients!  I'd love any suggestions you might have!

Tomorrow I will share a simple and fantastic appetizer recipe we learned at the class!

Tuesday, August 21, 2012

Back to School Cookies


Are you ready for school?

We've got a short two weeks left and we are making the most of it.   I've been waiting all summer for our trip to Tuscany (Siena) and Rome, Italy.  Mark is in Siena now and the way he describes it makes me think I may not want to come back! - olive groves, 700-year-old architecture, and pain au chocolat for breakfast.  I'll be joining him tomorrow.  Here's a photo of Siena...


I'll tell you all about it when I get back!
Enjoy the rest of your summer!


Friday, July 20, 2012

Christening Cake with Sleeping Lamb and Baby Blocks


This is a cake I made for a baby boy's Christening.  I sculpted the lamb out of marshmallow fondant mixed with a little tylose powder so that it would harden when dry.  To make the lamb's wool I rolled out little ropes of fondant, then rolled them into swirls and attached them with a little water.  The black details are Americolor edible marker.  


I printed out the letters and numbers onto paper in the chosen font, set the paper over the strip of fondant, and used a pin to mark where the letters should go.  Then I piped the letters with royal icing, using the pin marks as a guide.  It worked like a charm!


The blocks are solid marshmallow fondant with royal icing letters.  I weighed the fondant on a scale so that each block would be the same size, then molded them into shape (not as easy as you might think!)  Next time, I would insert wooden skewers into the cake and then place the blocks onto the skewers to give the blocks a bit more support.  I also would have rolled the fondant a but thicker to make it more opaque.  Every project is a learning experience!


Tuesday, July 17, 2012

Pink and Orange Graduation Dessert Table

I just love this pink and orange dessert table.  The colors just pop against the white icing and the hot pink tablecloth.


It didn't hurt that the weather was simply gorgeous that day!


Here are some behind the scenes pics of the finished pops.


And my snapware cupcake carriers from Costco came in mighty handy once again.  Costco doesn't have them anymore, but I think Martha Stewart has caught on and she is selling them at Macy's.  I also think you can get them online.  I simply love them and use them for everything.


More pops.  Save the styrofoam from the purchases you make - they are indispensible for letting the coating dry on the brownie pops.


Brownie pops swirls - my favorite way to decorate pops!


Sunday, July 15, 2012

Decorating Cupcakes Using Royal Icing Transfers


A friend asked me to make cupcakes with the number "18" on them for her daughter's 18th birthday celebration.  I didn't want to pipe the 18's with icing because I didn't think they would look uniform enough, so I decided to make the "18" using royal icing.  I love the uniformity and the dimension these gives to the cupcake.


 Here's how I made these:

1.  Find a font type and size of the numbers you want to place on the cupcake and print them out on paper.
2.  Tear out strips of waxed paper and place the paper with the printed number underneath the waxed paper where you want to pipe.
3.  Using stiff royal icing and a small tip such as a PME #1.5, pipe the outline of the number.  Make sure there are no gaps in your outline.  Slide the printed number underneath the waxed paper and repeat the outlining until you've piped the desired number of outlined numbers.
4.  Fill in the outlines with flood consistency royal icing and let dry overnight.  If you are using the same color to outline and flood, you do not need to wait for the outline to dry before you flood.
5.  Once dry, carefully peel the number from the waxed paper.  I used a small, thin offset spatula to help loosen the number from the waxed paper.  Make extra, because a few may break.
6.  Ice cupcakes and set the number on top.  And voila!  Cute cupcakes!


LinkWithin

Related Posts Widget for Blogs by LinkWithin