Wednesday, November 25, 2009

Pork Potstickers with Sesame-Ginger Dipping Sauce - A Great Holiday Appetizer

Pork Wontons

I used to watch Alton Brown on the Food Network. If I hadn't, I probably would never have tried these potstickers. But sometimes it just takes watching someone else making something to realize, "Hey, I could do that!" Finding the wonton wrappers in the grocery store might just be the hardest part! (You can find wonton wrappers in the produce section of the grocery store in a refrigerated case.)

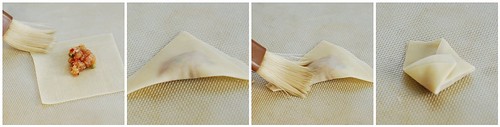
There are many ways to shape potstickers and this is how I assemble them...
1. Place about a teaspoon of filling in the center of the wonton wrapper.
2. Fill a small bowl with water. Dip a pastry brush in water and brush along two sides of the wrapper. This will act as the "glue"
3. Fold the wonton in half, lifting the unmoistened sides over the filling to meet the moistened sides. Press the sides together with your fingers while trying to remove any air that is inside the potsticker.
4. Brush across the top of the folded potsticker and fold the two points over to make the little envelope shape.

Pork Wontons

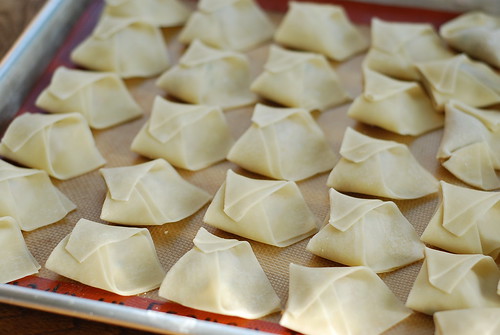
Line your wontons on a baking sheet lined with parchment or a silicone mat. Cover these with a damp cloth until ready to cook, or you can place them in single layers in an airtight container, placing plastic wrap between each layer. I don't recommend freezing them in a freezer bag because the "tips" of the shaped potstickers get brittle when frozen and will break off when jostled around in the freezer. You can cook the potstickers right from the freezer without thawing but I would add a minute or two to the cooking. This makes these little morsels perfect for a make-ahead holiday appetizer.

Pork Wontons

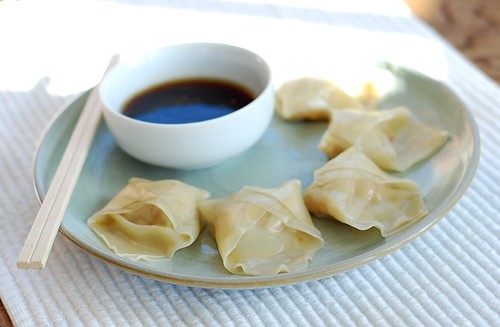
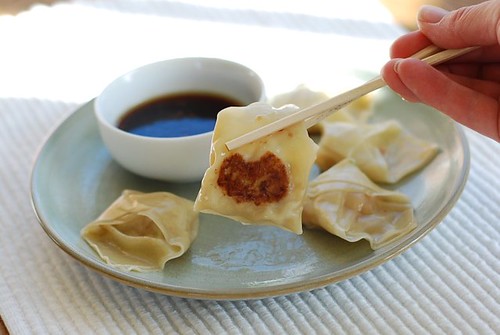
Carefully follow Alton's directions for cooking these and you'll get perfect potstickers with a nicely browned underside. Serve warm with dipping sauce and chopsticks. Delicious!

Pork Wontons

Perfect Potstickers
From Alton Brown's Good Eats, 2004Makes 35 to 40 potstickers

Ingredients
1/2 pound ground pork
1/4 cup finely chopped scallions
2 tablespoons finely chopped red bell pepper
1 egg, lightly beaten
2 teaspoons ketchup
1 teaspoon yellow mustard
2 teaspoons Worcestershire sauce
1 teaspoon light brown sugar
1 1/2 teaspoons kosher salt
1/2 teaspoon freshly ground black pepper
1/4 teaspoon cayenne pepper
35 to 40 small wonton wrappers
Water, for sealing wontons
3 to 4 tablespoons vegetable oil, for frying
1 1/3 cups chicken stock or water, divided (I use water)

Directions
Preheat oven to 200 degrees F.
Combine the first 11 ingredients in a medium-size mixing bowl (pork through cayenne). Set aside.
To form the dumplings, remove 1 wonton wrapper from the package, covering the others with a damp cloth. Brush 2 of the edges of the wrapper lightly with water. Place 1/2 rounded teaspoon of the pork mixture in the center of the wrapper. Fold over, seal edges, and shape as desired. Set on a sheet pan and cover with a damp cloth. Repeat procedure until all of the filling is gone.

Heat a 12-inch saute pan (not a non-stick pan) over medium heat. Brush with vegetable oil once the pan is nice and hot. Just a thim coating of oil is needed. Add 8 to 10 potstickers at a time to the pan and cook for 2 minutes, without touching or moving the potstickers (this is important!). Once the 2 minutes are up, gently add 1/3 cup chicken stock or water to the pan, turn the heat down to low, cover, and cook for another 2 minutes. Remove wontons to a heatproof platter and place in the warm oven. Clean the pan in between batches by pouring in a little water and allowing the pan to deglaze, then wipe clean with a paper towel. Repeat until all the wontons are cooked. Serve immediately.

Soy Ginger Dipping Sauce
from Cooking Light

2 tablespoons rice wine vinegar
2 tablespoons low-sodium soy sauce
1 tablespoon water
1 tablespoon dark sesame oil
1 teaspoon minced, peeled fresh ginger
1/4 tsp crushed red pepper
1 garlic clove, minced

Combine all ingredients, stirring well with a whisk.

Monday, November 23, 2009

Pumpkin Eggnog Pie

Pumpkin Eggnog Pie

It's almost Thanksgiving and I am headed over the river and through the woods to Grammy's house for Thanksgiving dinner. One of the things I'll be bringing is this Pumpkin Eggnog Pie. I've tried a few other pumpkin pie recipes but I always went back to the recipe on the Libby's Pumpkin label - until my friend Megan told me about this recipe. It's so smooth and creamy and delicious - yet still traditional for those traditionalists out there. It really begs for a dollop of whipped cream but this was only the dress rehearsal after all. For the big show there will certainly be plenty of whipped cream. Happy Thanksgiving!

Pumpkin Eggnog Pie


Pumpkin Eggnog Pie
adapted from Good Housekeeping

1/2 recipe Pate Brisee
1 15-oz can pumpkin (not pie filling)
1 1/4 cup eggnog (from a carton such as Land o' Lakes)
2/3 cup sugar
3 eggs
1/4 teaspoon salt
3/4 teaspoon cinnamon
1/2 teaspoon ginger
1/4 teaspoon cloves
1/4 tsp nutmeg
(or use 1 1/2 teaspoons pumpkin pie spice in place of the cinnamon, ginger, cloves and nutmeg)

Prepare pie crust and place it into a 9- or 10-inch pie pan and crimp the edges as desired.

Preheat oven to 375 degrees F. In large bowl, with wire whisk, mix pumpkin, eggnog, sugar, spice, salt, and eggs until well blended. Pour pumpkin mixture into the pie crust. The mixture will come up to almost the top of the piecrust. (Any extra custard can be baked in a custard cup. It is done when the center no longer jiggles.)

Bake pie 60 to 65 minutes or until filling puffs up around edges and center is just set but not puffed. Cool pie completely on wire rack. Refrigerate until ready to serve or up to 1 day. Garnish each serving with whipped cream sprinkled with pumpkin-pie spice.

Wednesday, November 18, 2009

Italian Semolina Bread

Semolina Bread

Here it is...the final piece to round out the dinner party menu. In case you missed the other parts of the menu, check out the links...

Italian Semolina Bread (see below)

There was nary a crumb left on anyone's plate, and everyone helped themselves to seconds, so I'll call that a successful dinner! Even better was the fact that nothing on the menu was too difficult or time-consuming. If you weren't into bread-baking, you could pick up an artisan loaf from your local market and save yourself the trouble of making it yourself. But if you know about Artisan Breads in 5 Minutes a Day, you'll know that you can make the dough a few days ahead and bake it up a few hours before your party. It doesn't get much fresher than that! The authors of that book have come out with a sequel called Healthy Bread in 5 Minutes a Day. It explains how to make whole grain and gluten-free breads the "5 minute" way.  Use a pizza stone to get the best results.

Italian Semolina Bread
adapted from Artisan Bread in Five Minutes a Day by Jeff Hertzberg and Zoë François
Makes four 1-pound loaves. The recipe can be doubled or halved.


3 cups lukewarm water
1 ½ tablespoons granulated yeast (1 ½ packets)
1 ½ tablespoons salt
3 cups durum semolina flour
3 ¼ cups unbleached all-purpose flour
Sesame seeds for top crust, approximately 1 to 2 teaspoons
Cornmeal for the pizza peel
Cornstarch wash (see below)

Cornstarch Wash: Using a fork, blend ½ teaspoon cornstarch with a small amount of water to form a paste. Add ½ cup water and whisk with the fork. Microwave or boil until mixture appears glassy, about 30 to 60 seconds on high. It will keep in the refrigerator for two weeks; discard if it has an off smell.

Mixing and Storing the dough:
Mix the yeast and salt with the lukewarm water in your 5-quart bowl electric mixer bowl. Mix in the flours without kneading with the dough hook of your heavy-duty stand mixer until the mixture is uniform. The dough should be wet. Cover (not airtight), and allow to rest at room temperature until the dough rises and collapses (or flattens on top), approximately 2 hours. The dough can be used immediately after the initial rise, though it is easier to handle when cold. Refrigerate in a lidded (not airtight) container and use over the next 14 days.

On Baking Day:
Dust the surface of the refrigerated dough with flour and cut off a 1-pound (grapefruit-size) piece. Dust the piece with more flour and quickly shape it into a ball by stretching the surface of the dough around to the bottom on all four sides, rotating the ball a quarter-turn as you go. Elongate the ball to form an oval-shaped free-form loaf. Allow to rest and rise on a cornmeal-covered pizza peel for 40 minutes.

Twenty minutes before baking time:
Preheat the oven to 450° F with a baking stone placed on the middle rack. Place an empty broiler tray on any other shelf that won’t interfere with the rising bread. Just before baking, paint the surface with cornstarch wash, sprinkle with sesame seeds, and slash the surface diagonally, using a serrated bread knife. Slide the loaf directly onto the hot stone. Pour 1 cup of hot tap water into the broiler tray, and quickly close the oven door. Bake for 30 to 35 minutes, until deeply browned and firm. Smaller or larger loaves will require adjustment in baking time. Allow to cool before slicing or eating.

Tuesday, November 17, 2009

Sauteed Mushrooms

Sauteed Mushrooms

Sauteed Mushrooms and crusty Semolina Bread are delicious additions to this menu including  Grilled Filet Mignon, and Cranberry Walnut Salad.  Finished the meal with a Pear Custard Galette for dessert and this delicious coffee.  I don't think anyone would be disappointed with this meal!

Dinner Party Menu

Sauteed Mushrooms
Serves 6

2 tablespoons butter
2 tablespoons olive oil
1 1/2 pounds baby portobello mushrooms, sliced
2-3 shallots or 1/4 cup red onion or scallions, minced
3-4 sprigs of fresh thyme
a splash of dry vermouth
salt and freshly ground pepper, to taste

Melt the butter and olive oil in a large skillet. After the butter stops foaming, add the shallots, sliced mushrooms and thyme springs and saute over med-high heat, stirring occasionally. Add some salt and pepper and cook until the mushrooms are slightly browned and caramelized. Add the vermouth and cook for a few more minutes while scraping the caramelized bits from the bottom of the pan. Serve warm or at room temperature. Remove the thyme sprigs before serving.


Wednesday, November 11, 2009

Cranberry Walnut Salad with Champagne Vinaigrette

Cranberry Walnut Salad

I wanted to share with you one of my favorite salads. It's a quick salad that requires no chopping of veggies and can be on the table in no time. It's sweet and tart and just plain delicious. Toast up some crusty bread and have yourself and healthy and delicious lunch!

Cranberry Walnut Salad
Spring Greens Mix (I use Earthbound Farms)
dried cranberries
walnuts, crumbled with your hands
crumbled blue cheese

Place all ingredients in a bowl in the amounts you desire. Now that was easy!

Vinaigrette
from Alice Waters' The Art of Simple Food

1 tablespoon Champagne vinegar, or your favorite vinegar
1 teaspoon Dijon mustard
salt and pepper to taste
3-4 tablespoons extra-virgin olive oil

Whisk together the vinegar, mustard, salt and pepper in a bowl. While whisking, add the olive oil, a little at a time, until the dressing tastes balanced. Toss with your salad and serve immediately.

Friday, November 6, 2009

Pear Custard Galette

Pear Custard Galette

The recipe is from Dorie Greenspan's Baking From My Home To Yours. It is a recipe that can use just about any fruit you have and Dorie suggests a few in her book, including various stone fruits and rhubarb. These in-season Bosc pears held their shape and tasted sweet and delicious. There are no added spices so you really experience the pure taste of the fruit itself, so it's best to use the most flavorful in-season fruit you can find.  The recipe calls for assembling and baking the pear galette for a little while and then pour the custard mixture wherever there is room between pears and bake for a little longer for the custard to set up. Serve the galette while still slightly warm with a scoop of good vanilla ice cream or creme fraiche on the side. 

Pear Custard Galette


Pear Custard Galette
adapted from Dorie Greenspan's Baking: From My Home to Yours
serves 6-8

For the galette:
Pie Crust for a single crust (I use half of  this recipe)
2-3 Tablespoons jam or marmalade, ginger marmalade recommended, but you can use any you like
2 graham crackers, crushed
4-6 pears, ripe but firm
1 Tablespoon turbinado or similar coarse sugar

For the custard:
3 tablespoons unsalted butter, melted and cooled
1/3 cup sugar
1 large egg
1/2 teaspoon vanilla extract

Preheat oven to 425 F.   Roll out the dough into a 12-13-inch diameter circle, about 1/8" thick.  Transfer the crust to a baking sheet.  Lightly score a circle in the center with a 10-inch diameter.  You will arrange the filling inside this inner circle.  Spread the jam inside the smaller circle and sprinkle with graham cracker crumbs.  The juicier the fruit you have, the more crumbs you will want to add to absorb the moisture as the fruit cooks.  Place the crust in the refrigerator while you prepare the fruit.  Quarter the pears and remove the peel and core.  Arrange the pears on top of the graham cracker crumbs, cut side down in a circular pattern.  Fold the outer circle of the crust up over the edges of the fruit, making pleats as needed until you have brought all of the outer crust up over the edges of the pears.  Brush the top of the crust lightly with water or cream, and sprinkle with coarse sugar.  Bake the galette for 25 minutes.

While the galette is baking, prepare the custard.  Whisk all of the custard ingredients in a small bowl.  After the galette has baked 25 minutes, remove it from the oven, but leave the oven on.  Carefully pour as much of the custard around the pears that it will hold  (you will probably not use all of the custard mixture - I used about half).  Bake the galette for another 10-15 minutes or until the custard is set and no longer jiggles.  Cool the galette on the baking sheet on a cooling rack for 15 minutes, then transfer the galette to cool directly on the cooling rack.  Serve at warm or at room temperature, preferably the same day it is made, with a small scoop of vanilla ice cream.


Monday, November 2, 2009

Prize-Winning Peanut Butter Banana Cream Pie

Peanut Butter Banana Cream Pie

Last month, I attended the Second Annual Pie Contest in Slippery Rock, PA, organized by my amazing mother-in-law (Happy Birthday by the way!) and a few of her neighbors. There were at least 25 pies entered in 5 pie categories - Cream, Fruit (except apple), Apple, Nut, and Custard.

Ellen and I both entered a pie. I baked a new recipe for pumpkin pie and topped it with whipped cream. It was pretty good but maybe a little too sweet.

Ellen found a recipe on Epicurious for this phenomenal Peanut Butter Banana Cream Pie. I wish I had taken a picture of an individual slice. Imagine from bottom to top - vanilla wafer crust, a layer of vanilla custard, sliced bananas, a layer of peanut butter mousse, and garnished with bananas and peanut brittle for a little crunchy contrast in texture. After a while, the peanut brittle started to dissolve a little and looked like drizzled caramel on top of the bananas. It was unbelievably good! Her pie won the cream pie category! Congratulations Ellen! You rock!

Here are some photos from the day - notice the aprons hanging on the clothesline for decoration. It was a great time to socialize while eating lots of pie. We were all judges and rated the pies we chose to try by assigning a number from 1 to 5 in five categories including appearance, taste, originality, and crust. The organizers tallied all the ballots and the pies with the highest score won for each category. After the five winners were announced, there were several overall judges who again tasted each of the winners' pies and rated them again. The winner of this won Best of Show. The Apple Raisin Streusel Pie won the Best of Show this year. Each participant was given a handmade knitted dishcloth and each winner was given a handmade apron. It was a terrific day.

Pie Contest Mosaic

Now for some of the pies...Mixed Berry, Pumpkin, Strawberry, Apple Streusel, Pumpkin Meringue, and Coconut Cream and many more!

My creation

Peanut Butter Banana Cream Pie
From Bon Apetit, May 2009
recipe courtesy of Matt Lewis and Renato Poliafito

Vanilla wafer crust:
6 ounces vanilla wafer cookies
6 tablespoons (3/4 stick) chilled unsalted butter, cut into 1/2-inch cubes
2 tablespoons sugar

Vanilla pudding filling:
1/3 cup sugar
1 1/2 tablespoons cornstarch
1/8 teaspoon salt
1 cup heavy whipping cream
1/2 cup whole milk
2 large egg yolks
1 vanilla bean, split lengthwise
1 tablespoon unsalted butter
4 firm but ripe bananas, peeled, divided
3 tablespoons orange juice, divided

Peanut butter layer:
3 ounces cream cheese, room temperature
1/2 cup powdered sugar
1 teaspoon vanilla extract
1/3 cup creamy peanut butter (do not use old-fashioned or freshly ground)
2/3 cup chilled heavy whipping cream
Purchased peanut brittle, coarsely chopped (optional)

For vanilla wafer crust:
Preheat oven to 350°F. Combine all ingredients in processor; blend until mixture resembles moist crumbs, about 1 minute. Transfer to 9-inch-diameter glass pie dish and press mixture onto bottom and up sides (not rim) of dish. Bake crust until golden brown, about 12 minutes. Remove from oven; press crust with back of spoon if puffed. Cool crust completely.

For vanilla pudding filling:
Whisk sugar, cornstarch, and salt in heavy medium saucepan until no lumps remain. Gradually whisk in cream, then milk. Add yolks and scrape in seeds from vanilla bean; whisk to blend. Cook over medium heat, whisking constantly, until pudding thickens and boils, about 5 minutes. Add butter and stir until melted. Spread warm pudding in cooled crust. Chill until filling is cool, about 1 hour. Thinly slice 3 bananas on diagonal. Combine banana slices and 2 tablespoons orange juice in medium bowl; toss to coat. Transfer banana slices to paper towels and pat dry. Arrange enough banana slices in single layer over vanilla custard filling to cover completely.

For peanut butter layer:
Using electric mixer, beat cream cheese and powdered sugar in medium bowl until smooth. Beat in vanilla, then peanut butter. Beat cream in another medium bowl until firm peaks form. Fold large spoonful of whipped cream into peanut mixture to loosen, then fold in remaining cream in 2 additions. Spread peanut butter layer evenly over bananas. Chill at least 3 hours.

DO AHEAD: Can be made 8 hours ahead. Keep chilled. Thinly slice remaining banana on diagonal. Toss with remaining 1 tablespoon orange juice, then pat dry with paper towels. Arrange banana slices around top edge of pie. Sprinkle peanut brittle over bananas, if desired, and serve.

LinkWithin

Related Posts Widget for Blogs by LinkWithin