Thursday, November 21, 2013

Lentil and Eggplant Stew


This past summer, I grew eggplant successfully for the first time.  Maybe it was the new raised beds we made with fresh dirt and compost that did the trick.
  

Or maybe it was the ample rain we got throughout the season. (We barely had to water the plants all summer!)


In years past, my eggplant just didn't produce, but in the summer of 2013 we had the nicest crop of tomatoes, peppers, and eggplant that I've ever seen.  I didn't do anything differently, and I don't ever use fertilizers or pesticides.  I'm always amazed at how many tomatoes can grow on just one plant without any fussing at all.  Tying up the tomatoes was the only thing I made sure to do.


 Since I'd never been able to grow eggplant in any quantity before, I was at a loss of what to do with them.


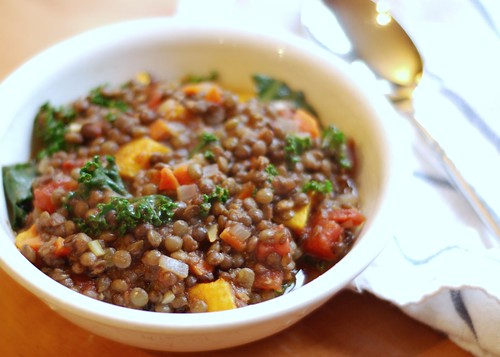
Then I found a recipe for Turkish Lentil and Eggplant Stew at Simply Recipes.  The recipe is similar to another favorite of mine - Lively Yourself Up Lentil Soup.   I made a few changes to Elise's recipe and the result is a new favorite meatless lentil soup!  I recommend doubling the recipe and freezing to enjoy the goodness all winter long.

Eggplant and Lentil Stew
Serves 4-6

1 1/2 pounds eggplant, cut into cubes (Can substitute butternut squash or sweet potato)
1/2 cup brown or green lentils
1/4 cup extra virgin olive oil, plus more for roasting eggplant
1 medium onion, diced
2 large cloves garlic, minced
1 tablespoon tomato paste
1 quart whole tomatoes, undrained (or 4 large fresh tomatoes, seeded, peeled and chopped)
1 jalapeño pepper, some or all of the seeds removed for desired heat, minced
2 sprigs fresh oregano, or 1/2 tsp dried
pinch of crushed red pepper flakes, or to taste
1 tsp salt
1/2 tsp pepper
2 tablespoons parsley, chopped
Two big handfuls of hearty greens such as kale or swiss chard, stems removed and leaves chopped (optional)
2 tablespoons fresh cilantro for garnish, chopped (optional)

1.  Preheat the oven to 400 degrees F.  Place the eggplant cubes in a colander and sprinkle with salt.  Let sit in the sink for 1/2 hour while the oven is preheating.  Spread the eggplant out onto a baking sheet and drizzle with ample amount of olive oil.  Bake until eggplant is soft and beginning to caramelize.

2.  Check that the lentils do not contain any small rocks or dirt.  Place the lentils in a saucepan add enough water so that the lentils are covered by an inch of water.  Bring the lentils to a boil, then reduce heat and simmer until just tender, about 15-20 minutes. Drain.

3.  Heat 1/4 cup olive oil in a pot over medium heat.  Add the onions and jalapeño and cook until soft.  Add the garlic and cook for one minute.  Add the tomato paste and cook until heated through.  Add the tomatoes, cooked lentils, oregano, crushed red pepper, salt and pepper and parsley and simmer for 30 minutes.  Add water to obtain the desired thickness of the stew.   Add eggplant and greens, if using, and continue to cook until greens are wilted and tender, about 10 minutes.  Adjust seasonings to taste.  Remove from heat, pull out oregano stems and stir in the fresh cilantro, or garnish each bowl with cilantro and a drizzle of olive oil to taste. (I add extra cilantro to my bowl!)


Saturday, October 12, 2013

Applesauce Spice Cake with Cream Cheese Frosting


It's mid-October and I have to accept that summer is gone, so I'm embracing Fall with this Applesauce Spice cake.  This is the recipe you've been searching for if you are looking for that perfect spice cake - moist and delicious with just the right combination of spices.  I haven't tried, but I bet you could change it up and add chopped apples or nuts, or substitute pumpkin puree for the applesauce.  These would be a great thing to take with you to the pumpkin patch!  Happy Fall!

Applesauce Spice Cake
Adapted from Today's Letters Blog

Make in a 13x9" pan, or make cupcakes, or 6" or 8" round layers

1 jar (24oz by weight) applesauce (I used homemade)
1/2 cup (4oz, 1 stick) unsalted butter, softened
2 large eggs
2 cups sugar
3/4 tsp vanilla
3 cups all-purpose flour
1 tsp salt
2 tsp baking soda
2 tsp cinnamon
1/2 tsp nutmeg
1/2 tsp cloves
1/2 tsp allspice

Cake Directions:

1.  Preheat oven to 350 degrees F.  Prepare your baking pans by lining cupcake tins with liners, or lightly greasing cake pans with Pam spray and lining the bottom with parchment and lightly spray the parchment.

2.  In a medium bowl, whisk together the flour, salt, baking soda,  cinnamon, nutmeg, cloves, and allspice.  Set aside.

3.  In a bowl of your electric mixer, beat together the butter, sugar and vanilla until fluffy.  Add eggs one at a time, mixing well between additions and scraping the side of the bowl as needed.

4.  Alternate adding the flour mixture and the applesauce to the egg mixture, beginning and ending with the flour mixture and mix until all the ingredients are incorporated.

5.  Pour batter into pans and bake for the times listed below or until a toothpick inserted a the center of the cake comes out clean.
13x9" pan - about 50 minutes
6" or 8" round layers - about 30 minutes
cupcakes - about 20 minutes

6.  Cool completely before icing with your favorite cream cheese icing or maple glaze.


Saturday, October 5, 2013

Butterscotch Pecan Ice Cream


It's October and we're having a heat wave!  I love it, but my kids are ready for it to be cool and fall-like.  Of course, it doesn't need to be hot to enjoy delicious ice cream.

This is butter pecan ice cream with a twist - the scotch whiskey added to this recipe gives the ice cream a grown-up flavor which is hard to resist.   I think this ice cream would pair well with a fall dessert like spice cake or pumpkin pie.  Hot weather or not, you should try this ice cream!


Butterscotch Pecan Ice Cream
from The Perfect Scoop by David Lebovitz

5 Tablespoons butter
3/4 cup packed dark brown sugar
1/2 teaspoon coarse salt
2 cups heavy cream
3/4 cup whole milk
6 large egg yolks
1/2 teaspoon vanilla extract
1 tablespoon scotch whiskey (optional, or use a little less to taste)
Buttered Pecans, coarsely chopped (recipe follows)

Melt the butter in a saucepan, stir in brown sugar and salt, then whisk in 1 cup of the cream and the milk.  Warm the mixture and pour the remaining cream into a large bowl and set a mesh strainer on top.

In  separate bowl, whisk together the egg yolks.  Ladle about half of the warmed sugar mixture into the egg yolks while whisking constantly.  Scrape the egg mixture back into the saucepan and heat the mixture while stirring constantly until the mixture thickens and coats the spoon.  Pour the custard through the strainer and stir it into the cream.  Add the vanilla and scotch and allow to cool.  Chill the mixture in the refrigerator for at least 3 hours.  Freeze the chilled custard in an ice cream machine and during the last few minutes of churning, add the buttered pecans.

Buttered Pecans

1 1/2 tablespoons butter
1 1/2 cups pecan halves
1/4 teaspoon coarse salt

Preheat the oven to 350 degrees F.  Melt the butter in a skillet.  Remove from heat and toss the pecans with the butter and sprinkle with the salt.  Spread the pecans on a baking sheet and bake for 10-12 minutes, stirring halfway through baking.  Remove from oven and let cool.


Saturday, September 28, 2013

Banana Walnut Bran Muffins


Here's another use for those overripe bananas on your counter or in your freezer.  I really enjoyed them.  They were stick-to-your-ribs hearty, but still very tasty.  Great for a grab-and-go breakfast on those busy school mornings!  Substitute chocolate chips for the walnuts for a more indulgent treat.

Marzipan Archives:
5 years ago Zucchini Soup

Banana Walnut Bran Muffins
Makes 12-18 muffins

2 1/8 cups (312g) all-purpose flour
2 1/4 cups (160g) wheat bran
2 tsp baking soda
1 3/4 tsp kosher salt
2 1/2 cups (500g) mashed banana
1 cup + 2 tablespoons (250g) unsalted butter at room temperature
2 large (100g) eggs
1 cup (200g) brown sugar
1 1/3 cups (150g) walnuts, toasted and coarsely chopped
1 cup (150g) sliced ripe banana (I omitted)

Preheat oven to 350 degrees F.  Grease 12-18 muffin cups or line with muffin liners depending on how full you fill the cups and how big you want your muffins to be (I filled the cups to the top and it made about 18 smaller muffins.)

In a large bowl, whisk together the flour, wheat bran, baking soda, and salt and set aside.

In another bowl with a mixer, beat the mashed banana and softened butter until mixed.  The mixture will look lumpy and curdled.  Add the eggs and brown sugar and mix until completely combined.

Fold the dry ingredients into the banana mixture and stir just until combined, then gently fold in the walnut pieces and banana slices.

Scoop the batter into the muffin cups.  Bake for 23-25 minutes or until the muffin is lightly browned and a toothpick inserted into the center comes out clean.

Cool in the pan 5 minutes, then remove from the pan and place on a wire rack to cool completely.  Serve or freeze within 8 hours.


Monday, August 19, 2013

Turtle Cheesecake


Do you know anyone who doesn't like cheesecake?  Even those without a sweet tooth or those with a great amount of will power cannot resist the delicious combination of creamy cheesecake, caramel, nuts and chocolate.  (I have witnessed this firsthand!)

This cheesecake is perfection.  It is different from other cheesecakes in that it does not have your normal graham cracker crust.  You only place a dusting of graham cracker crumbs in the pan before adding the cheesecake filling.  This way the crust doesn't overpower the filling and you are left to enjoy the best part - and it takes away the extra step of mixing the crust and pre-baking it.  I really do prefer it this way.   No graham crackers in the house?  You can substitute any cookie crumbs you might  have on hand - I used crushed Belvita biscuits and it worked perfectly.   You could even use plain dried bread crumbs in a pinch.  

Turtle Cheesecake
from Diner Desserts by Tish Boyle

Note:  For the photo above, I sliced the cheesecake and then drizzled the toppings for serving.  I recommend adding the pecans, but since my daughter has a nut allergy, I did not use them on the cake in the photo.  Cheesecakes freeze quite well, making them great for entertaining.  Leave the cake in the springform pan and wrap with plastic and then with foil and freeze.  Thaw a day or two ahead in the refrigerator and add toppings the day of serving.

Cheesecake Filling:
1/3 cup graham cracker or cookie crumbs (I used crushed Belvita biscuits)
1 3/4 pounds cream cheese, softened
1 1/2 cups granulated sugar
2 Tablespoon cornstarch, sifted
1/2 cup sour cream
4 large eggs
2/3 cup heavy cream
1 Tablespoon vanilla extract

Caramel Topping:
1/2 cup heavy cream
1 cup granulated sugar
1/4 cup water
2 Tablespoons unsalted butter
1 tsp vanilla extract

Pecan Garnish:
1/2 cup pecan pieces, toasted

Chocolate Drizzle:
2 ounces semisweet chocolate, chopped
1/4 cup heavy cream

Cheesecake Filling:
Preheat the oven to 350 degrees F.  Butter the bottom and sides of a 9-inch springform pan.  Dust the pan with the cracker crumbs.

In an electric mixer fitted with the paddle attachment, beat the cream cheese and the sugar on medium speed until smooth and creamy, about 2 minutes.   Add the cornstarch and mix until combined.  Add the sour cream and mix on low speed until combined.  Add the eggs, one at a time, beating well after each addition and scraping down the sides of the bowl as necessary.  Add the heavy cream and vanilla and mix until blended.

Scrape the batter into the prepared pan.  Bake the cake for 30 minutes.  Reduce the oven temperature to 225 degrees F and bake an additional 60-70 minutes , or just until the center no longer looks wet.  Turn the oven off without opening the door and leave the cake in the closed oven for an additional hour.  Remove the cake from the oven and cool on a wire rack for 30 minutes.  Refrigerate the cheesecake for at least 3 hours before making the toppings.

Remove the sides of the springform pan from the cheesecake.  Using a small offset spatula, spread the caramel topping over the top of the cake.  You may have some topping leftover.  Sprinkle the nuts on top, if using, then drizzle with chocolate.  Refrigerate one hour before serving.

Caramel Topping:
Measure out the heavy cream and have it ready near the stove.  In a small, heavy saucepan, combine the sugar and water and bring to a boil over medium-high heat, stirring to dissolve the sugar.  Increase the heat to high and cook the mixture for 8-10 minutes, or until it turns dark amber.  Remove the pan from the heat and gradually stir in the heavy cream (the mixture will bubble).  Return the pan to medium heat and stir just until smooth.  Remove the pan from the heat and stir in the butter until completely melted.  Stir in the vanilla extract.  Transfer the topping to a medium bowl and refrigerate 1 hour, or until spreadable.

Chocolate Drizzle:
Place the chocolate in the top of a double boiler over barely simmering water and heat, stirring occasionally, until completely melted.  Slowly whisk in the heavy cream until smooth.  Allow to cool until it is just warm.  Transfer the chocolate to a plastic resealable bag and cut a small hole in one corner and use it to pipe the drizzle onto the cheesecake.


Wednesday, July 24, 2013

Delicious Homemade Chicken Enchiladas


I was first introduced to these awesome enchiladas by my friend Jen from Hope Studios.  Jen is a great cook and baker and everything she makes is delicious!  She's really great at adding those extra touches to make a dish look great too.  Above are the enchiladas I made and below are the enchiladas Jen made.


This is Mexican comfort food at it's best!  I loved all the toppings she prepared so we could personalize them.  My favorites are avocado, lettuce, just a smidge of sour cream, and lots of cilantro.  Serve these enchiladas with Mexican Rice with Black Beans.  If there are any leftovers, I like to freeze one or two in a container with leftover rice and after a few minutes in the microwave, voila! - instant yummy lunch for one!


Chicken Enchiladas
adapted from The New Best Recipe by Cook's Illustrated
serves 6

1 medium onion, diced 
3 garlic cloves, minced
3 tablespoons chili powder
3 teaspoons cumin
2 teaspoons sugar
16 ounces canned tomato sauce
1 cup water
1 pound boneless skinless chicken breasts, whole
2 cups shredded cheddar cheese
3 tablespoons pickled jalapeno, chopped
1 fresh jalapeno, minced
1/2 cup cilantro, minced
12 6 inch corn tortillas

Coat the bottom of a large saucepan with olive oil and heat over medium low heat. add the onions, cover, and cook until the onions are soft, about 8 minutes.

Stir in the garlic, chili powder, cumin, and sugar and cook until fragrant, about 30 seconds.

Stir in the tomato sauce and water and bring to a simmer. cook until thickened, about 5 minutes.

Place the chicken in the sauce. reduce heat to low, cover, and cook until the chicken is cooked through, about 10 minutes.

Transfer the chicken to a plate and set aside. 

Strain the sauce to remove solids and season with salt and pepper.

When the chicken is cool enough to handle, shred into bite size pieces. toss the chicken with about 1/2 cup of the sauce, 1 cup cheddar cheese, jalapenos, and cilantro and season with salt and pepper.

Preheat your oven to 300F. spray a 9x13 inch pan with non stick spray. set aside.

Warm the tortillas in the microwave so they are pliable. place about 1/3 of a cup of the chicken mixture in each tortilla. roll each and place them seam side down in the pan. continue until the pan is full.

Pour the remaining sauce evenly over the enchiladas. sprinkle with the remaining 1 cup cheddar cheese. cover with foil and bake about 25 minutes, or until the enchiladas are heated through.

Friday, July 19, 2013

Pink Ruffle Cake


While our kitchen was being renovated, I didn't do a lot of baking.  I had an oven, but no counter space and no dishwasher.   But it was a big year for my daughter and her wonderful group of friends. Throughout the year, they were all turning sweet 16, getting driver's permits and licenses and more freedom.  (yay for them, yikes for me!)  Of course they wanted tasty and pretty cakes to celebrate so I did my best!

Here's the how-to:  I frosted the cake with a thin smooth layer of Swiss meringue buttercream icing. Then, I used an Ateco 104 tip (a petal tip) and held the piping bag at a 90 degree angle to the side of the cake with the skinny end of the tip on the top and the larger end of the tip on the bottom.  I started at the top of the cake, applying icing horizontally in a ruffly circle.  (A cake decorating turntable is great to use here.)  I repeated going down the cake, overlapping a tiny bit of the bottom of the previous circle of icing until I reached the bottom.  That's it!  Pretty ruffles for pretty girls!  


Tuesday, July 16, 2013

Giant Cupcake Cake!


I baked this cake for a very cute 9-year-old girl.  She loves cupcakes, and what could be better than a giant cupcake on your 9th birthday!  

I used the Wilton giant cupcake pan.  Although I will link to it here, I'm not sure I'd recommend using it.  The top and bottom cavities are connected and since they are very different shapes, they took very different times to bake.  So the top was done long before the bottom - and the bottom took forever to bake all the way through and ended up denser than pound cake.  The top half was probably a little dry and over-baked.  (good thing there was lots of icing!)

Next time, I would bake multiple cake layers, assembling the layers with icing and then refrigerating until firm.  After the cake is well-chilled, I would carve all around using a serrated edge knife to make the cupcake shape.  A less-than-perfect carving job will be well disguised by the decorations.  The bottom is covered with pink tinted fondant (I made a template from parchment paper first) and the top is covered with chocolate buttercream using a Wilton 1M tip.  A fondant daisy and sprinkles top it off.

I took note of the dimensions (height and diameters) of the pan to guide me in the next giant cupcake I bake.  The cake will cut into 15-20 moderate slices.  Since the cupcake is tall, I would slice the top half separate from the bottom half.   Let me know if you try this cake!  I'd love to see your photos!


Friday, July 12, 2013

A Tennis Cake and A Shortcut: Using Candy Melts for Writing


A problem I run into when I am making chocolate ganache icing for a cake is that I have to make another icing which can be colored with food coloring for the writing on the cake.  This means thinking ahead and getting the butter out to soften, making a fraction of a recipe for buttercream, dirtying another bowl and beaters, and adding food coloring to the right shade.  

So here's a shortcut for you:  If you have candy melts on hand (such as the Wilton brand you can get a JoAnn's), you can place the melted candy coating in a decorator's bottle or a plastic baggie with a small hole cut in the corner and write away!  The candy coating is already colored so there's no need to mess with food coloring (in fact, don't try to add regular gel food coloring to candy melts, or the candy coating will seize.)

Tennis anyone?

Wednesday, July 10, 2013

Margarita and Lime Cookies


Hello and Happy Summer - my favorite time of the year!  I hope you are enjoying the warm temperatures and having a margarita or two.  I'm dusting off my camera and hope to bring you more yummy photos to look at.   Are you baking or working on any fun projects, reading any good books, how is your garden growing?  Let me know in the comments!

Monday, March 4, 2013

Lemon Poundcake Squares


When it comes to bakery fare, I'm pretty hard to please.  I mean, I'm used to nibbling on sweets just hours or minutes from my own oven.  Many times those sweets in the bakery case are dry or taste like they've been sitting just a bit too long.

But I have to say that I used to love Starbuck's Lemon Pound Cake. {They have since changed the recipe I think, because it's not as good as I remember.}   It was lemony and moist and the perfect accompaniment to a chai tea latte.   I'll always ate it from the bottom, so my last bites could all have that sweet lemony icing that's on top.  It's the best part!

Enter these super easy Lemon Poundcake Squares.  They taste exactly like that Starbuck's poundcake, but they're made in a bar form and every single bite has that lemony icing!  Every bite!  Trust me, if you're a lemon poundcake lover you must try these.  But be warned, you'll keep cutting little slices out of the pan until they are all gone.  You won't be able to stop eating these.  Thankfully, I found this recipe on Pinterest and I can have my Iced Lemon Poundcake fix anytime within an hour without leaving the house!  

Other lemony recipes you can find here:


Lemon Poundcake Squares
adapted from Baker Girl
Makes one 9x13" pan of lemon squares; recipe may be halved and baked in an 8 x 8" pan

Note:  I doubled the icing from the original recipe, so if you want a thinner layer of icing on top, cut the amount of icing in half.


1 1/2 cups all-purpose flour
1 1/2 cups granulated sugar
1/2 teaspoon salt
1 cup (2 sticks) butter, softened
4 large eggs
1 Tablespoon lemon zest
3 Tablespoons lemon juice

Lemon Glaze:
2 cups powdered sugar
3 tablespoons lemon juice (or more for desired consistency)


Preheat oven to 350°F. Spray an 9-by-13-inch baking dish with cooking spray and set aside. Zest and juice three small lemons; set aside.  (You will need a total of 6 tablespoons lemon juice and 1 tablespoon of zest for the cake and glaze.)

In the bowl of an electric mixture fitted with the paddle attachment, beat the flour, sugar, salt, and softened butter until combined.

In a separate bowl, whisk together the eggs, lemon zest, and lemon juice until combined. Pour into the flour mixture and beat at medium speed until smooth and creamy, about 2 minutes. Pour into baking dish and bake for 25 minutes, or until just starting to turn golden around the edges and a toothpick inserted into the center of the batter comes out clean. Allow to cool completely before glazing.

Make the glaze by whisking together the powdered sugar and lemon juice.  Add more powdered sugar or lemon juice to get a pourable but not-too-thin consistency.  Spread over the cooled bars with an offset spatula and let set.  Cut into squares when icing is dry.

Thursday, February 28, 2013

Kitchen Update

I promised a kitchen update about a month ago!   I'm happy to say that things are progressing and the end is in sight!

Our project, which involved much more than just the kitchen, is just a few short weeks away from completion.

The stress, the worrying, the sleepless nights, the decisions that were looming and seemed so huge... it's all going away and being replaced by excitement and anticipation!

There is still a lot to do, but here's what's done:

The floor was installed and finished (this is actually part of the new family room)


The drywall went up

And the walls were finished - goodbye rusty orange!!


 The walls and trim were painted, the cabinets were installed


The recessed lights were put in and the soapstone was placed - aack!  So exciting!

It's all coming together and I've been told I'll be able to move into the kitchen in a couple of weeks.  Still to do - seal the brick, and install appliances, stainless countertops, sinks, faucets, cabinet hardware and tile backsplash.  How I wish I were on the Property Brothers timeline.  Our entire project would've been completed months ago!  Someone please tell me how they complete a major renovation from start to finish in 5 weeks!


Friday, February 15, 2013

Pittsburgh Penguins Cake


Hockey is back in Pittsburgh!

And what's better for a hockey fan's birthday than the team's logo on a traditional yellow cake with chocolate icing?

I decided to use the royal icing transfer method to make the decorations on the cake.  The advantage is that the design can be made ahead of time so you don't have to worry about decorating at the last minute.

It's just like decorating a cookie with royal icing, except you are piping directly onto waxed paper instead of onto a cookie.  The design can be printed out on paper and placed under the waxed paper so you know exactly where to pipe.

Outlines of the design need to be piped with stiff-consistency icing, allowed to dry, and then the spaces are "flooded" with 10-second icing.   10-second icing is stiff icing to which water has been added a few drops at a time until a spoon can be drawn through the icing and the icing becomes completely smooth in 10 seconds.  A good video for learning how to get the right consistency for flooding can be found here.

Let's Go Pens!


Monday, February 4, 2013

Cute Monster Party Brownie Pops


I made these cute monster brownie pops for a little boy's birthday party.  I love the way they turned out!  If you want to try these yourself, I have listed the supplies I used to make them below.

Note:  Have all the decorations ready because they need to be applied while the dipped brownie pop is still wet.  Use water and a small paint brush to attach the fondant teeth to the fondant mouth.

Red Monster - red candy melts for coating, upside down confetti hearts for horns, nonpareils, candy eyes (purchased from a baking supply store), fondant mouth and teeth
Green Monster - green candy melts for coating, green decorating sugar, candy eyes and fondant mouth/teeth
Yellow Monster - yellow candy melts for coating (use a toothpick to make him furry), red string licorice for horns, candy eyes, fondant mouth/teeth
Blue Monster - blue candy melts for coating (use a toothpick to make him furry), candy eye, fondant mouth/teeth

Happy Baking!

Thursday, January 31, 2013

Lentil Soup with Kale and Butternut Squash

Lively Yourself Up Lentil Soup

It's a dreary and cold day in late January and maybe you have just spent the last couple of days unintentionally loading up on sugary carbs and now you're feeling sluggish and generally crappy.  What do you do now?

Make some of this lentil soup!  It's meatless - vegan actually - unless you decide top with a poached egg which is also quite good.  It's colorful and delicious and every bite gets you back to feeling good again, even though it's still late January and still cold and dreary.

A few important items about this soup:

1.   Try to find French green lentils, also called Puy lentils, or black beluga lentils for this soup.  They hold up to cooking and don't break apart and turn to unrecognizable mush like other lentils have a tendency to do when cooked.  I have great luck finding these varieties in the bulk section of groceries like Whole Foods.

2.  Substitute roasted sweet potato for the butternut squash if you desire.

3.  Any hearty green will work.  I prefer kale in this recipe, but I've also used swiss chard which is also quite good.  The kale is just a bit heartier and chewier and stays defined in the soup a bit better.

4.  The leftovers may not be quite as colorful as the kale tends to turn less green as it sits, but it will be just as delicious as the day it was made.

5.  The leftover soup can be frozen quite successfully.

Lentil Soup with Butternut Squash and Kale
adapted from 101Cookbooks
Serves 6-8

1 medium butternut squash, peeled and diced to 1/2" cubes
2 cups black beluga lentils or green French lentils, picked over and rinsed
2 tablespoons extra virgin olive oil, divided
1 large onion, chopped
2 carrots, finely chopped
1 clove garlic, minced
2 tsp coarse salt
ground black pepper to taste
1 tsp dried marjoram
1 28-ounce can crushed tomatoes
2 cups water
3 cups of a big leafy green (chard, kale, etc), rinsed well, deveined, chopped

Preheat oven to 375 degrees F.  Place the diced squash on a sheet pan lined with foil.  Drizzle with olive oil and sprinkle with salt and pepper.  Roast for 30 minutes or until tender.  This can be done a day ahead.

Bring 6 cups of water to a boil in a large saucepan, add the lentils, and cook for about 20-30 minutes, or until tender. Drain and set aside. Meanwhile, heat the oil in a heavy soup pot over medium heat, then add the onion, carrots, garlic, salt, pepper and marjoram and sauté until tender, about 5 minutes. Stir in the tomatoes, lentils, and water and continue cooking for about 10 more minutes, letting the soup come back up to a simmer. Stir in the chopped greens and roasted squash, and simmer another minute or two until kale is wilted and squash is heated through.  Adjust seasoning if desired.

Monday, January 28, 2013

Iced Lemon Ricotta Cookies

Lemon Ricotta Cookies

I love ricotta cheese.  I prefer my lasagna without it, but I love to eat it on spaghetti squash and in these cookies.  These cookies are light and delicious; sweet, but not too sweet.  They are much like our favorite orange cookies, but a bit lighter.  And the batter is unbelievably good!  Don't ask me how I know this.

Lemon Ricotta Cookies

The recipe is from Giada DiLaurentis, so when you read the recipe, make sure to roll your "R" a little  when you say "ricotta" in your head.  You'll feel more Italian that way!  Do you have any favorite ways to use ricotta cheese?  If so, I'd love to hear about it!

{Kitchen Update:  the floors and plaster are completed!  Paint and cabinets come next...stay tuned!}

Lemon Ricotta Cookies
from Giada DiLaurentis and Food Network

Cookies:
2 1/2 cups all-purpose flour
1 teaspoon baking powder
1 teaspoon salt
1 stick unsalted butter, softened
2 cups sugar
2 eggs
1 (15-ounce) container whole milk ricotta cheese
3 tablespoons lemon juice 1 lemon, zested

Glaze:
1 1/2 cups powdered sugar
3 tablespoons lemon juice
1 lemon, zested

Directions:
Preheat the oven to 375 degrees F.

In a medium bowl combine the flour, baking powder, and salt. Set aside.

In your electric mixer bowl combine the butter and the sugar and beat until light and fluffy, about 3 minutes. Add the eggs, 1 at a time, beating until incorporated. Add the ricotta cheese, lemon juice, and lemon zest. Beat to combine. Stir in the dry ingredients.

Line 2 baking sheets with parchment paper or Silpat mats. Spoon the dough (about 2 tablespoons for each cookie) onto the baking sheets. Bake for 15 minutes, until slightly golden at the edges. Remove from the oven and let the cookies rest on the baking sheet for 20 minutes.

For the Glaze: Combine the powdered sugar, lemon juice, and lemon zest in a small bowl and stir until smooth. Spoon about 1/2-teaspoon onto each cookie and use the back of the spoon to gently spread. Let the glaze harden for about 2 hours.

Monday, January 14, 2013

My Dining Room a.k.a. My Temporary Kitchen

Since my kitchen currently looks like this...

DSC_0243

...I've had to set up a temporary kitchen in the dining room. The plumber and electrician set up my range by hooking it up to the gas line from the fireplace and by running a temporary electric wire from around the corner.  The range was not hooked up for the first 2 weeks and let me tell you - it's game changing.  Trying to cook with only a tabletop oven and portable induction cooktop was not fun.

   DSC_0208

Another saving grace was being able to use the butler's pantry (which will also get a makeover when the main kitchen is complete).  The original sink was a small bar sink and too small to do any dishes in, so at first I had to take the dishes in a bin to the basement to wash them.  But the builders were able to install a large utility sink which will eventually be installed in the garage.  I still miss my dishwasher and disposal, but I'm so grateful that I don't have to haul dishes to the basement anymore!  Note the plastic on the doorway - it's the only thing separating me from the construction - and the dust finds it's way into the rest of the house and blankets everything!  Thank goodness for swiffer cloths.

DSC_0227

Opposite the sink is the refrigerator which will eventually be moved into the main kitchen area.

DSC_0228

We had to get a little creative with storage space.  This cabinet on the right used to be filled with serving dishes and cake stands.  It's now called the "snack cabinet" and serves as a little pantry.  In the background you'll see that we covered the piano with a tablecloth and it's being used as a bookshelf for essential cookbooks.  {Annie didn't want the kitchen to get all the attention.  She's not at all camera shy!}

DSC_0215

I also moved a shelving unit from the basement to hold baking pans and ingredients and I have boxes of kitchen non-necessities stacked in every available space.  Oh, hello again Annie!

DSC_0213

Below is what my foyer looked like just before Christmas.  Choosing paint colors and coordinating cabinet and tile is the most painful part of the process for me.

DSC_0216

The kitchen has made some progress since these photos were taken and I'll show you some of those  pics next time!  It's getting closer to the finish line!


Sunday, January 6, 2013

Pizzelles and Making Ice Cream Cups

DSC_0401

I'm getting ready to show you my temporary kitchen, but before I do that, I'd like to share with you a cookie that requires NO oven - the pizzelle!  My daughter missed having pizzelles at Christmas this year, so we spent a little time yesterday making them.

The only caveat is that you need a pizzelle iron, or ice cream cone maker.  Pizzelle irons make small 4" rounds and ice cream cone makers make 7" rounds.  Otherwise they are essentially the same thing.  For this recipe it is also useful to have a small cookie scoop for portioning the batter.

DSC_0396

I liked the idea of having these cookies with ice cream, but the rounds were too small to make cones so we improvised a bit and made small ice cream cups.  I used small custard cups to mold them, but you could use a bigger bowl like a cereal bowl or even drape the cookie over the bottom of the upside-down bowl to make bigger, wider cups.   The trick is to immediately place the warm cookie right from the iron into the bowl.  Keep the bowls next to the iron and don't hesitate, because as soon as the cookies cool for a few seconds, they get crispy and are unable to press into the bowl without cracking.

Pizzelle Bowls

After the cups cool, they will hold their shape.  You can change the flavorings in the recipe to suit your taste and to suit the ice cream flavors and toppings you will serve it with.  For eating just plain cookies, I like to use anise and vanilla extracts with lemon and orange zests.  The anise is not at all overpowering and it will smell stronger in the batter than it will in the finished cookie.  For eating with vanilla ice cream, strawberries and chocolate sauce like we did, you might want to omit all flavorings except the vanilla so the flavors don't compete.  These little cups take your ice cream dessert to a whole new level and provides an impressive presentation with very little effort - and without turning on your oven!

DSC_0399 

Pizzelles
Makes about 20-25 cookies

3/4 cup sugar
1/2 cup unsalted butter, melted and cooled slightly
3 eggs
1 tsp anise extract
zest of 1/2 a lemon
zest of 1/2 an orange
1 T vanilla
1 1/2 cups flour
1 1/2 tsp baking powder
1/4 tsp salt

Whisk together the flour, baking powder and salt and set aside.  Cream together the sugar and melted butter.  Add the eggs, one at a time, and mix well.  Add the extracts and zests.   Add the flour mixture and stir until just incorporated.  Scoop batter onto pizzelle iron with a small cookie scoop or according to your pizzelle maker's instructions and bake until golden.  Transfer to a cooling rack.  Cookies will become crispy as they cool.

If shaping your pizzelles into bowls, immediately place the hot pizzelle into a bowl, pressing very gently, but working very quickly before the cookie has a chance to cool.  Let cool in the bowl before removing.  Store cooled pizzelles in an airtight container up to 5 days.

LinkWithin

Related Posts Widget for Blogs by LinkWithin