Showing posts sorted by relevance for query lemon tart. Sort by date Show all posts

Thursday, March 19, 2009

Lemon Tart


I found this recipe in a book I got from the library called Classic Home Desserts by Richard Sax.
The lemon curd was well balanced and not too tart as some lemon curds can be. The tart dough, blind baked with pie weights, kept its shape nicely. The tart shell is then filled with the curd and baked again. After it's cooled, brush with strained apricot jam and garnish with a thin lemon slice.  Richard Sax calls this "The World's Best Lemon Tart" and maybe it is!

The World’s Best Lemon Tart
from Classic Home Desserts by Richard Sax
Makes one 9- or 10-inch tart; serves about 8
Rich Tart Dough:
1 ½ cups All Purpose flour
2 Tbsp sugar
Pinch salt
½ cup cold unsalted butter, cut into pieces
3 Tbsp ice water or cold orange juice (I needed to use about 5 Tbsp)

Combine the dry ingredients and butter in a food processor and pulse briefly until crumbly; do not over mix. Add the liquid gradually and process just until the dough begins to clump together. Shape into a disk and refrigerate at least one hour.

Roll out the dough on a lightly floured surface into a large circle; the crust for this tart should be very thin. Gently fold the dough in half, and fit it, without stretching, into a lightly buttered fluted tart or quiche pan with removable bottom. Trim off the excess dough, leaving a ¾-inch overhang. Tuck in the overhang, pressing the edges of the dough against the sides of the tart pan to form a high, smooth border. Chill the tart shell while you preheat the oven to 400 degrees F, with a rack in the center.
Line the tart shell with a sheet of lightly buttered foil, buttered side down. Weigh down with dried beans, rice, or pie weights; place the shell on a heavy baking sheet. Bake until the edges are set, 8 to 10 minutes. Very carefully lift out the weights and foil; prick the dough lightly with a fork. Continue to bake until the pastry is very pale gold, about 8 minutes longer. Cool slightly on a wire rack; leave the oven on.

Lemon Curd Filling:
Juice of two lemons
6 large eggs
1 scant cup sugar
10 T cold unsalted butter, cut into pieces
Finely grated zest of 3 lemons
3 T apricot preserves
1 paper-thin lemon slice

In the top of a double boiler or a heatproof bowl, whisk together the lemon juice, eggs and sugar until blended. Add the butter, and set over simmering water. Whisk the mixture constantly until thick and smooth, about 8 minutes. Do not let the mixture boil; be sure to scrape the bottom as you whisk. Remove from the heat. Strain the mixture into a clean bowl; whisk in the lemon zest. If you are not going to use the custard immediately, lay a sheet of wax paper or plastic wrap directly on the surface and refrigerate.
Pour the custard into the tart shell. Bake until the filling is set and lightly golden, about 30 minutes. Cool the tart to room temp on a wire rack, 1-2 hours.
Strain a thin layer of the preserves directly over the surface of the tart (it may need to be warmed if stiff). Gently brush it over the surface of the tart, glazing evenly. Lay the thin slice of lemon in the center of the tart; glaze the lemon slice with the preserves. Remove the tart from the rim of the pan and serve at room temp.
Variation:
Fresh Orange Tart: for the lemon zest and juice, substitute the zest of one orange and 1 lemon, ¼ cup fresh orange juice and the juice of ½ lemon.

Saturday, June 26, 2010

Fresh Fruit Tart

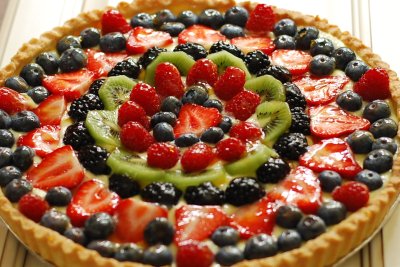
Fresh Fruit Tart with Lemon Curd

This may be one of the most beautiful desserts I've ever made. I can't take the credit though. The berries get it all. It's the time of year when fresh, beautiful fruit is in abundance and this dessert showcases it like no other.

I used a pate sucree for the tart crust in a 12-inch tart pan, and a lemon curd filling, although you could also use a vanilla pastry cream or a cream cheese filling instead. The fruit is arranged on top and brushed with an apricot jam glaze for a glossy shine.

Almost too beautiful to eat!

Pate Sucree
adapted from The Secrets of Baking by Sherry Yard
enough for two 9- or 10- inch tarts, or 16 mini tarts

1/2 pound butter, softened but still cool
1/2 cup sugar
1/2 teaspoon salt
2 large egg yolks, at room temperature
3 cups pastry flour, sifted
2 tablespoons heavy cream

1. Place the butter in the bowl of a standing mixer fitted with the paddle attachment. Beat on low speed for 2-3 minutes, or until lightly creamed. Stop the mixer and scrape down the sides of the bowl. Add the sugar and mix for 30 seconds.
2. Add the salt and egg yolks, one at a time, scraping down the sides of the bowl after each addition.
3. Add the flour and mix until the dough just about comes together, about 30 seconds. Add the cream, then pulse the mixer on low speed for 15-30 seconds, or until the dough is smooth.
4. Remove the dough from the bowl, divide it in half, and wrap each piece in plastic wrap. Chill for at least 4 hours. At this point, the dough will keep in the refrigerator for up to 3 days or may be rolled out and frozen for up to 1 month.
5. When you remove the dough from the refrigerator, it will be very hard. To make it pliable enough to roll out, you must soften it without warming it up too much. I cut the dough into several pieces and gently kneaded each piece, then gathered the pieces back together into a ball.
6. After rolling the dough out and lining the tart pan, place the tart shell in the freezer until ready to bake, at least 30 minutes (not necessary to wrap), or up to one month, well wrapped in plastic.
7. Place a parchment liner over the dough and fill with dried beans or uncooked rice and bake at 350 degrees F for 15 minutes. Remove the liner and the dried rice/beans, prick the bottom of the tart shell with a fork, and bake for another 10 minutes, or until golden brown. The tart shell may be baked a day ahead.

Lemon Curd
adapted from The Secrets of Baking by Sherry Yard
makes about 2 cups

2/3 cup sugar
2 tablespoons finely chopped or grated lemon zest
3 large eggs
4 large egg yolks
3/4 cups lemon juice, or 1/2 cup lemon juice and 1/4 cup lime juice
8 tablespoons unsalted butter, cut into 1/2-inch cubes

Fill a medium saucepan with about 2 inches of water and bring to a simmer. Combine the sugar and lemon zest in a food processor and pulse for about one minute. Combine the lemon sugar, eggs, and egg yolks in a medium heatproof bowl such as a stainless steel mixing bowl and whisk together for 30 seconds. Place the bowl over the simmering water and immediately begin whisking and stir until the sugar is dissolved. Add the lemon juice and continue to cook and stir with a rubber spatula to scrape the bottom of the bowl, until the curd has thickened and reached a temperature of 160 degrees F.

Rinse and dry the bowl of your food processor. Using a mesh strainer, strain the curd into the food processor bowl. Pulse the food processor while you add the butter a piece at a time, until the texture is homogenous. Transfer the curd to a container with a lid and place a piece of plastic wrap directly on the surface of the lemon curd. Allow the curd to cool completely and then place the lid on your container and place it in the refrigerator to chill for at least 2 hours or up to one week.

Apricot Glaze
1/2 cup apricot jam
1 tablespoon of water

Heat the jam and the water gently in a saucepan until smooth. Strain through a mesh strainer into a bowl. Add more water if needed to adjust the consistency.

To assemble the fruit tart:
Place the tart shell on a serving platter. Fill with tart shell with lemon curd, leaving a little space for the fruit. Arrange your choice of fruit on top of the lemon curd and using a pastry brush, brush the apricot glaze over the fruit. Refrigerate until ready to serve. (This tart is best eaten the same day as it is assembled.)

Monday, March 4, 2013

Lemon Poundcake Squares


When it comes to bakery fare, I'm pretty hard to please.  I mean, I'm used to nibbling on sweets just hours or minutes from my own oven.  Many times those sweets in the bakery case are dry or taste like they've been sitting just a bit too long.

But I have to say that I used to love Starbuck's Lemon Pound Cake. {They have since changed the recipe I think, because it's not as good as I remember.}   It was lemony and moist and the perfect accompaniment to a chai tea latte.   I'll always ate it from the bottom, so my last bites could all have that sweet lemony icing that's on top.  It's the best part!

Enter these super easy Lemon Poundcake Squares.  They taste exactly like that Starbuck's poundcake, but they're made in a bar form and every single bite has that lemony icing!  Every bite!  Trust me, if you're a lemon poundcake lover you must try these.  But be warned, you'll keep cutting little slices out of the pan until they are all gone.  You won't be able to stop eating these.  Thankfully, I found this recipe on Pinterest and I can have my Iced Lemon Poundcake fix anytime within an hour without leaving the house!  

Other lemony recipes you can find here:


Lemon Poundcake Squares
adapted from Baker Girl
Makes one 9x13" pan of lemon squares; recipe may be halved and baked in an 8 x 8" pan

Note:  I doubled the icing from the original recipe, so if you want a thinner layer of icing on top, cut the amount of icing in half.


1 1/2 cups all-purpose flour
1 1/2 cups granulated sugar
1/2 teaspoon salt
1 cup (2 sticks) butter, softened
4 large eggs
1 Tablespoon lemon zest
3 Tablespoons lemon juice

Lemon Glaze:
2 cups powdered sugar
3 tablespoons lemon juice (or more for desired consistency)


Preheat oven to 350°F. Spray an 9-by-13-inch baking dish with cooking spray and set aside. Zest and juice three small lemons; set aside.  (You will need a total of 6 tablespoons lemon juice and 1 tablespoon of zest for the cake and glaze.)

In the bowl of an electric mixture fitted with the paddle attachment, beat the flour, sugar, salt, and softened butter until combined.

In a separate bowl, whisk together the eggs, lemon zest, and lemon juice until combined. Pour into the flour mixture and beat at medium speed until smooth and creamy, about 2 minutes. Pour into baking dish and bake for 25 minutes, or until just starting to turn golden around the edges and a toothpick inserted into the center of the batter comes out clean. Allow to cool completely before glazing.

Make the glaze by whisking together the powdered sugar and lemon juice.  Add more powdered sugar or lemon juice to get a pourable but not-too-thin consistency.  Spread over the cooled bars with an offset spatula and let set.  Cut into squares when icing is dry.

Wednesday, August 19, 2009

Lemon Blueberry Tartlettes


Lemon Blueberry Tartlettes

This recipe has five components, but only two of them require a recipe, and those can be made ahead for fast assembly shortly before you are serving the tartlettes.  You can make several tartelettes or one or two larger tarts with this recipe.

You will need:
1. The pate sucree. Pate sucree has more sugar than the Pate Brisee and is therefore a crispier, sweeter tart shell. See recipe below.
2. Raspberry jam.
3. Lemon Curd - recipe below or store-bought
4. Fresh fruit - any fruit in season would be wonderful on this tart.
5. Apricot jam. Strained and thinned with water for a shiny glaze.

Pate Sucree
adapted from The Secrets of Baking by Sherry Yard
enough for two 9- or 10- inch tarts, or 16 mini tarts

1/2 pound butter, softened but still cool
1/2 cup sugar
1/2 teaspoon salt
2 large egg yolks, at room temperature
3 cups pastry flour, sifted
2 tablespoons heavy cream

1. Place the butter in the bowl of a standing mixer fitted with the paddle attachment. Beat on low speed for 2-3 minutes, or until lightly creamed. Stop the mixer and scrape down the sides of the bowl. Add the sugar and mix for 30 seconds.
2. Add the salt and egg yolks, one at a time, scraping down the sides of the bowl after each addition.
3. Add the flour and mix until the dough just about comes together, about 30 seconds. Add the cream, then pulse the mixer on low speed for 15-30 seconds, or until the dough is smooth.
4. Remove the dough from the bowl, divide it in half, and wrap each piece in plastic wrap. Chill for at least 4 hours. At this point, the dough will keep in the refrigerator for up to 3 days or may be rolled out and frozen for up to 1 month.
5. When you remove the dough from the refrigerator, it will be very hard. To make it pliable enough to roll out, you must soften it without warming it up too much. I cut the dough into several pieces and gently kneaded each piece, then gathered the pieces back together into a ball.
6. Roll out the dough to 1/8" thickness, using a small amount of flour on the board and rolling pin to keep it from sticking. Cut the dough into circles about an inch wider than the tart pans and gently place the dough into the tart pan, being careful not to stretch the dough too much. Press the dough into the sides of the tart pan and use a rolling pin or a knife to cut off the excess dough. Place the tarts in the freezer while the oven is heating.
7. Preheat the oven to 350 degrees F. Adjust the rack to the lower third of the oven. Prick the bottom of the pastry shell a few times with a fork. Line each tart with a piece of aluminum foil and fill it with dried beans or uncooked rice. Bake for 15 minutes. Remove the foil and filling and bake 5-10 minutes more, or until deep golden brown. Cool on a rack before using.

Lemon Curd
from The Pastry Pal

3 large eggs
3 large eggs yolks
1/2 cup sugar
zest of 1 lemon
1/2 cup freshly squeezed lemon juice
pinch of salt
2 sticks (8 oz) unsalted butter, cut up into small pieces

1. Fill a medium pot with a couple of inches of water and bring to a boil.
2. Place the eggs, sugar, lemon zest, lemon juice and salt into a large metal mixing bowl and whisk together. Keep the butter chilled.
3. Set the bowl over the pot with boiling water. This is our faux double boiler.
4. You must whisk the entire time the bowl is over the water. Keep the mixture moving, so the eggs don’t get a chance to scramble. After a few minutes it starts to get frothy. (If necessary, hold the bowl still by gripping the edge with a kitchen towel.) Keep whisking. After a few more minutes, it transforms into something creamy. Whisk for another minute just to thicken it up.
5. Take the bowl off the heat. Feed it a handful of butter and whisk it in. The residual heat of the curd will melt it. Keep adding handfuls of butter until it’s all in and fully incorporated. If you still see any little lumps, return to the double boiler for a brief minute, until it disappears, but this is rarely necessary.
6. Push the curd though a fine mesh sieve into a container. Place a piece of plastic wrap directly on the surface of the lemon curd to prevent a skin from forming and refrigerate. Once it’s completely cold, wrap the whole container tightly and store. (The curd will firm up considerably as it cools. Give it a good stir to loosen it up again before using.) You can store it in the fridge for up to 5 days or freeze for up to a month. To defrost, let the container thaw in the fridge overnight.

To assemble the tarts:
1. Spread a thin layer of raspberry jam on the bottom of the tart shell.
2. Stir the refrigerated lemon curd until smooth and place enough in the tart to almost fill the tart shell.
3. Place the fresh fruit on top of the lemon curd.
4. With a pastry brush, apply a thin layer of strained apricot jam over the entire tart.
5. Garnish with a sprig of fresh mint if desired.
6. Refrigerate the tarts until ready to serve. Serve these tarts the same day they are assembled.

One year ago: Favorite Chicken Tortilla Soup

Wednesday, September 22, 2010

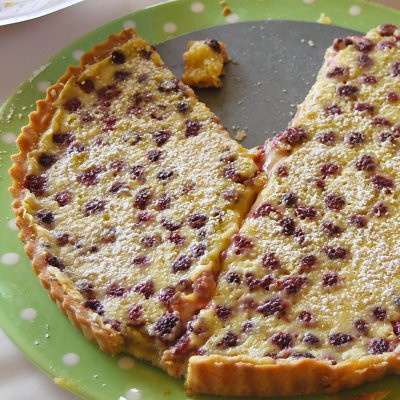
2010 Pie Festival and a Prize-Winning Raspberry Custard Tart

Raspberry Custard Tart

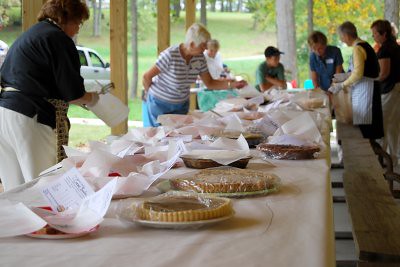
Last weekend marked the 3rd Annual Pie Festival and Contest organized by my mother-in-law and a few of her neighbors. You may have heard me talk about it in 2009 and 2008.

2010 Pie Festival

The shelter was rented and decorated with hanging aprons and vintage tablecloths. The table centerpieces were made with garden-picked flowers in quart canning jars set inside a brown paper bag and tied with ribbon. There was coffee and water and iced tea for drinking. And of course pies for eating. Everything was perfect.

2010 Pie Festival

Each pie was registered and three pieces were cut from each pie. The pieces were placed on a plate with a ballot attached. All of the attendees chose the pieces they wanted to taste and rated them for appearance, taste, crust, and originality.
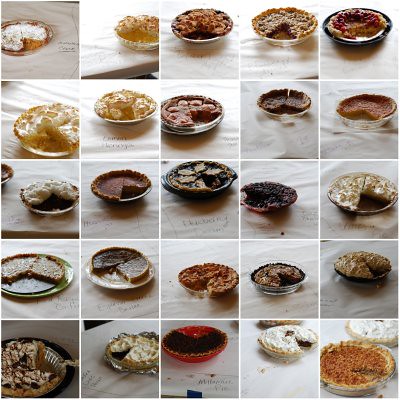
There were more than 25 pies entered in the contest. It was the year of custards and creams. All of the pies were delicious!

2010 Pie Festival Pies

Row 1: Momofuku's Crack Pie, Aunt Ginny's Coconut Cream, Blackberry Apple, Blueberry Streusel, Fruit Glazed Creme Brulee
Row 2: Pineapple Custard, Lemon Meringue, Peach Polka Dot, Shaker Sugar, Lemon Buttermilk
Row 3: Chocolate Cream, Hoosier Sugar, Blueberry Dream, Deep Dish Blueberry, Vinegar pie
Row 4: Raspberry Custard, Coffee Creme Brulee, Peach Custard, Oreo Chiffon, Peanut Butter Cream
Row 5: Caramel Sweet Potato, Baked Chocolate Pecan, Millionaire Pie, Santigo Chocolate, Maple Walnut Oatmeal Pie

And the winners are...
Baked Chocolate Pecan won the Nut category and Best of Show
My daughter, Ellen (in the pink sweater), tied in the custard category for her Coffee Creme Brulee Pie
The other winner in the custard category was the Blueberry Streusel Pie
Peanut Butter Cream won in the Cream category
My mother-in-law (in the orange vest) won in the Heirloom category for her Aunt Ginny's Coconut Cream Pie
And my Raspberry Custard Pie won the Fruit category

2010 Pie Festival Winners

It was a great day! Thanks to all who helped organize this year's festival!

If you love red raspberries and cream, you'll love this dessert!

Red Raspberry Custard Tart
adapted from Classic Stars Desserts by Emily Luchetti
Makes one 9-inch tart

1 cup of fresh red raspberries
1 pre-baked tart crust in a 9-inch tart pan (recipe follows)
1 cup granulated sugar
2 large egg yolks
1 teaspoon pure vanilla extract
3/4 cup heavy whipping cream
2 tablespoons flour
pinch of kosher salt
1/4 cup sliced almonds (optional- I omitted)

Preheat oven temperature to 325 degrees F. (Or reduce the temperature if the oven is already on from baking the tart crust.) Arrange the raspberries on the bottom of the baked tart crust and set aside. In a bowl, whisk together the sugar, egg yolk, vanilla and cream until blended. Stir in the flour and salt. Carefully pour the cream mixture over the berries. Sprinkle the almonds evenly over the top. Bake at 325 for 35 minutes until almost completely set. Let the tart cool and transfer to a platter. Sprinkle with sifted confectioners sugar if desired.

Tart Crust
makes one crust for a 9-inch tart
from The Book of Great American Desserts by Maida Heatter

1 cup flour
2 tablespoons sugar
1/4 teaspoon salt
4 ounces (one stick) cold butter, cubed
1 large egg

Preheat oven to 350. Place flour, sugar and salt in the bowl of a food processor and pulse to mix. Add the butter and pulse until the mixture resembles coarse crumbs. Add the egg and pulse just until the mixture comes together. Turn the mixture out onto a board and knead a few times, using a bench scraper if the dough sticks to the surface. Form the ball into a small disk and wrap in plastic. Refrigerate for at least one hour. Roll the dough out onto a floured surface and place carefully into a 9-inch tart pan with a removable bottom. Cut the edges of the pastry off, prick the bottom of the pastry with a fork and chill the pastry in the freezer for 30 minutes. Line the dough with foil and place pie weights or dried rice in the tart shell. Bake for 15 minutes, remove the foil and the weights and bake for 10-15 minutes more or until the crust is lightly browned.

Monday, August 18, 2008

Fresh Plum Frangipane Tart


This is an incredible dessert made with delicious plums and complemented by an almond custard filling.  Almost any fruit can be substituted.


Plum Frangipane Tart
Bon AppƩtit June 1997
Makes 8 Servings.

almond crust:

Makes One 9-inch Crust

1 1/4 cups all purpose flour
1/2 cup slivered blanched almonds (about 2 ounces)
1/4 cup sugar
1/4 teaspoon salt
1/2 cup (1 stick) chilled unsalted butter, cut into pieces
3/4 teaspoon almond extract (I used less)
2 tablespoons (about) ice water

Blend flour, almonds, sugar and salt in a food processor until nuts are finely ground. Add butter and pulse food processor until the mixture resembles coarse meal. Mix in almond extract and enough water to form moist clumps. Knead dough briefly to combine, flatten into a disk and wrap in plastic. Refrigerate 2 hours or up to one day.

Filling:
1 cup slivered blanched almonds
1/3 cup sugar
5 tablespoons unsalted butter, room temperature
1 large egg
1 teaspoon vanilla extract
1 teaspoon almond extract
1 teaspoon dark rum (I omitted)
1 teaspoon grated lemon peel
5 large plums, halved and pitted, then sliced

Blend all ingredients except plums in a food processor until almonds are finely ground.

Glaze:
2 tablespoons apricot jam (I used plum syrup)
2 teaspoons brandy (I omitted)

Preheat oven to 375°F. Roll out crust dough on lightly floured surface to 13-inch round. Transfer dough to 9-inch-diameter tart pan with removable bottom. Gently press dough into tart pan; trim excess. Freeze crust 15 minutes.

Place tart pan on baking sheet. Bake crust 10 minutes; pierce with toothpick if crust bubbles. Continue to bake until crust is pale golden, about 12 minutes. Cool crust on baking sheet 15 minutes. Maintain oven temperature.

Spread frangipane filling in prepared crust. Place plum slices on top of frangipane, pressing gently to anchor.

Bake tart on baking sheet until frangipane is puffed and golden and plums are tender, about 30 minutes.

For glaze, bring jam and brandy to a boil in a small saucepan. Brush glaze over warm tart. Remove sides of tart pan and cut into wedges to serve.

Monday, May 19, 2008

Raspberry Streusel Bars


Raspberry Streusel Bars
from Cook's Illustrated, Published September 1, 2005
Makes twenty-four 2-inch squares

This recipe can be made in a standing mixer or a food processor. Frozen raspberries can be substituted for fresh; be sure to defrost them before combining with the raspberry preserves. If your fresh raspberries are very tart, add only 1 or 2 teaspoons of lemon juice to the filling. The bars are best eaten the day they are baked but can be kept in an airtight container for up to 3 days (the crust and streusel will soften slightly with storage).

Ingredients
2 1/2 cups unbleached all-purpose flour (12 1/2 ounces)
2/3 cup granulated sugar (about 4 3/4 ounces)
1/2 teaspoon table salt
16 tablespoons unsalted butter (2 sticks) plus 2 tablespoons, cut into 1/2-inch pieces and softened to cool room temperature
1/4 cup packed brown sugar (1 3/4 ounces), light or dark
1/2 cup rolled oats (1 1/2 ounces), old-fashioned
1/2 cup pecans (2 ounces), chopped fine
3/4 cup rasberry preserves (8 1/2 ounces)
3/4 cup fresh raspberries (3 1/2 ounces)
1 tablespoon lemon juice from 1 lemon

Instructions
1. Adjust oven rack to middle position; heat oven to 375 degrees. Cut 18-inch length foil and fold lengthwise to 8-inch width. Fit foil into length of 13 by 9-inch baking dish, pushing it into corners and up sides of pan; allow excess to overhang pan edges. Cut 14-inch length foil and fit into width of baking pan in same manner, perpendicular to first sheet. (If using extra-wide foil, fold second sheet lengthwise to 12-inch width.) Spray foil-lined pan with nonstick cooking spray.

2. In bowl of standing mixer fitted with flat beater, mix flour, granulated sugar, and salt at low speed until combined, about 5 seconds. With machine on low, add 16 tablespoons butter one piece at a time; then continue mixing on low until mixture resembles damp sand, 1 to 1 1/2 minutes. (If using food processor, process flour, granulated sugar, and salt until combined, about 5 seconds. Scatter 16 tablespoons butter pieces over flour mixture and pulse until mixture resembles damp sand, about twenty 1-second pulses.)

3. Measure 1 1/4 cups flour mixture into medium bowl and set aside; distribute remaining flour mixture evenly in bottom of prepared baking pan. Using hands or flat-bottomed measuring cup, firmly press mixture into even layer to form bottom crust. Bake until edges begin to brown, 14 to 18 minutes.

4. While crust is baking, add brown sugar, oats, and nuts to reserved flour mixture; toss to combine. Work in remaining 2 tablespoons butter by rubbing mixture between fingers until butter is fully incorporated. Pinch mixture with fingers to create hazelnut-sized clumps; set streusel aside.

5. Combine preserves, raspberries, and lemon juice in small bowl; mash with fork until combined but some berry pieces remain.

6. Spread filling evenly over hot crust; sprinkle streusel topping evenly over filling (do not press streusel into filling). Return pan to oven and bake until topping is deep golden brown and filling is bubbling, 22 to 25 minutes. Cool to room temperature on wire rack, 1 to 2 hours; remove from baking pan by lifting foil extensions. Using chef's knife, cut into squares and serve.


Friday, March 27, 2009

Friday Favorite - Marshall's!


If you shop at Marshall's, you probably enter the store, start browsing through the clothing and shoe departments, meander back to the home interiors aisle and around through to the toys and books. Not me - when I go to Marshall's, I make a bee-line right to the gourmet foods and kitchen supplies section, and then, if I have time, I might browse through the clothing and handbags. You might not think that Marshall's is the best place to buy food items, but I'm here to change your mind! I've been buying my favorite Greek extra-virgin olive oil there for a few years now. It has a "use-by" date so I can tell that it's fresh and I use it for almost all my cooking. It's especially good in a Greek Salad. The other staple I've stocked up on is the Vanilla Bean Extract "Crush" made by the Sonoma Syrup Co. It's a combination of the best vanillas (Madagascar Bourbon and Tahitian) and has a lot of real vanilla bean seeds in it so you can see the bean flecks in your baked goods. It's so delicious - and a few dollars cheaper than if you bought it from King Arthur Flour.


My other recent finds are in these pictures as well - all-natural apricot jam which I used to glaze the Lemon Tart, delicious and unique rapeseed blossom honey from Germany (to add to my honey collection), and some baking spices. I LOVE my new green casserole dish which turned out to be perfect for the Tomato Sausage Lasagna and my two white cake stands, one round and one square - heck, I even found the tablecloth at my favorite Marshall's! Happy Shopping!

Thursday, December 30, 2010

Best of Marzipan 2010

The year is winding down and it's time to look back on 2010 and reflect on drool over the past year's posts. It was a good year! So good, that some of these recipes deserve some awards, so drumroll please...

The 5 most-viewed 2010 Marzipan recipes are:


Banana Cupcakes with Pastry Cream

Also, I voted and decided on the following awards for 2010:

Best of 2010 1

Most Beautiful Dessert: Lemon Curd Fruit Tart

Best Comfort Dessert: Creamy Rice Pudding

Best of 2010 2

Best Dessert which can disguise itself as Breakfast: Blueberry Crumb Cake


Best of 2010 3


Most Delicious Savory Dish : Lemon and Basil Pasta

Best of 2010 4

Best Cupcake: The Hostess

Best New Cookie: Melomakarona

Best of 2010 5

Best New Cake: The Grasshopper Cake

Most frequently repeated in my baking repertoire: Peanut Butter Crispy Bars

That's it! Let's toast to a Grand New Year and lots of new and tasty recipes!

Saturday, August 9, 2008

Roasted Plum Cakes


If you can remember Spring here in Pittsburgh (it seems like so long ago), you'll remember the flowering trees and how they seemed to be just loaded with blossoms this year. Well, those blossoms have turned into plums in a friend's yard. I wish I had taken a picture of the tree - the branches were threatening to break from the masses of fruit on each limb, with the branches bending down until they almost touched the ground. And when my friends offered me a bag to fill with plums well, for me, that's like offering candy to a baby! I thought about making one of those beautiful plum tarts with all the slices placed just so and glazed with a shiny coat of apricot jam. But these plums were a little small and I didn' t have the time for a fussy tart. So instead I decided to try the Roasted Plum Cakes from Baking with Julia. They are simple to make and so delicious served warm with a side of vanilla ice cream. You could substitute raspberries, blueberries or peaches for the plums if you had them on hand. I baked one with red raspberries and it was delicious too.


Roasted Plum Cakes
adapted from Baking with Julia

1 stick of unsalted butter at room temperature
2/3 cup brown sugar, divided (I used less for topping)
1/2 cup sugar
2 large eggs
1 tsp minced orange zest (I used lemon)
1/2 tsp vanilla extract
1 cup flour
3/4 tsp baking soda
1/4 cup buttermilk
4 large ripe plums, halved and pitted

Preheat oven to 350. Butter 8 ramekins and place them on a rimmed baking sheet. Cream the butter, 2 T of brown sugar, and the granulated sugar for 6 minutes, scraping down the sides of the bowl as needed. Add the eggs one at a time, mixing well after each addition. Add the zest and vanilla and mix well. Add the flour and baking soda and beat on low speed for only 15 seconds. Pour in the buttermilk and beat for 30 seconds more. Remove from mixer and use a spatula to finish blending the ingredients if necessary.

Spoon the batter into the ramekins, dividing the batter among them evenly. Place a half plum, cut side up, into each cup leaving the plum a bit higher than the batter so that the plum will show after the cakes rise in the oven. Sprinkle the remaining brown sugar evenly over each plum. Bake 25 minutes or until a toothpick inserted into the cake portion comes out clean. Cool the cakes 10 minutes. To serve, remove the cakes from the ramekins onto a dessert plate and serve with vanilla ice cream or whipped cream.

Wednesday, July 9, 2014

Purslane - is this super weed growing in your garden?


Purslane is a common weed found in most of our yards and gardens.  I call it a superweed, not because it is unmanageable, but because it is a nutritional powerhouse!

Check out these nutrition facts:

-purslane has more omega-3 fatty acids (in the form of ALA) than any other plant food.  100 grams of fresh purslane contains 350 mg of ALA.  Increasing our intake of omega-3's has been linked to better heart health and decreased systemic inflammation.

-it is a good source of many vitamins and minerals including vitamins C and E, riboflavin, beta carotene, iron, magnesium, manganese, potassium and calcium.

-purslane is also high in dietary fiber, contains antioxidants and is reported to contain compounds which help with depression.

Purslane growing among the thyme and rosemary.

In my garden, I practice selective weeding.  I'll pull other weeds and leave the purslane to grow.  It is actually beneficial to the surrounding plants as it provides a great edible ground cover which helps retain soil moisture and prevents other weeds from taking over.  It grows low to the ground so it doesn't impede my other plants from getting the sunlight they need - and it's such a cute and happy looking plant!

Purslane is an annual plant that reseeds itself each year.  The seedlings will appear when the soil warms to 76 degrees F.  The plant will grow in just about any soil conditions, even in the cracks of the sidewalk, and the seeds can remain viable in undisturbed soil for more than 30 years.  I will allow some of my purslane to flower and go to seed to ensure that I will have more purslane next year.

I think purslane is delicious.  It has a mildly tart lemony flavor. I eat purslane straight from the garden sometimes, but most of the time I'll add it to a salad along with other greens.  (Only harvest purslane in areas which you know have not been chemically treated.)  The leaves, tender stems and flowers are all edible.  Just pinch off the stems, or pull the entire plant and cut off the roots if you are trying to control the plant.  

I added olive oil, lemon juice, salt and pepper to the bowl of purslane in the photo at the top of this post and ate it all!  It can also be added to potato salad, soups, or anywhere you would use spinach or other greens.

In the case of purslane,  I'm happy to ask my kids, "have you eaten your weed today?"

Purslane as ground cover under my tomato plants.

Sources:
http://www.naturalhealth-solutions.net/healthy-eating/powerhouse-of-nutrition-purslane
http://www.nutrition-and-you.com/purslane.html
http://www.canadiangardening.com/plants/native-plants-and-wildflowers/purslane-an-edible-groundcover/a/31791

Thursday, October 8, 2009

Tomatillo Chicken and Bean Stew


Tomatillos look like green tomatoes, but they are quite different. When they grow, they have a thin papery husk around them. They are green when fully ripened and used mainly in Latin American cooking. Tomatillos are the basis of Salsa Verde or "green sauce". They are crisper than a tomato and have a tart taste with a hint of lime flavor.


I'd never heard of or tried a tomatillo until they showed up in my CSA box a few years ago.  The internet is a great resource for recipes using unusual ingredients. Elise at Simply Recipes has posted several recipes which use tomatillos. Her latest was a Tomatillo Chicken Stew...I added a can of Cannellini beans and I liked the added texture provided by the beans. The tomatillo sauce was a little spicy for me - I guess the jalapenos I used were pretty hot. I added lots of cilantro and took Elise's advise and served it with white rice and a dollop of sour cream to cool it down a bit. It was delicious with a touch of unusual!


Tomatillo Chicken Stew
from Simply Recipes
Tomatillo Sauce:
1 1/2 lbs tomatillos
1-2 jalapeƱo chile peppers, or 2-3 serrano chili peppers (include the seeds if you want the heat, remove them if you don't want the heat), stems discarded, chopped
1 clove garlic, chopped
1 teaspoon salt
2 Tbsp lime (or lemon) juice
Pinch of sugar
Stew:
2 lbs boneless, skinless chicken thighs or breasts, trimmed of excess fat, cut into 1-inch cubes
Salt and pepper
Olive oil
2 yellow onions, chopped
2 cloves garlic, minced
1 teaspoon ground cumin
1 teaspoon ground coriander
1 1/2 cup chicken stock
1 15-ounce can white beans, drained and rinsed (optional)
2 cups tomatillo sauce
1 teaspoon dry oregano or 1 tablespoon fresh, chopped
1/2 cup packed chopped cilantro (about one bunch, rinsed and chopped, stems and leaves)

1 Make the tomatillo sauce. Remove the papery husks from the tomatillos and rinse well. Cut the tomatillos in half and place them cut-side down on an aluminum foil-lined roasting pan. Broil for 5-7 minutes until blackened in spots. Let cool enough to handle. Place the tomatillos, any juice they have released, chile peppers, garlic, salt, lime juice and sugar in a blender, and pulse until well blended. If you make ahead, refrigerate until needed.

2 Heat a couple tablespoons of olive oil in a large, thick-bottomed pot on medium high heat until almost smoking. Pat dry the cubed chicken parts with paper towels. Sprinkle salt and pepper over them. Working in batches so as not to crowd the pan, and adding more olive oil when necessary, brown the chicken pieces on two sides. When you place the pieces in the pan, make sure there is room between them (otherwise they will steam and not brown), and don't move them until they are browned on one side. Then use tongs or a metal spatula to turn them over and don't move them again until they are browned on the other side. Do not cook through, but only brown. Remove the chicken pieces from the pan and lower the heat to medium. There should be a nice layer of browned bits at the bottom of the pan.

3 Add the onions to the pan, and a tablespoon or two more olive oil if needed (likely). Add ground cumin and coriander. Cook a few minutes, stirring occasionally until onions are softened and the browned bits from the chicken have been picked up by the onions and are no longer sticking to the pan. Add the garlic and cook for 30 seconds more, until fragrant.

4 Add the browned chicken, the tomatillo sauce, chicken stock, beans and oregano to the pan. Stir to combine. Bring to a boil and reduce to a simmer. Cook, partially covered, for 20 minutes until chicken is cooked through. Add the cilantro to the stew in the last minute or so of cooking.
Serve over white rice, accompanied with sour cream if needed to offset the heat from the chiles. The stew will thicken as it cools.

LinkWithin

Related Posts Widget for Blogs by LinkWithin